Create DVD/Blu-ray disc/folder or ISO files from all video formats.
2 Simple Steps to Record, Save, and Burn MiniDV to DVD!

Posted by Paula Pailaga to Burn DVD/Blu-ray Sep 20, 2024
Converting MiniDV to DVD is an excellent way of improving the lifespan of your MiniDV tapes or footage. Why? Magnetic tape deteriorates over time, which brings risk to your MiniDV footage. Thus, digitalizing and burning it on a DVD is an excellent way to lengthen its life span and improve its accessibility. Now, how will you do that? Well, continue reading this post, which features two steps to convert MiniDV to DVD! So, without further ado, start diving below.
Guide List
How to Record MiniDV and Save in Digital Formats Ultimate Way to Burn MiniDV Files to DVD QuicklyHow to Record MiniDV and Save in Digital Formats
The first step you must do is to convert MiniDV to digital format. Before you do that, you must first prepare the following supplies. You must have these supplies to efficiently and successfully digitalize your MiniDV tapes or footage. After preparing the supplies below, you can jump into the steps to transform or convert the MiniDV tape to a digital file.
• MiniDV camcorder or tape deck.
• The tape itself.
• USB cord/cable.
• Windows/Mac computer.
• Video capture software programs like Adobe Premiere Pro, iMovie, WinDV, etc.
Step 1 Link the MiniDV camcorder or the tape deck to your computer utilizing the USB cable or cord. Next, open the camcorder or tape deck. If you are using a camcorder, set it to VCR mode.
Step 2 Insert and load the MiniDV tape into the camcorder or tape deck. Then, open your computer, download a video capture software online, and run it.
Step 3 From the software’s "File" menu, click the “Capture” button and wait until a window appears on your screen. Then, press the "Play" button on your camcorder or tape deck.
Step 4 After pressing the "Play" button, the MiniDV tape will begin to play; click the "Record" button on the program and wait until the program records the tape in real time.
Step 5 Once the MiniDV tape is done playing, press the "Stop" button on the capture window. The next step is to save the recorded MiniDV tape in your computer’s local storage.
That’s it! That’s how you convert MiniDV to a digital file! Now, if you are planning to buy a new MiniDV camcorder to replace your old one or to give to someone as a gift, this post has the best recommendations from the market. Explore each below and choose the one that suits your needs and budget.
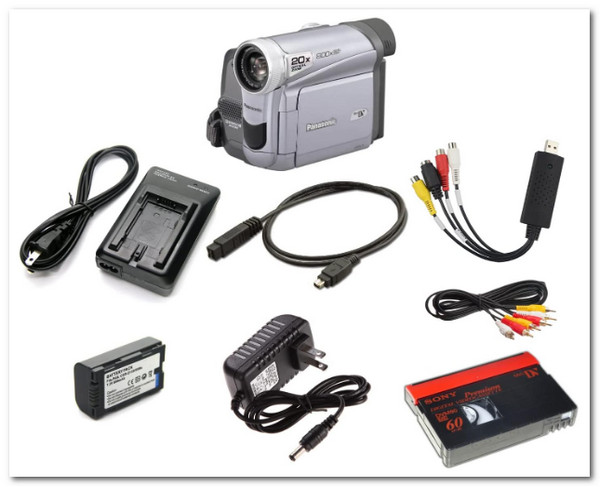
1. Panasonic MiniDV Camcorder Bundle
Price: $249.00
Special Feature: USB capture device for tape transfer and blank MiniDV tape.
Connectivity Technology: USB and FireWire.
The first on this list is the Panasonic MiniDV Camcorder. This camcorder includes a USB Adapter that you can use to convert MiniDV to DVD format and store it on a computer. It also provides a battery and AV cables for TV playback. To record with this one, insert the MiniDV tape into the camcorder’s tape compartment, power on the camcorder, and press the record button. And that’s it! That’s how you record your precious moments with this MiniDV camcorder. However, this is quite an expensive MiniDV camcorder from the market; if you want a much cheaper alternative, check the Sony product below.
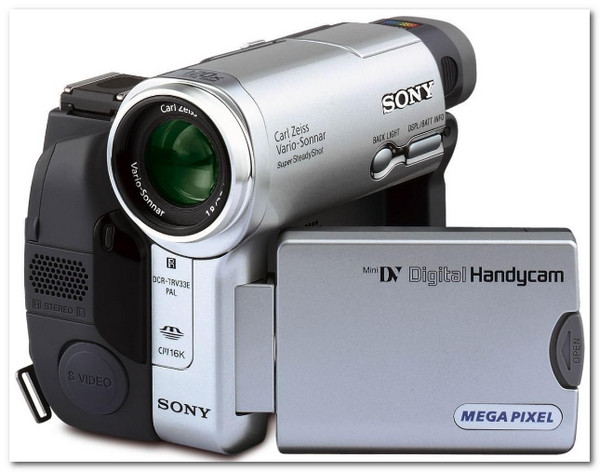
2. Sony Handyman DCR-TRV33 MiniDV Camcorder
Price: $195.00
Special Feature: Super SteadyShot, Digital Effects, Still Images Capture, etc.
Connectivity Technology: Infrared, FireWire, and Analog AV outputs.
In addition to the first one, you can use the Sony Handyman DCR-TRV33 MiniDV Camcorder to record and transfer or convert MiniDV to DVD format. This camcorder also includes basic video adjustment parameters and offers decent video quality. The way you use this one is also similar to how you use the Panasonic MiniDV Camcorder. Just insert the MiniDV, power it on, shoot your footage, and save it! Similar to the first one, shooting footage with this MiniDV Camcorder is easy.
Ultimate Way to Burn MiniDV Files to DVD Quickly
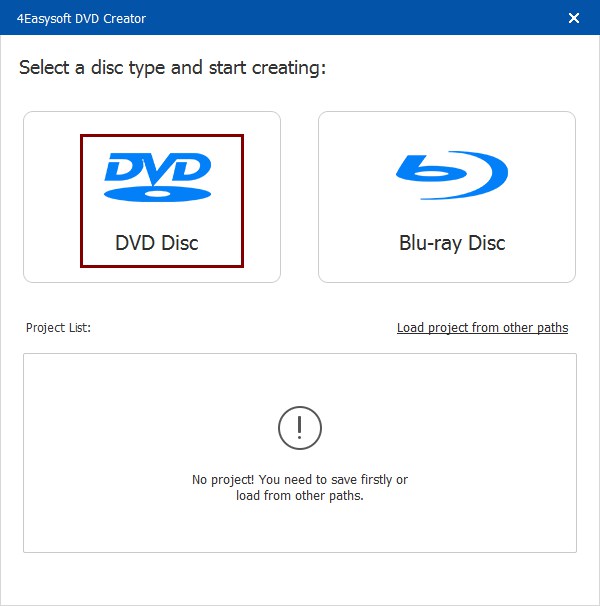
Now that you know how to convert MiniDV to digital files, it is time to burn them into a DVD. And the best tool you can use is the professional 4Easysoft DVD Creator. This tool allows you to burn videos, including digitalized MiniDV files, to various DVDs. It also supports essential functions that let you create chapters of your MiniDV digitalized footage by merging or splitting them. Moreover, this tool also offers customizable menu theme templates that you can add to your DVD and personalize. Through these menu templates, you can add themed-centered navigation to your DVD and bring easy access to various MiniDV footage burned on it. This tool is the best medium to burn MiniDV to DVD! To discover more about its other features, explore the list below!
High option that can keep your MiniDV footage's original resolution and quality.
Edit digitalized MiniDV tapes with this tool’s trimmer, cropper, option to add subtitles, etc.
Let you customize the menu theme template’s background, button, music, etc.
You can burn MiniDV to DVD using various standards to play on TV/DVD: NTSC or PAL.
100% Secure
100% Secure
Step 1Install the 4Easysoft DVD Creator on Windows or Mac. Then, run the tool, insert the blank DVD into the external or internal disc drive, and select the "DVD Disc" option.
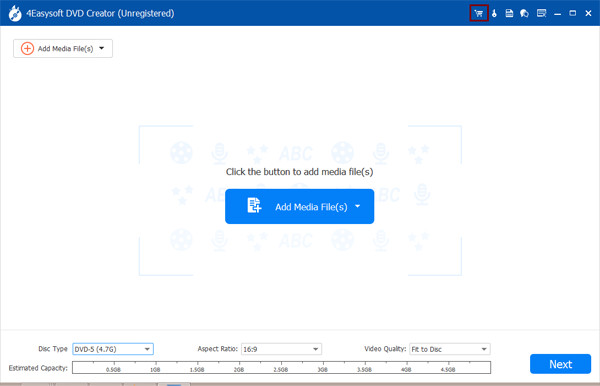
Step 2After that, click the "Add Media File(s)" button and select all of the MiniDV footage you digitalized earlier to import on the tool’s interface. Then click the "Next" button.
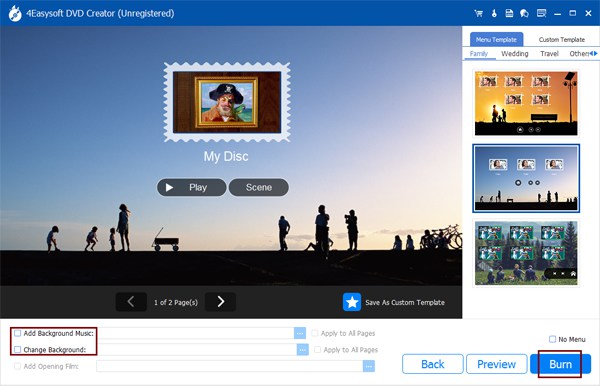
Step 3Next, click the "Menu Template" tab on the right and choose a menu-themed template that suits your MiniDV digitalized footage. You can also customize their background and title.
Step 4Once you are done choosing and adjusting your DVD’s menu, click the "Burn" button. You can change the storage path, burning settings, and playback mode on the new window.
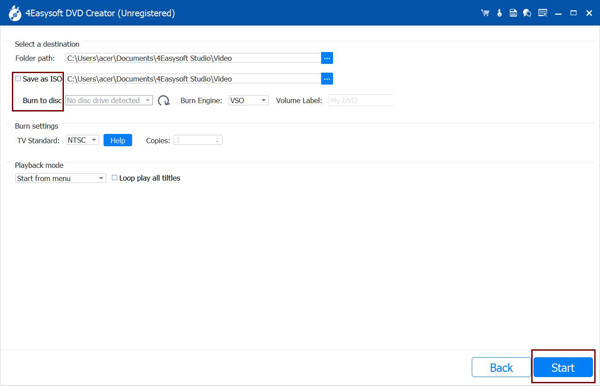
Step 5After completing the above setup, click the "Start" button to burn your digitalized MiniDV to DVD. And that’s it! That’s how you use this professional tool to burn MiniDV files to DVD!
Conclusion
MiniDV tapes deteriorate over time and might lead to losing the stored footage. But with those two simple steps above, you can easily digitalize them and burn MiniDV to DVD! By burning digitalized MiniDV, you can lengthen the captured footage's life span and improve its accessibility, compatibility, and convenience. You must use the professional 4Easysoft DVD Creator tool for an efficient and successful MiniDV to DVD burning process! With this tool’s incredible features, you can acquire the best output and burning experience! Use this tool now.
100% Secure
100% Secure