Record video, audio, gameplay, and webcam to record precious moments easily.
How to Record Minecraft? 5 Proven Ways to Follow Are Here!

Posted by Ethan Brooke to Record Gameplay Apr 16, 2025
Whether you’re building structures, exploring landscapes, or battling mobs, these thrilling moments are meant to be shared with the world! Thus, you’ll likely want to record Minecraft gameplay—indeed, a fantastic way to showcase your skills and revisit the best moments. Having trouble where to start? Here are the five best ways to do Minecraft recording, giving you steps for every level of expertise. Dive in now so you can start recording your adventures!
Guide List
Best Recording Software for Minecraft with High Quality How to Record Minecraft through OBS Studio Use Game Bar to Record Minecraft on Windows 10/11 How to Screen Record Minecraft Online for FreeBest Recording Software for Minecraft with High Quality
Imagine you’re about to go on an epic Minecraft adventure. Wouldn’t it be amazing to capture those breathtaking cities or other jaw-dropping moments and share them with the world? This is where you need the best recording software for Minecraft named 4Easysoft Screen Recorder. With this tool, you can record every pixel of your Minecraft experience with no lag and no loss of quality, thanks to the CPU and GPU acceleration technology. Before recording, 4Easysoft gives you the freedom to set your desired settings, and after that, you can even trim, cut, and do more to your recordings. So, capture all your gameplay now and unleash your creativity!
Its Gameplay Recorder captures crystal-clear video and audio of Minecraft.
Let you record the entire screen, specific regions, or a single active window.
Support hardware acceleration for smooth, no-lag recording.
Preview the gameplay recording to check if you need to trim or cut some parts.
100% Secure
100% Secure
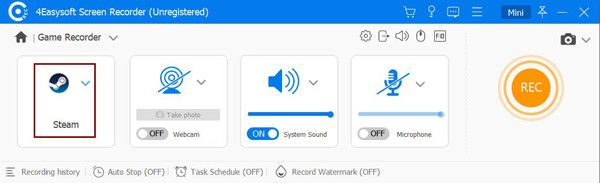
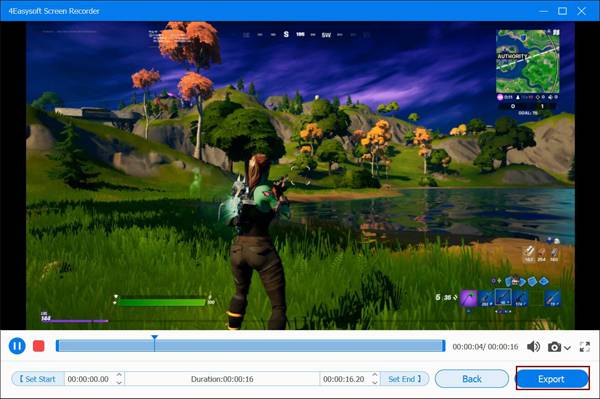
Step 1After launching the 4Easysoft Screen Recorder, launch the Minecraft gameplay you wish to capture. On the program’s screen, select the "Game Recorder" option.
The recorder will recognize it automatically; click the "Select the game" button and select the gameplay window. You can then enable the "Webcam" and "Microphone" switch buttons to record both camera and voice.
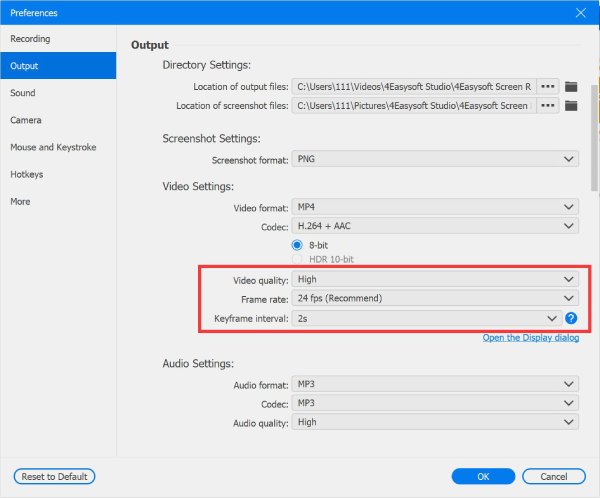
Step 2To add your touches to the recording, go for the "Settings" button and set the frame rate and quality, then click the "OK" button to proceed to recording Minecraft.
Step 3Click the "REC" button now to initiate the countdown so you have time to go back to the Minecraft window and start playing. Your gameplay is now being recorded.
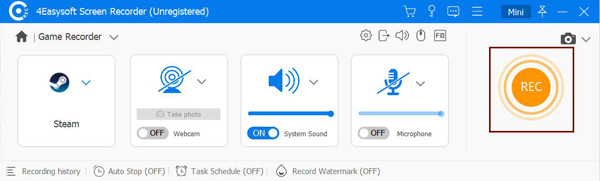
Step 4After all that, click the "Stop" button to finish. Here, in the preview, you can take a look and see if you need to do some trimmings of some unnecessary parts. Click the "Save" button to conclude.
How to Record Minecraft through OBS Studio
Another versatile game recorder that provides recording and streaming, OBS Studio offers various customization options and the power to record Minecraft in real-time without affecting your system’s performance. Aside from recording, OBS supports multiple screens, sources, and layouts, giving you the freedom to create professional-looking content. It also lets you tweak settings for video and audio to get the best possible quality. See now how to record Minecraft in OBS:
Step 1Once OBS Studio is launched, click the "Add" button from "Sources", then select the "Game Capture" option, and go for "Capture Specific Window".

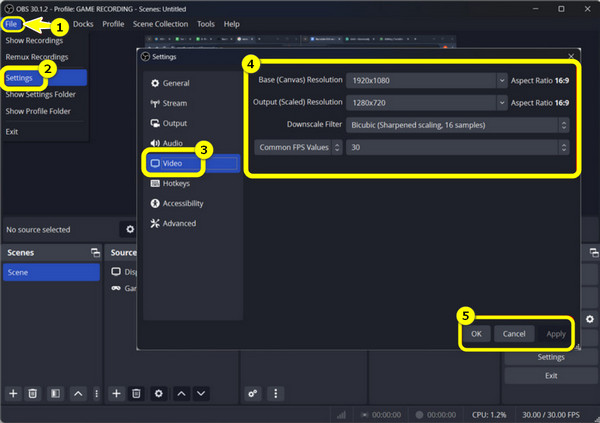
Step 2Among the choices, select "Minecraft" as the window. Then, you can adjust the video and recording settings for optimal recording quality in the "File" menu, then "Settings".
You can also configure audio settings by clicking the "Add" button in "Sources" and going for "Audio Input Capture" or "Audio Output Capture".
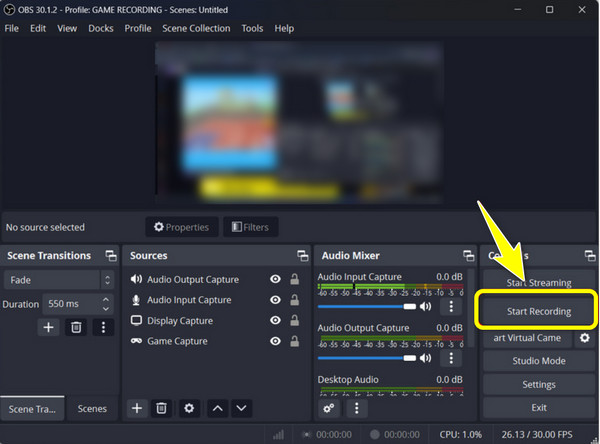
Step 3Once ready, click the "Start Recording" button to record Minecraft. Later, aim for the "Stop Recording" button to end it and locate your recording in your designated folder.
Use Game Bar to Record Minecraft on Windows 10/11
For someone who uses Windows 10/11, you should know the built-in tool called Game Bar, which allows you to record Minecraft without needing third-party help. Game Bar works effortlessly with most games and captures them at a reasonable quality without you facing complex steps. While it has few advanced features compared to other tools, Game Bar is perfect if you want a simple and quick solution to capture your Minecraft highlights. So, here’s how to record Minecraft on Windows 10/11’s built-in recorder:
Step 1Activate the Game Bar using the "Windows + G" keys once you have ready the Minecraft gameplay; if prompted, select "Yes, this is a game".
Step 2Next, click the "Record" button to start recording Minecraft. Now, play until you get the clips you want; click the "Stop" button to end the recording. The video is stored in the "Videos" folder under "Captures".

How to Screen Record Minecraft Online for Free
Aside from the built-in tool, an online screen recording can help you record Minecraft without installing anything. Thankfully, several online tools provide basic recording functionality, which can be done straight from your web browser. Below are two great options to consider when learning to record Minecraft: Screencastify and Loom Screen Recorder.
1. Screencastify
Screencastify is a web-based, incredibly easy-to-use, and free solution for basic gameplay recording needs. Using this online Minecraft recorder, you can select whether to capture your whole screen or select a specific area. Like any other tool, it has a free version that limits recording to up to 30 minutes and offers basic editing tools only. If you only want to capture highlights of your Minecraft gameplay, here’s how to record Minecraft for free with Screencastify:
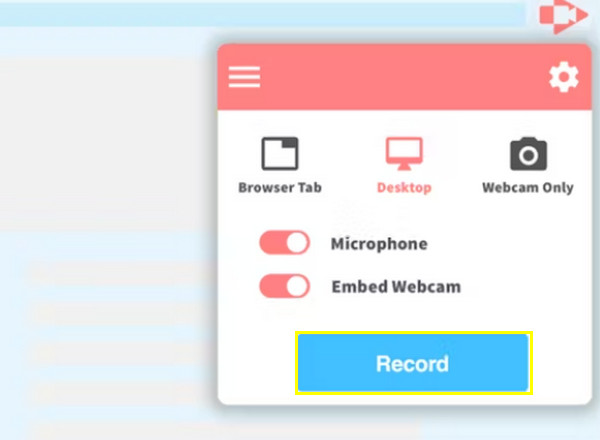
• Once it has been added to your browser as an extension, make sure to prepare the Minecraft gameplay window before selecting what part to record. On Screencastify, select "Desktop" out of all other options.
• Next, click the "Record" button to start. After a while, stop the recording and save the project or export it as MP4 on Google Drive.
2. Loom Screen Recorder
Next is the Loom Screen Recorder, which offers simplicity and functionality. It lets you record Minecraft without experiencing any complex setups. Despite being a free online tool, Loom is ideal for team collaboration, supporting high-quality video capture, and is famous for interacting with recorded video via comments and more. While it does not hold much advanced capabilities, it is still an excellent choice for quick recordings, especially for those who have teams. Check the steps below for Minecraft recording with Loom:
• Add the Loom extension on your chosen browser, then open the Minecraft gameplay you wish to record. On your browser, click the "Loom" icon, then select "Full screen" or "Custom Size" from the box.
• Click the "Start Recording" button, and then later on, once it ends, a link will appear where you can paste and share it or share it straight on social media.

Conclusion
With these five easy methods, you’re prepared to record Minecraft adventures in high quality. Whether you want a built-in tool, dedicated software, or an online recorder, there’s a perfect option just for you! Out of them, make sure to give time to the 4Easysoft Screen Recorder. Not only does it record Minecraft, but it ensures smooth frame rates and no lag on the recording, giving you only stunning clarity. Even for those new to recording, the program perfectly balances ease of use, performance, and quality, making it the top choice for Minecraft recording.
100% Secure
100% Secure