Transfer and manage all data between iOS devices, device and computer, and iTunes and devices.
AirDrop Failed to Save Item? Get the Reasons and Fixes
AirDrop makes file sharing between different iOS devices easy and quick. However, you will be frustrated when you suddenly encounter the "Failed to save an item. Save to iCloud Drive instead" error during file-sharing. Now, you are definitely looking for a way to fix it. If you are, continue reading this post, for it features 7 efficient ways to fix the "AirDrop failed to save item" error! So, without further delay, explore each of them below.
Guide List
7 Possible Solutions to Fix AirDrop Failed to Save Item The Safest Way to Transfer Your Item Between Devices FAQs About Fixing AirDrop Failed to Save Item7 Possible Solutions to Fix AirDrop Failed to Save Item
Well, the failed-to-save items on AirDrop only come once in a blue moon. It usually pops up due to some possible reasons. These reasons include when transferring large files across multiple devices, Wi-Fi and Bluetooth are turned off, outdated system version, disabled AirDrop, system glitches, and incorrect AirDrop settings setup. Thankfully, this post collects 7 efficient ways that you can use to fix the error. You can explore each of them and check which one works.
1. Restart your Device
Before executing complicated ways, sometimes a simple restart can fix the "AirDrop failed to save item" error. If the issue’s occurrence is due to the system’s bugs or glitches, then you need to restart your device. Doing this will refresh its memory and close all the running processes in the background.
2. Check your Device’s Storage
Apart from a simple restart, another uncomplicated thing you need to do is to check your device’s storage space. AirDrop automatically stops the file-transferring process or fails to save an item once your device has insufficient storage space. Now, if your device suffers from insufficient storage space, you can delete or move some files (move to cloud storage/computer). Then, check whether it fixes the "AirDrop failed to save item" error.
3. Check AirDrop Settings
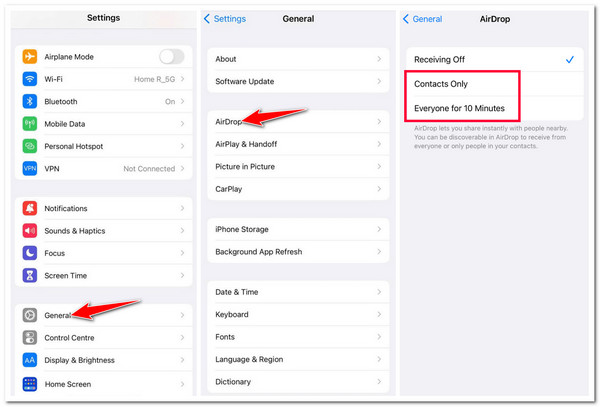
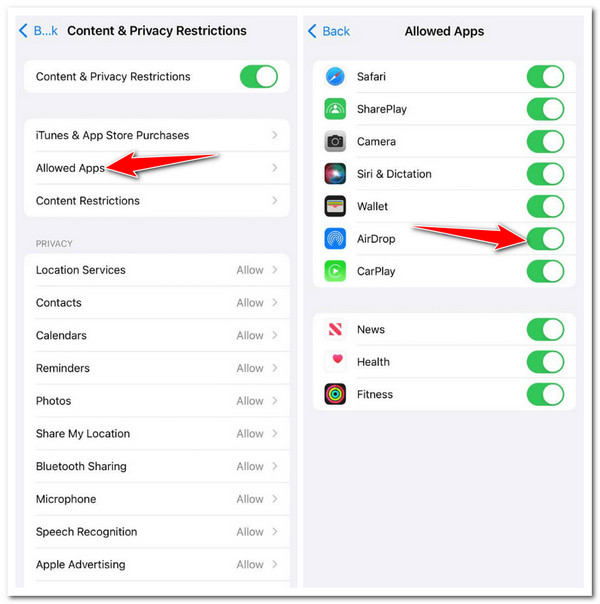
Aside from checking your device’s storage, you must also check your device’s AirDrop setting. If there are improper setups of your AirDrop settings, there’s a great chance you will experience the issue. Moreover, you must also check and ensure that no features restrict AirDrop, such as Screen Time. Now, to execute this way to fix the "AirDrop failed to save item" error, here are the steps you should follow:
- Check AirDrop Settings: Launch the "Settings" app on your device, select the "AirDrop" option, and from the option, choose between the "Contacts Only and Everyone for 10 Minutes" options.

- Unrestrict AirDrop: Go back to the "Settings" menu, tap the "Screen Time" button, and select the "Content & Privacy Restrictions" option. After that, tap the "Allowed Apps" button and ensure the "AirDrop" is toggled on.

4. Check Bluetooth and Wi-Fi Settings
Besides those settings mentioned above, you must also ensure that Wi-Fi and Bluetooth are enabled. AirDrop utilizes these wireless technologies to search for nearby AirDrop and received files. So, if these wireless technologies are turned off, there’s a great chance you will definitely encounter the "AirDrop failed to save item" error.

5. Change the File Format
Now, moving on to a slightly complicated way, another option you can do to fix the "AirDrop failed to save item" error is to change a file format. Though Apple hasn’t released any file restriction information about files to be sent, reports show that a file with specific formats, encoding, and aspect ratios often faces issues/errors. In that case, you can change the format or aspect ratio of the files you wish to send via AirDrop.
6. Reset Network Settings
If the above option cannot fix the "AirDrop failed to save item MP4" error, you can blame the error on your device’s problematic network settings. This way will remove/delete network-related information and preferences, but it is still a great way to fix the issue.
Now, to reset your device network settings, run the "Settings" app, tap the "General" button, scroll down, and select the "Transfer or Reset iPhone" option. After that, tap the "Reset" button and select the "Reset Network Settings" option. Then, perform the following instructions and check whether the "AirDrop failed to save item" error is fixed.

7. Update Software Version
If the "AirDrop failed to save item" error’s occurrence is not due to a problematic network, it might also be due to an outdated software version. Apple always includes valuable fixes with every newly released software version. So, if you encountered the AirDrop error after your last software update, Apple might include fixes to address various issues, including AirDrop with its latest update.
The Safest Way to Transfer Your Item Between Devices
If you are hesitant to use AirDrop to transfer files due to errors like "AirDrop failed to save item", the best way this post can recommend is to use a professional file transfer tool! And one of the best tools you can use is the 4Easysoft iPhone Transfer! This Windows and Mac-compatible tool lets you transfer various files from one iOS device to another. Some of this tool’s supported files to transfer include those categorized as necessary, media files, and social data. Regarding supported devices from which you transfer files, it supports iOS devices, computers (Windows and Mac), and iTunes. Furthermore, compared to AirDrop, this tool provides a safe, fast, and seamless file transfer process!

Provide an advanced preview feature to easily see and select files to transfer.
Modify some files with Photo Manager, Contact Assistant, and Music Editor.
Manage the files from a device before transferring them: delete, edit, create, etc.
Offer extra features to transfer/backup files between mobiles, computers, and iTunes.
100% Secure
100% Secure
How to Use 4Easysoft iPhone Transfer Tool as an Alternative to AirDrop with failed to save Item Error:
Step 1Download and install the 4Easysoft iPhone Transfer tool on your Windows or Mac computer. Then, launch the tool, link your iPhone to the computer through a USB cord, and wait at least a few seconds until the tool successfully detects your device.
Step 2Once the connection is established, you will see all the information about your device. Select an option from the left corresponding to the file you wish to transfer. Suppose you want to transfer photos; select the "Photos" option.
Step 3After that, select all the images you wish to transfer from the different categories. Then, once you have selected all of them, click the "Export to PC" icon at the top if you want to transfer the photos to the computer. After that, tick the "Select Folder" button.
Step 4Otherwise, if you want to transfer them on an iPhone/iPad, click the "Export to Device" icon at the upper part of the tool. And that’s it! Those are the simple steps on how to use this tool as an alternative to AirDrop with failed to save item error.
FAQs About Fixing AirDrop Failed to Save Item
-
How do you fix the AirDrops failure to save item issue on Mac?
To fix the AirDrop failure to save item issue. Although the steps of performing them are different, you can still use them to guide you on what you need to check on.
-
What must I do to fix the AirDrop failed to save item MP4 error?
To fix it, you need to access the Formats option on your device’s Settings app and select the H.265 format. It would help if you also deselected the HEVC box.
-
Are there any specific settings I need to configure for AirDrop to work correctly?
Yes, there are some specific settings you need to configure for AirDrop to work correctly. These AirDrop settings include setting up the discoverability to Everyone or Contacts only and enabling Wi-Fi and Bluetooth.
Conclusion
That’s it! Those are the 7 efficient ways to fix the "AirDrop failed to save item" error! Through these ways, you can now bring back your AirDrop to its expected service. If none of the above fixes could help you, you can use the professional 4Easysoft iPhone Transfer tool as an alternative! This tool’s powerful file-transferring feature allows you to transfer all files seamlessly, quickly, and safely you want from one iOS device to another. To discover more about this tool, visit its official website today.


