قم بإنشاء قرص/مجلد DVD/Blu-ray أو ملفات ISO من جميع تنسيقات الفيديو.
من Mac إلى Blu-ray: أربع طرق لحرق أقراص Blu-ray على Mac [2024]

منشور من طرف باولا بيلاجا ل حرق دي في دي / بلو راي 18 أكتوبر 2024
هل أنت من مستخدمي أجهزة Mac وتبحث عن طريقة لإنشاء نسخ احتياطية مادية أو مشاركة وسائط عالية الجودة مع الآخرين؟ إذا كان الأمر كذلك، فإن إتقان فن حرق أقراص Blu-ray على أجهزة Mac يمكن أن يرفع من مستوى تجربتك. سواء كنت من عشاق الفيديو المنزلي أو صانع أفلام أو تريد ببساطة الاحتفاظ بالذكريات، فإن هذا الدليل سوف يتعمق في أربع أسهل الطرق لحرق أقراص Blu-ray على أجهزة Mac، من أفضل الطرق إلى حلول البرامج التابعة لجهات خارجية. احصل على الوسائط المفضلة لديك الآن واصنع جودة خالدة في نسخ أقراص Blu-ray.
قائمة الدليل
أفضل طريقة لحرق أقراص Blu-ray على جهاز Mac بجودة عالية كيفية حرق أقراص Blu-ray على جهاز Mac باستخدام Disk Utility (بيانات محدودة) خطوات حرق أقراص Blu-ray على جهاز Mac من خلال ImgBurn استخدم BurnAware لإنشاء أقراص Blu-ray من أي مقاطع فيديوأفضل طريقة لحرق أقراص Blu-ray على جهاز Mac بجودة عالية
قبل قراءة المقارنة الكاملة بين UHD وBlu-ray في هذا المنشور، يمكنك استكشاف المعلومات الموجزة أو المقدمة أدناه.
ابدأ هذا الحل باستخدام أفضل برنامج نسخ أقراص Blu-ray على نظام التشغيل Mac، 4إيزيسوفت دي في دي الخالقإنه تصميم برنامج مخصص لنظام التشغيل macOS يتيح تحويل ملفات الفيديو وحرقها على أقراص مادية. يغطي البرنامج جميع تنسيقات الفيديو تقريبًا، مما يضمن التوافق مع أي ملف وسائط قد يكون لديك. كما يتميز بمجموعة من قوالب القوائم القابلة للتخصيص، مما يتيح لك تخصيص قوائمك بالصور والنصوص والموسيقى الخلفية لتجربة مشاهدة محسنة. يمكن تحقيق كل ذلك دون منحنى تعليمي حاد أو تأثير على جودة الصورة والصوت. لذا، سواء كنت تريد إنشاء أقراص Blu-ray مخصصة لمقاطع الفيديو المنزلية أو العروض التقديمية الاحترافية أو مجموعات من أفلامك، فاحصل على هذه الأداة لإنجاز المهمة دون أي متاعب.

إخراج فيديو عالي الجودة من خلال الحفاظ على الدقة الأصلية ونسبة العرض إلى الارتفاع.
يمكنك بسهولة تحويل مقاطع الفيديو من مصادر مختلفة إلى تنسيق جاهز لـ Blu-ray.
تم تحسينه لسرعات الحرق العالية، مما يؤدي إلى إنشاء القرص الخاص بك دون التضحية بالجودة.
قم بمعاينة قرص Blu-ray الخاص بك للتأكد من أن كل شيء يبدو كما هو متوقع.
100% آمن
100% آمن
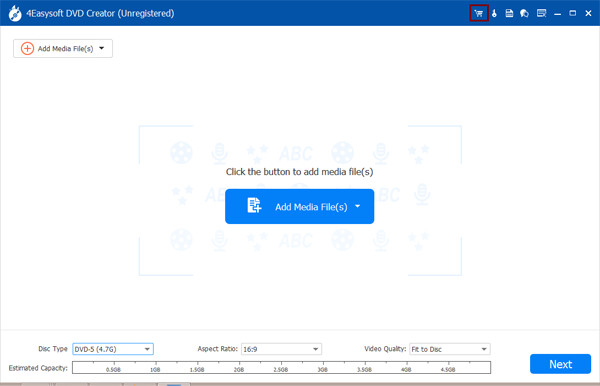
الخطوة 1بعد إطلاق 4إيزيسوفت ماك دي في دي الخالقابدأ باختيار خيار "قرص Blu-ray" من الشاشة الرئيسية. ثم انقر فوق الزر "إضافة ملفات الوسائط" لفتح جميع الملفات التي تريد حرقها.
الخطوة 2بمجرد الإضافة، انقر على زر "التالي". هنا، يمكنك تحديد القوالب اللازمة لقرص Blu-ray الخاص بك. بخلاف ذلك، انتقل إلى خيار "القالب المخصص" لإنشاء قالبك الخاص مع الخلفية والعنوان؛ ويمكنك إضافة موسيقى خلفية كما يحلو لك.
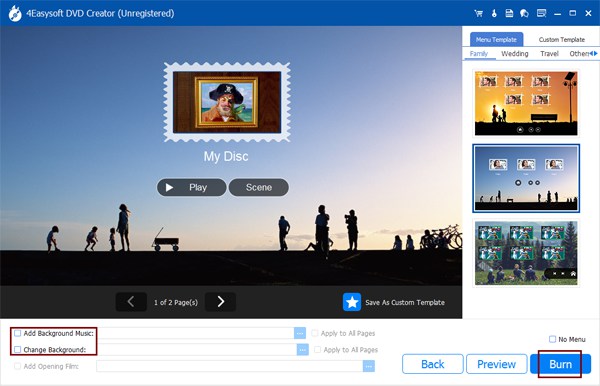
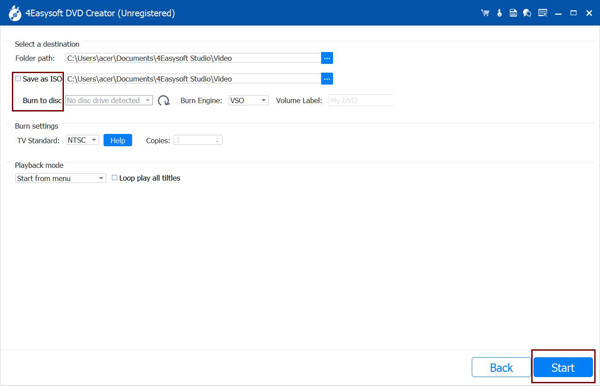
الخطوه 3إذا كان هذا يبدو مذهلاً بالفعل، فيمكنك "معاينة" الملف أولاً لمعرفة ما إذا كان هناك تغييرات يجب إجراؤها. انقر فوق الزر "نسخ" لتغيير إعدادات الإخراج، وأخيرًا، انقر فوق الزر "ابدأ".
كيفية حرق أقراص Blu-ray على جهاز Mac باستخدام Disk Utility (بيانات محدودة)
على الرغم من أن نظام التشغيل macOS لا يدعم حرق أقراص Blu-ray بشكل أصلي، إلا أنه لا يزال بإمكانك استخدام Disk Utility للمشروعات الأساسية المتعلقة بالأقراص. تجدر الإشارة إلى أن Disk Utility غير مصمم في المقام الأول لأقراص Blu-ray، ولكن يمكن استخدامه لحرق مجموعات بيانات أكثر صغرًا على قرص في ظل ظروف معينة. باستخدام هذه الطريقة، يمكنك أرشفة عدد محدود من البيانات أو مجرد ملفات أساسية بتنسيق متوافق مع الأنظمة الحديثة.
تذكر أنه باستخدام Disk Utility، يمكنك ببساطة التعامل مع صور القرص والبيانات الأساسية بدلاً من إنشاء قرص Blu-ray قابل للتشغيل. إذا كنت ترغب في نسخ مشاريع فيديو واسعة النطاق، فمن المستحسن استخدام برنامج نسخ Blu-ray مخصص على نظام التشغيل Mac. على الرغم من أن هذا هو الحال مع هذه الطريقة، إلا أنها لا تزال طريقة مباشرة لنسخ أقراص Blu-ray على نظام التشغيل Mac؛ تحقق من الخطوات أدناه:
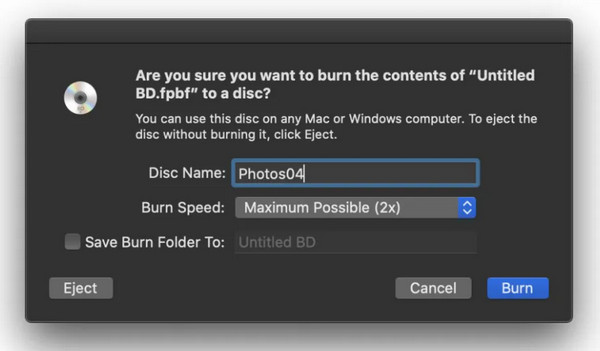
الخطوة 1قم بتنظيم الملفات التي ترغب في نسخها قبل نسخها، حيث إن هذا النهج يتعامل مع البيانات وليس تنسيقات الفيديو على وجه التحديد. بعد ذلك، ضع قرص Blu-ray في محرك الأقراص.
الخطوة 2افتح "أداة القرص" بالانتقال إلى "التطبيقات"، ثم "الأدوات المساعدة"، ثم "أداة القرص". من الجانب الأيسر للنافذة، حدد القرص الفارغ الذي أدخلته.
الخطوه 3في النهاية، انتقل إلى قائمة "ملف" واختر "صورة جديدة" إلى "صورة من مجلد"، وحدد المجلد الذي يحتوي على الملفات التي ترغب في حرقها، ثم "احفظ" صورة القرص على القرص الصلب لديك.
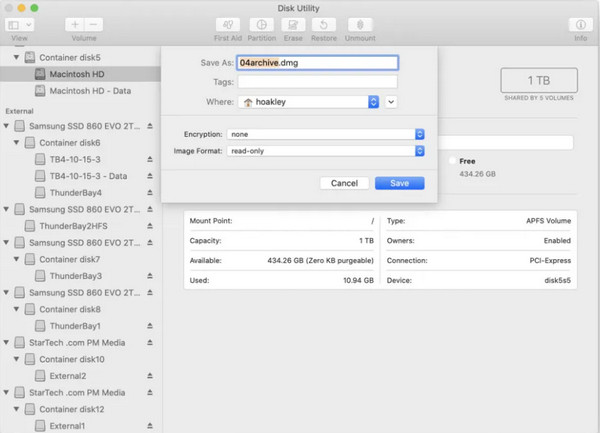
الخطوة 4بمجرد أن تصبح الصورة جاهزة، ابحث عن ملف صورة القرص وانقر عليه مرتين لتثبيته على الشاشة. ارجع إلى البرنامج، وحدد صورة القرص المثبتة من القائمة، وانقر على زر "حرق".
انتظر حتى تنتهي عملية الحرق، قد يستغرق الأمر بعض الوقت، اعتمادًا على عدد البيانات.
خطوات حرق أقراص Blu-ray على جهاز Mac من خلال ImgBurn
ImgBurn هو برنامج حرق أقراص شهير يستخدم بشكل أساسي على أنظمة Windows، ولكنه قابل للتشغيل على أجهزة Mac من خلال طبقة متوافقة. إذا كان لديك بالفعل إمكانية الوصول إلى بيئة Windows على جهاز Mac الخاص بك، مثل VMware Fusion أو Parallels Desktop أو نظام التشغيل المزدوج، فإليك كيفية استخدام ImgBurn لحرق أقراص Blu-ray على جهاز Mac:
الخطوة 1أولاً، قم بإعداد نظام تشغيل Windows في برنامج المحاكاة الافتراضية الذي اخترته. ثم أدخل قرص Blu-ray الفارغ في محرك الأقراص لديك.
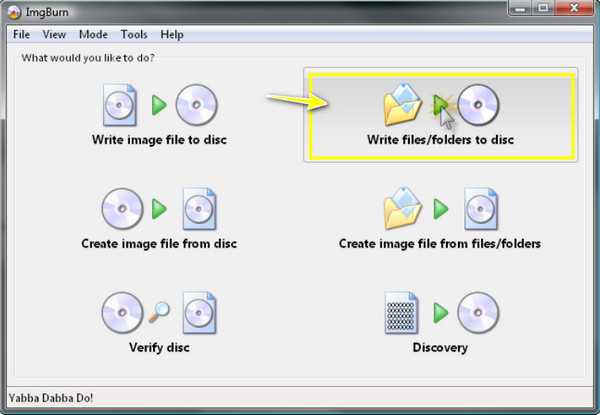
الخطوة 2قم بتشغيل برنامج ImgBurn من بيئة Windows، والتي توجد عادةً في قائمة "ابدأ". اختر "كتابة الملفات/المجلدات على القرص" من البرنامج لحرق البيانات على القرص.
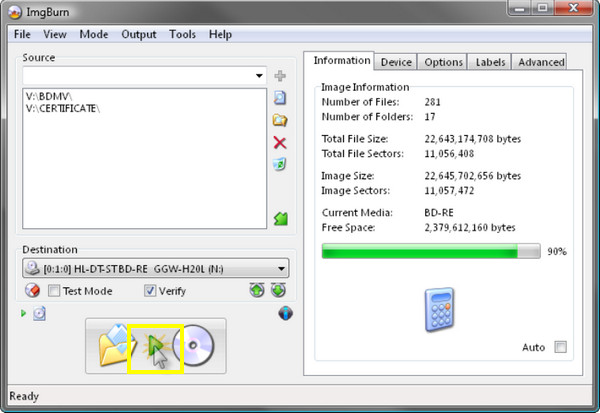
الخطوه 3انقر فوق الزر "إضافة" لتحميل الملفات التي تريد نسخها إلى مربع "المصدر". ثم انتقل إلى قسم "الوجهة" لمعرفة ما إذا كنت قد حددت محرك الأقراص الصحيح. يمكنك أيضًا تعيين سرعة الكتابة والعلامة المناسبة.
الخطوة 4لاحقًا، انقر فوق الزر "كتابة" لبدء البرنامج في كتابة البيانات على قرص Blu-ray. يُرجى الانتظار حتى تنتهي عملية الحرق.
استخدم BurnAware لإنشاء أقراص Blu-ray من أي مقاطع فيديو
في الواقع، هناك شيء فريد من نوعه في الاحتفاظ بنسخة مادية من مقاطع الفيديو المفضلة لديك، ولهذا السبب يتم توفير BurnAware كحل آخر لك لحرق أقراص Blu-ray على جهاز Mac. يشتهر BurnAware بسهولة استخدامه وميزاته القوية، حيث يتيح لك حرق أقراص Blu-ray دون عناء، مع ضمان الحفاظ على مقاطع الفيديو الخاصة بك بدقة عالية مذهلة.
بمجرد أن تصبح جاهزًا، إليك دليلًا خطوة بخطوة لاستخدام برنامج حرق أقراص Blu-ray هذا على نظام التشغيل Mac:
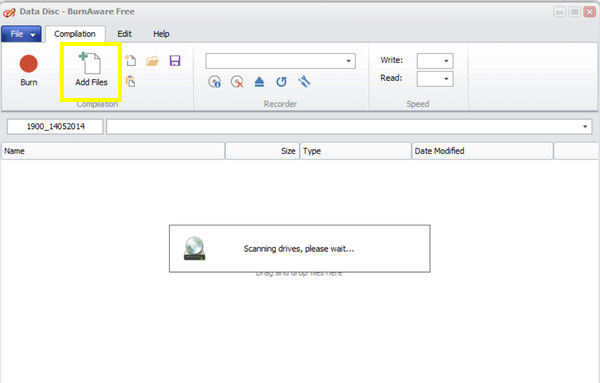
الخطوة 1افتح برنامج BurnAware. من القائمة الرئيسية، حدد خيار "Blu-ray" لبدء اختيار نوع قرص Blu-ray الذي ترغب في حرقه.
الخطوة 2انتقل إلى زر "إضافة ملفات" لوضع جميع مقاطع الفيديو بتنسيقات مختلفة تنوي حرقها. من الجيد أن تنظمها بالترتيب المطلوب للتأكد من أنها جاهزة للحرق.
الخطوه 3بعد ذلك، قم بتكوين إعدادات القرص، مثل ضبط الجودة وسرعة النسخ وعلامة القرص والإعدادات الأخرى، للحصول على أفضل نتيجة ممكنة. لاحقًا، راجع الإعدادات وقم بمعاينة القرص لمعرفة شكله على قرص Blu-ray.
الخطوة 4إذا كنت راضيًا، فانقر فوق الزر "حرق". بعد عملية الحرق، سيتم الانتهاء من القرص وسيصبح جاهزًا للتشغيل على أي مشغل Blu-ray متوافق.
خاتمة
توفر كل طريقة من الطرق المذكورة أعلاه لحرق أقراص Blu-ray على نظام التشغيل Mac مزايا مميزة وفقًا لاحتياجاتك، سواء كنت تريد ميزات على المستوى الاحترافي أو نهجًا بسيطًا لحرق البيانات الأساسية. باستخدام الحل المناسب الذي يناسب متطلباتك وإعداداتك، يمكنك حرق أقراص Blu-ray بسرعة على نظام التشغيل Mac! ولكن للحصول على إجابة شاملة تجمع بين السهولة والميزات الشاملة، استخدم 4Easysoft Mac DVD Creator. فهو يوفر أدوات قوية لإدارة ملفات الوسائط وحرقها بسرعة عالية وجودة عالية، مما يجعله خيارًا مثاليًا لك لتبسيط عمليات حرق الأقراص.
100% آمن
100% آمن