Convert, edit, and compress videos/audios in 1000+ formats with high quality.
How to Compress Audio in Audacity with Top 3 Alternatives
For a podcaster, musician, or other audio enthusiast, compression is a crucial technique that would make a huge difference to your final product. For this task, Audacity is one great tool that can help you compress audio files. Besides shrinking file size, the program has adjustable options to ensure you get the best results. Thus, today’s post will show you how to compress audio in Audacity and give you more choices to enhance your audio projects.
Guide List
How Audacity Works to Compress Audio The Best Settings in Audacity for High-Quality Compression Compress Audio with the Top 3 Audacity AlternativesHow Audacity Works to Compress Audio
It's amazing how Audacity works to make edits to your audio files. This free audio editor for Windows, Mac, and Linux offers an outstanding toolset to achieve your desired audio results, whether in MP3, WAV, OGG, or more formats. It holds many functionalities that are surprisingly accessible to everyone looking to optimize their audio recordings for music production, podcasts, or other audio projects. So, explore now how to compress audio files using this versatile platform.
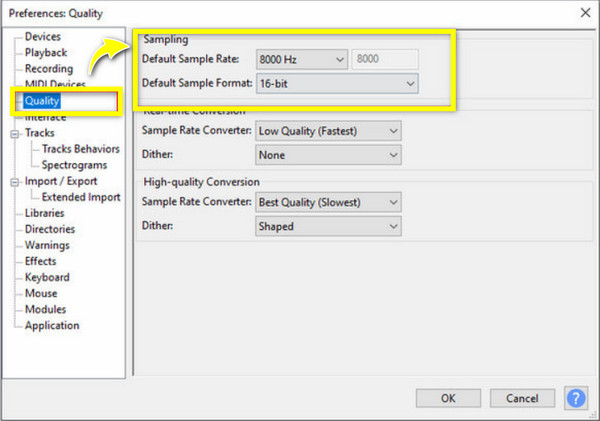
Step 1Upon launching Audacity, upload your audio file to begin. Next, click the “Edit” menu where to select “Preferences” then "Quality". Here, you can lessen the sample rate and sample format.
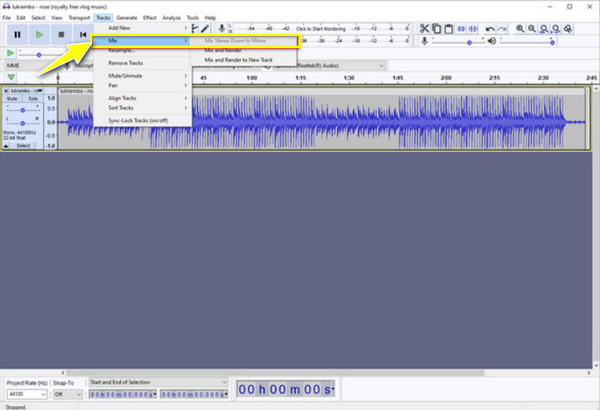
Step 2Afterward, navigate to the "Tracks" menu, click the "Mix" option, then choose "Mix Stereo Down to Mono" from the side menu.
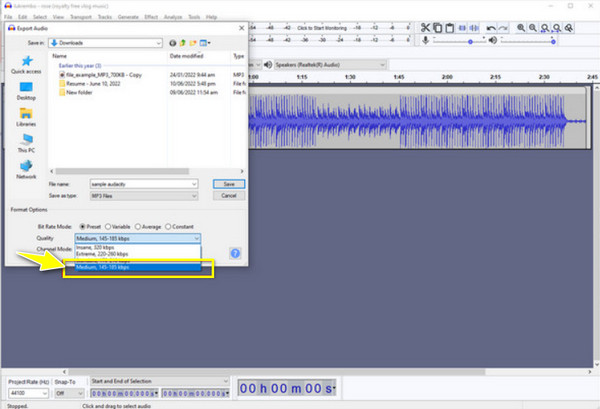
Step 3Now, it’s time to save the audio file! Go to the "File" menu, then "Export Audio"; here, you must select "MP3" in the "Save as type" field, then set the "Quality" to "Medium, 145-185 kbps".Doing so will compress the audio file, but get ready to face quality loss.
The Best Settings in Audacity for High-Quality Compression
While the quality may be affected after you compress audio in Audacity, is there a way to avoid this from happening? Yes! Before exporting your audio file, you might need to think about setting some settings for effective audio compression, and here are the best settings to have in Audacity:
• Threshold. Set the threshold to a good level that records the louder audio peaks. The usual point starts at around -20 dB and goes up to -30 dB, but you must adjust it depending on your recording.
• Ratio. For general audio compression, a 3:1 to 6:1 ratio can be used; higher ones are much more suggested for aggressive compression but may change the natural sound.
• Attack Time. For this setting, you must pick between 5 ms and 30 ms, letting the compressor quickly respond to peaks without cutting off the sound.
• Release Time. Lastly, the release time should be adjusted from 50 ms to 200 ms so that the compressor can go back to normal gain seamlessly once the loud sound has ended.
By using these suggested settings in Audacity, you can successfully achieve a compressed audio file that keeps the integrity of your audio. However, you should remember that each audio recording has specific adjustments, so be patient when experimenting with these settings to achieve high-quality compression.
Compress Audio with the Top 3 Audacity Alternatives
Like other software, Audacity can experience not working properly; otherwise, you perhaps just want to try alternatives and see what they offer to help you compress audio files. Thus, in this part, you will learn about three tools considered the best alternatives to Audacity.
1. 4Easysoft Total Video Converter
Of the many alternatives, the 4Easysoft Total Video Converter stands out best! It is designed with the ability to compress audio files while maintaining the high quality that everyone desires. It is made with an intuitive interface, so anyone, even if you’re a starter in this task, can effortlessly compress audio files and achieve all your multimedia projects here! Additionally, it supports fast exporting; thus, you won’t have to wait for a long time, regardless of the number of your audio files to be compressed. What are you waiting for now? Come after the following steps to achieve the best compression results with this amazing tool.

The Audio Compressor permits you to compress files to less than 40%.
Acquire the format, sample rate, channel, and more settings you want easily.
Preview the compressed audio to confirm it meets your expectations.
It is free from malware and ads, securing your uploaded audio files.
100% Secure
100% Secure
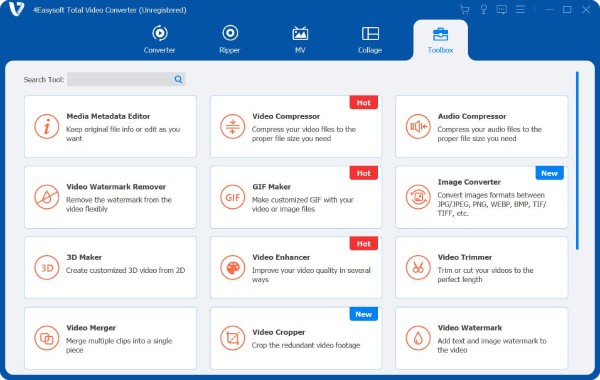
Step 1Enter the 4Easysoft Total Video Converter app on your computer. From the above widgets, please select "Toolbox", where you can find over fifteen toolkits, including the "Audio Compressor", and click on it.
Step 2Now, upload your MP3, AAC, WAV, or other audio file format to the window. Start pulling the "Size" slider to lessen your audio file to less than 40%. You can also change the options below, such as format, channel, sample rate, etc.
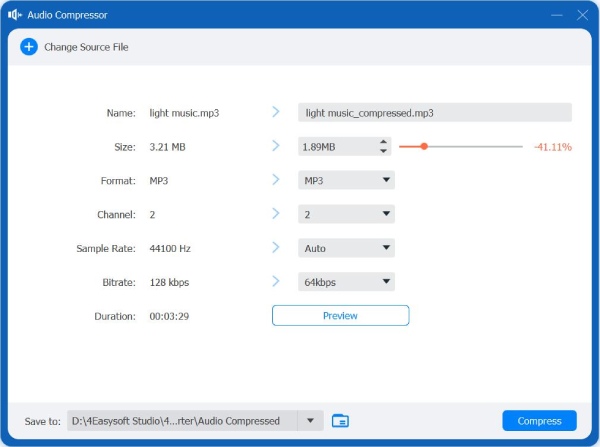
Step 3To ensure you get the result you want, click the "Preview" button. If it turns out to be what you expect it to be, click the "Compress" button and save it to your designated location.
2. FreeConvert MP3 Compressor
If a free online tool is what you need, then you must try the FreeConvert MP3 Compressor! It is friendly to every user’s skill level in compressing MP3 files. Aside from helping you compress audio files, you can change parameters like the bitrate and quality, achieving the loved file size and sound quality. Moreover, if you have lots of audio files to compress, this tool supports multiple files simultaneously, which is good for completing larger projects in no time.
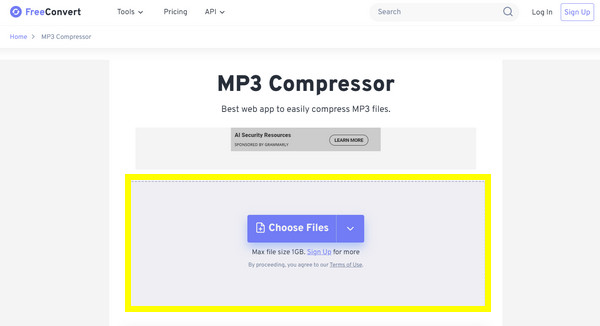
Step 1 Search FreeConverr MP3 Compressor on your browser. Start by clicking the "Choose Files" button to import the file you wish to compress from your computer file.
Step 2To begin the compression, adjust the "Bitrate" slider to change it to your desired quality. Note that lowering it will minimize the size but affect the audio quality. Once you’re satisfied, click the "Compress MP3" button.
3. Media.io Online Audio Compressor
Another choice to consider is the Media.io Online Audio Compressor. It offers audio and video editing tools and, most importantly, an audio compressor that is used to minimize file size without losing quality. Furthermore, you can ensure that you can compress audio files in just seconds, so you’re able to enjoy more files to compress than the waiting time. For personal and professional usage, this compressor is an excellent tool for everyone who needs it.
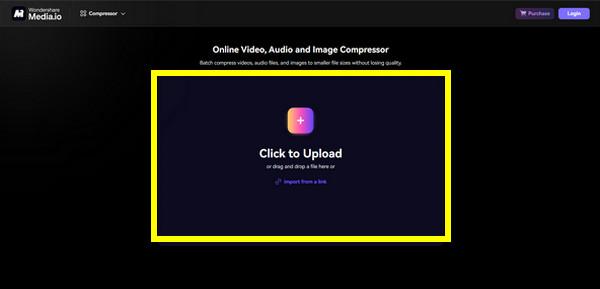
Step 1Once inside the Media.io Online Audio Compressor website, upload your audio file from your computer or drag and drop it straight to the upload box.
Step 2After that, you’ll see options to adjust the bitrate and sample rate; pull each slider to set it to your desired balance. Later on, click the "Compress" button to start the compression and save it.
Conclusion
In today’s post, you’ve got a comprehensive guide on how to compress audio in Audacity, and hopefully, you’ve got your desired compression with it. If not, you can try the three best alternatives mentioned to compress audio files with high quality. Among them, the one that stands out most is the 4Easysoft Total Video Converter. It has a designed audio compressor tool that minimizes audio file size while maintaining the highest quality possible, which you deserve. Besides that, it provides more editing functionalities than what you expect. Don’t miss these; download the program today!
100% Secure
100% Secure


