Convert, edit, and compress videos/audios in 1000+ formats with high quality.
How to Compress Videos in VLC: A Comprehensive Tutorial
Videos can be larger than ever, consuming significant amounts of storage space and bandwidth. So, to upload faster or save space, you can compress videos in VLC. Fortunately, VLC Media Player offers a straightforward solution for video compression. If unsure, this post has your back! Dive in now to learn the three compression methods using VLC, demonstrating how you can use it to reduce MP4 file size while maintaining quality.
Guide List
How to Use VLC to Compress Videos by Changing Format Adjust the Video Parameters in VLC to Reduce File Size Detailed Steps to Trim Videos in VLC to Compress Size The Easiest Way to Compress Videos without Losing QualityHow to Use VLC to Compress Videos by Changing Format
The first method of VLC compressing video is changing the format. This converting solution into a more efficient format, like MP4 or WebM, can significantly decrease the file size, making it painless to share or store. Shared below are the steps to compress video in VLC by changing your video’s format, compressing its size, and optimizing it for your needs.
Step 1Launch VLC on your computer. Move to the “Media” tab in the far left corner of the window, then select “Convert/Save” from the pulldown menu.
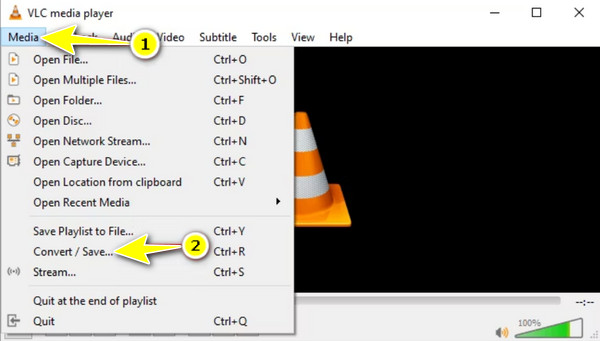
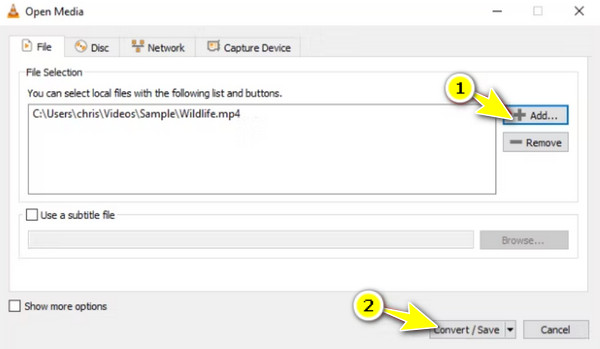
Step 2Click the “Add” button from the “Open Media” window to browse for your video file that needs to be compressed. Click “Open” to verify the selection, then click the “Convert/Save” button at the bottom.
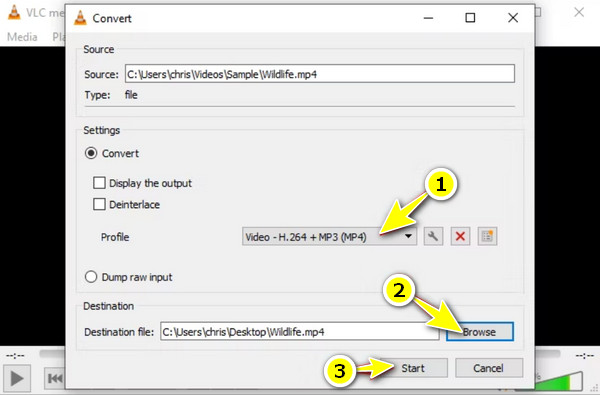
Step 3Inside the “Convert” window, set a file name and location for your compressed video. From the “Profile” menu, select a format, such as MP4. Adjust its settings if needed, then click the “Start” button to initiate the conversion.
The program will then compress and convert your video into MP4 format; the process depends on the file size and your system’s performance.
Adjust the Video Parameters in VLC to Reduce File Size
Meanwhile, adjusting video parameters requires modifying parameters like resolution, bitrate, and frame rate, creating a more manageable file size perfect for your storage and sharing needs. The good thing about VLC is that it provides a field of settings that can be fine-tuned to achieve more efficient compression, e.g., to reduce MP4 file size. Here’s how to compress video in VLC by adjusting these settings.
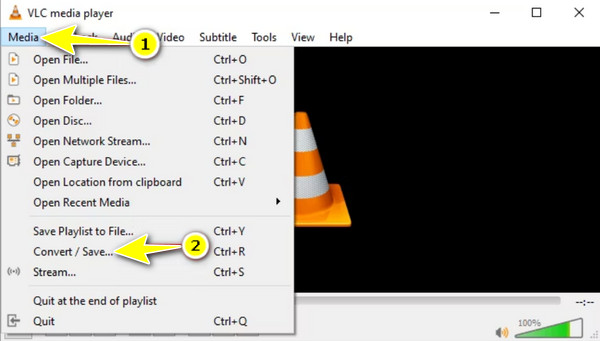
Step 1In the VLC window, go to the “Media” tab and choose “Convert/Save” from the menu list. Click the “Add” button to sync the video file you wish to compress, then click the “Convert/Save” button.
Step 2From the new window, you’ll see “Profile” where you can select a new output format. Go to the “Profile Settings” button next to it to adjust video parameters, like Video Codec, Bitrate, Resolution, and Frame Rate.
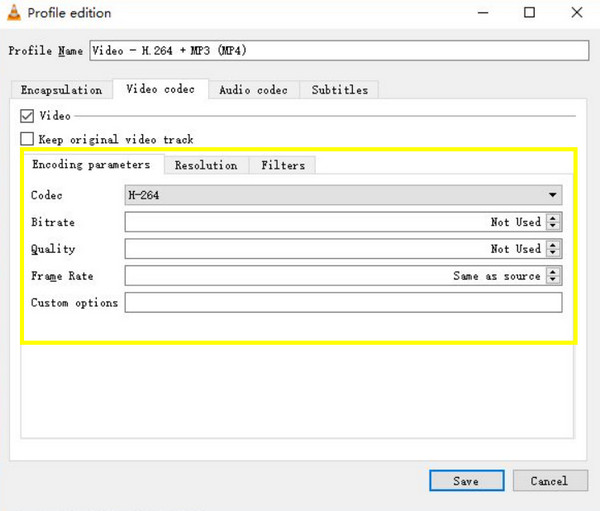
Step 3After adjusting everything according to your needs, save the profile by clicking the “Save” button. Then, select a file name and location and click the “Start” button to undertake the compression process.
Detailed Steps to Trim Videos in VLC to Compress Size
Another helpful method to compress videos in VLC is trimming, especially when you only need a specific video part. The program has an easy way to cut out unwanted sections from your videos without extra software. By doing this, you can significantly lessen the file size while protecting the quality of your footage. Below are the detailed steps on how to compress a 1-hour video in VLC:
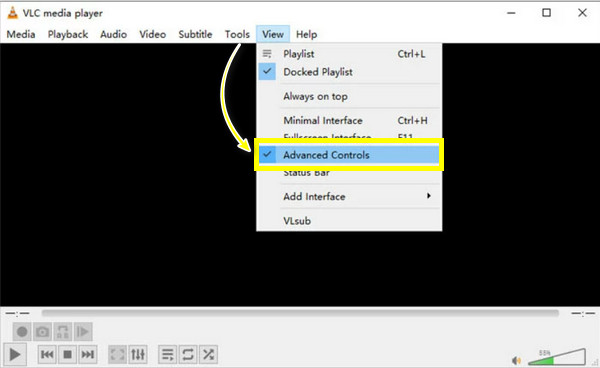
Step 1Run the VLC program on your computer. To access the trimming features, open the “View” menu at the top and choose “Advanced Controls” to add extra buttons.
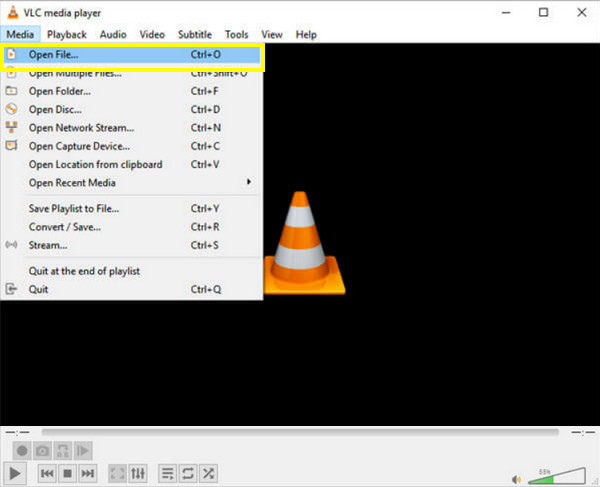
Step 2Assign to the “Media” tab and settle on “Open File” to upload the 1-hour or longer video you wish to trim to be compressed. Then, use the playback control to choose the starting point of the portion you want to keep, then pause the video at the desired start point.
Step 3Click the “Record” button to embark on recording from the start point, then resume playback to capture the desired segment of the video.
Once you have reached the end point of the portion you want to keep, click the “Record” button again to stop recording. The program will then save the trimmed segment as a new video file.
Step 4The recordings are typically saved in the “Videos” folder. Check your newly trimmed video there to see if it meets your expectations.
The Easiest Way to Compress Videos without Losing Quality
While VLC doesn't disappoint in helping you compress videos using three different methods, if you want a more straightforward compressing solution, the4Easysoft Total Video Converter attracts attention as an exceptional tool! This user-friendly program is made to simplify the video compression process, making it accessible even for those with limited technical knowledge. Its Video Compressor tool provides a range of options to adjust compression settings with precision, like choosing output format, bitrate, resolution, and more, all aimed at achieving the best balance between file size and quality. So, instead of learning all methods to compress video in VLC, why not use this program to achieve optimal compression results with minimal effort?
Employ advanced compression algorithms to maintain the quality of your videos.
Preview the compressed output to ensure it meets your expectations.
Save time with the batch processing feature, compressing multiple videos at once.
Fine-tune compression settings to strike the perfect balance between size and quality.
100% Secure
100% Secure
Step 1Enter the 4Easysoft Total Video Converter, then decide on the “Toolbox” widget above. From the toolkits there, favor "Video Compressor."
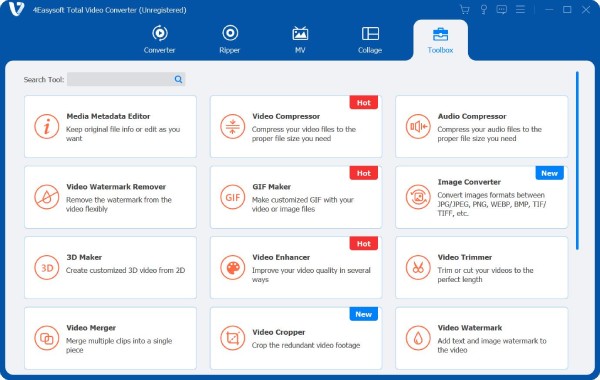
Step 2Load your video file, which must be compressed, by clicking the “Add” button in the middle of the “Video Compressor” window. To modify the size, use the slider or the buttons until you achieve the desired compression.
Also, change the format, bitrate, and resolution as needed. To see how your compressed video is doing, click the “Preview” button.
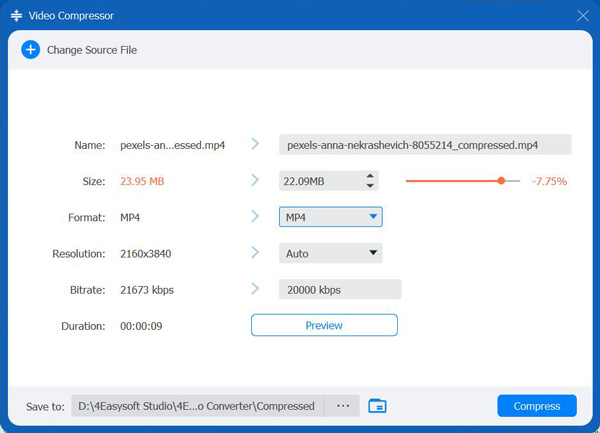
Step 3After naming and selecting the destination for the compressed video, click the “Compress” button if you’re happy with the results.
Conclusion
That’s how you compress video in VLC! The program offers a valuable and accessible solution for compressing video files through conversion, parameter adjustments, and trimming. With these ways, you can effectively reduce file size, making it a feasible choice for everyday compression. However, if you want a more streamlined procedure, consider the 4Easysoft Total Video Converter. This software has a designed toolkit for an effortless compression experience with customizable settings and high-quality results. Get the program today and ensure your videos are clear and sharp while being manageable in file size.
100% Secure
100% Secure


