Convert, edit, and compress videos/audios in 1000+ formats with high quality.
DaVinci How to Crop Video in 6 Methods [Step-by-step Guide]
DaVinci how to crop video: As a newbie user of DaVinci Resolve, it is understandable that you find it overwhelming. Even though you only want to crop a video, you might still need something to guide you on how to use DaVinci Resolve’s crop feature efficiently. Thankfully, this post provides six efficient methods DaVinci how to crop video! This post also listed the corresponding simple step-by-step procedures for these methods. So, without further ado, start learning below.
Guide List
Method 1: How to Crop Videos without Black Bar with DaVinci Method 2: How to Crop video Via Zooming in DaVinci without Altering the Aspect Ratio Method 3: Change the Video’s Resolution to Crop it Using DaVinci Method 4: Crop Video Using a Fake Letterbox to Acquire a Cinematic Look Method 5: Steps to Crop Video Using DaVinci Resolve’s Dynamic Zoom Method 6: Best Alternative to Quickly Crop Videos to Any SizeMethod 1: How to Crop Videos without Black Bar with DaVinci
If you aim to remove a video’s black bars around it, you can use DaVinci Resolve’s cropping feature. This feature lets you cut off black bars from your videos' left, right, top, and bottom. Now, DaVinci, how to crop the video’s black bars? Here are the steps you must follow:
Step 1Assume that the video you wish to crop is already on the timeline. Select it, head to the Inspector on the right side, and click it. Then, scroll down until you see the "Cropping" option.
Step 2After that, double-click the "Cropping" option to access it. Next, crop your video’s black bars by sliding the Crop Left, Crop Right, Crop Top, and Crop Bottom sliders.
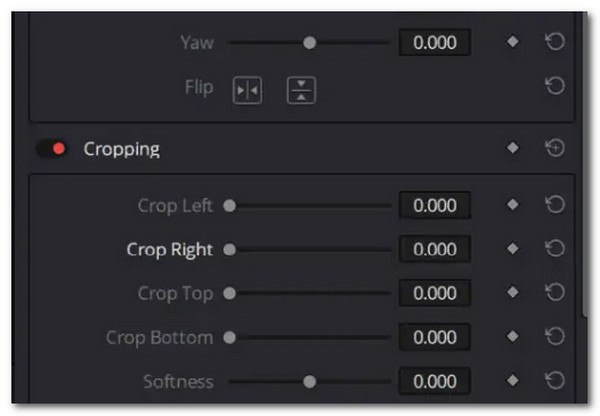
Note: While removing the black bars by sliding the crop sliders, ensure you won’t affect the video’s frames from each side to prevent losing them.
Method 2: How to Crop video Via Zooming in DaVinci without Altering the Aspect Ratio
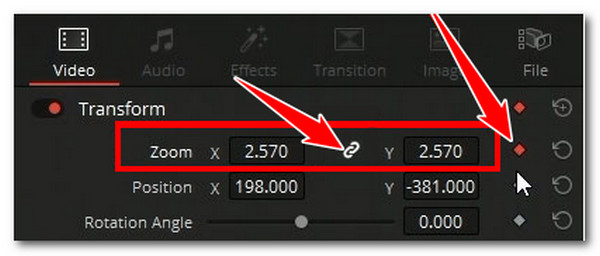
Another way to crop your video is to zoom it in. This method does not require altering the aspect ratio; you just need to zoom in on the video until the black bars are eradicated. Note that this indirect cropping method will make the video appear closer. Using DaVinci, how to crop the video by zooming in? Here are the steps to guide you:
Step 1Suppose you already placed the video you want to crop on DaVinci’s timeline. Place your mouse’s cursor over the boxes and drag them to the sides to zoom in and out.
Step 2The "Link" button placed between the "X" and "Y" indicates that they are linked. So, when you change the X, the Y will also change. Alter this value until you eradicate the black bars.
Method 3: Change the Video’s Resolution to Crop it Using DaVinci
Apart from those two ways, you can also modify the video’s resolution. Although this one is also an indirect way of cropping a video, it can help you match the device-supported resolution for much better playback where you wish to play it and eradicate the black bars around your video. So, DaVinci, how to crop video through this one? Go after the steps below:
Step 1Press the "Shift + 9" on your keyboard on the DaVinci tool. After that, click the "Master Settings" button and set the "Timeline Resolution" to the "Custom" option.
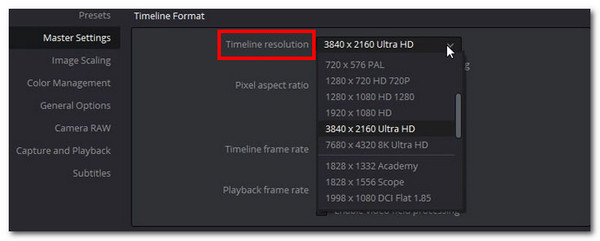
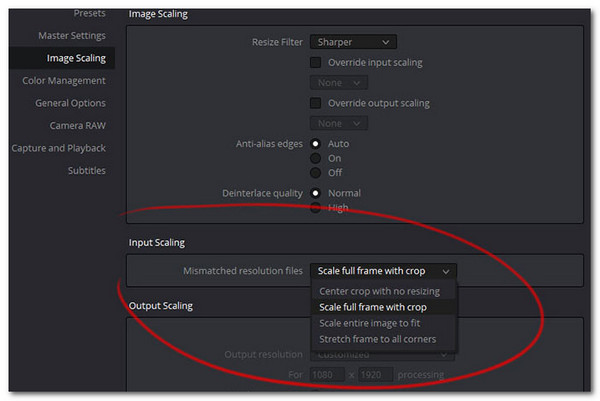
Step 2Next, change the resolution to a broader resolution based on the device where you want to play the video. Then, access the "Image Scaling" and "Input Scaling" options.
Step 3After that, set the Mismatched Resolution Files to the "Scale full frame with crop" option. And there you have it!
Method 4: Crop Video Using a Fake Letterbox to Acquire a Cinematic Look
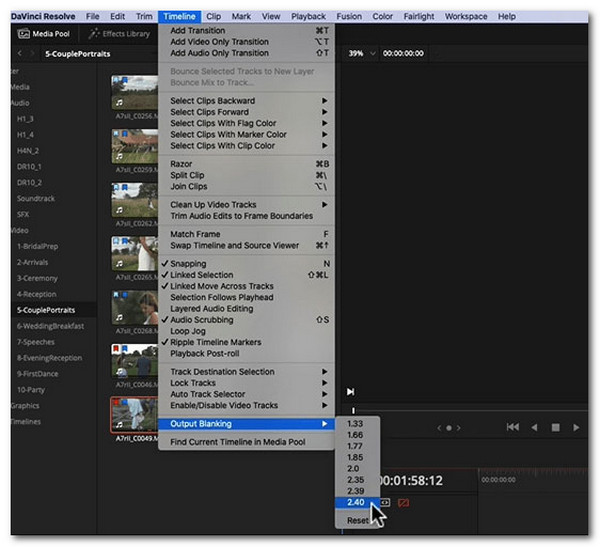
If you are into adding an effect to your video aside from just cropping it, you can use DaVinci’s Fake Letterbox. Adding this effect can achieve your desired aspect ratio for your video and infuse cinematic effects. To perform this one, the steps show DaVinci how to crop the top and bottom of the video by adding the Fake Letterbox below:
Step 1On the timeline, select "Output Blanking". Then, choose an aspect ratio. Note that an aspect ratio lower than 1.77 will crop from the sides, and higher will crop the top and bottom.
Step 2After that, you can preview your changes to see whether they look good with your video. And that’s it! That’s how you do this method.
Method 5: Steps to Crop Video Using DaVinci Resolve’s Dynamic Zoom
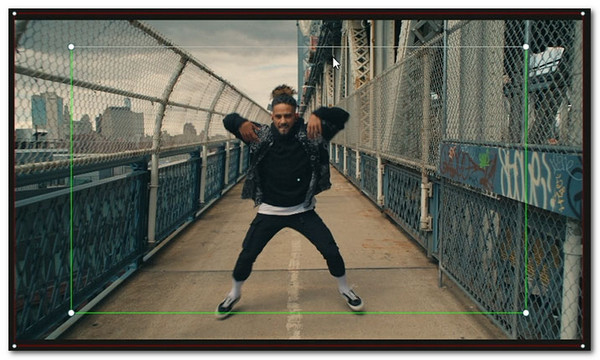
Aside from Fake Letterbox, you can also apply a dynamic zoom effect to your video. Although it doesn’t directly crop your video, it adds movement effects, like small to big, which cut off some areas. Do you want to try this one? Guide yourself with the steps showing you DaVinci how to crop video below:
Step 1Place the video on the timeline, click the "Rectangular" button at the right corner of the tool, and select the "Dynamic Zoom" option. This option has basic cropping and zoom features.
Step 2Next, you’ll see a green rectangular line on your screen. Drag it to the area where you wish to apply the zoom effect. Ensure that it doesn’t include the area you want to crop.
Method 6: Best Alternative to Quickly Crop Videos to Any Size
If you find the above methods to crop video DaVinci too challenging, the last and best shot you have to crop your video is to use the 4Easysoft Total Video Converter. This tool supports the Video Cropper feature, which enables you to crop videos in any size quickly. This tool allows you to manually crop the video by dragging the frame or entering a crop area value. Apart from that, it also offers you aspect ratio options. Through these options, you can easily and quickly crop your video based on the aspect ratio supported by the device where you wish to play it. This tool is the best alternative to those methods earlier showing DaVinci how to crop video.

Allow you to crop your video in any size and area easily, quickly, and efficiently.
Let you tweak the output’s resolution, frame rate, encoder, etc., to enhance its quality.
Support the built-in preview feature to check the changes you applied to your video.
Crop video to any size without compromising its original high quality.
100% Secure
100% Secure
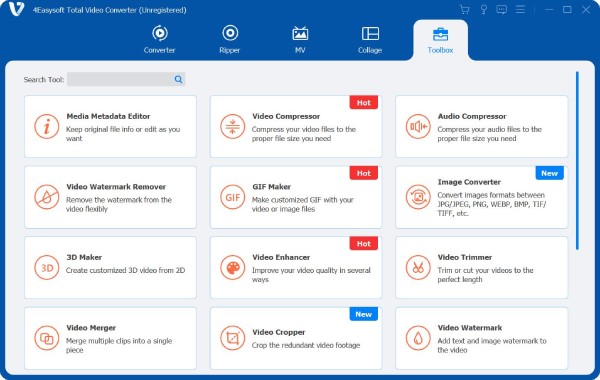
Step 1Install the 4Easysoft Total Video Converter on your computer. Then, run the tool, click the "Toolbox" tab, and select the "Video Cropper" option.
Step 2After that, click the “Add” button, select the video you wish to crop, and click the “Open” button to bring the video into the tool’s interface.
Step 3Next, select a ratio from the "Aspect Ratio" menu to quickly crop the video. You can also manually crop it by choosing the "Freely" option and entering a value on the Crop Area.
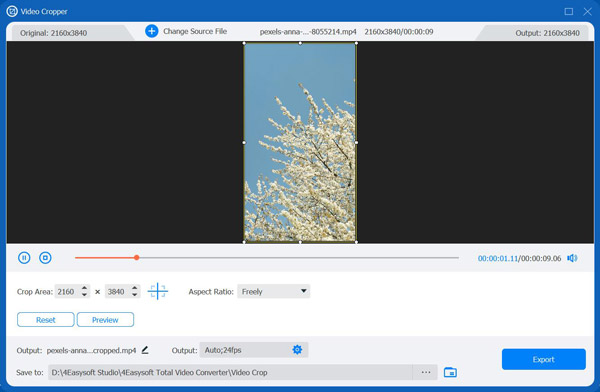
Step 4You can also freely drag the border frame from the area you wish to keep. This will eliminate all areas outside the frame. After that, click "Export" to save the cropped video.
Conclusion
Those are the six methods “DaVinci how to crop video”. You can now cut off black bars around your video or a specific area through these methods. If you find DaVinci Resolve too tricky, use the 4Easysoft Total Video Converter as an alternative. This tool lets you quickly and efficiently crop your video in any area and size! It also offers you options to enhance it before exporting it! So, what are you waiting for? Visit this tool’s official website and install it now.
100% Secure
100% Secure


