Unlock all your iPhone/iPod/iPad by wiping passcode and remove Apple ID completely.
How to Delete Your Apple ID with or Without Password
"I have a new Apple ID and hope to delete the old Apple ID permanently, how can I do that?" Once you get an Apple product, you will be asked to create an Apple ID and password. That can be used to activate your device and access all Apple services available, such as FaceTime, iMessage, iCloud, Find My, App Store, etc. Thus, it’s very important to delete Apple ID when you changed to a new iPhone/iPad. Know more about why and how to delete Apple ID from this article.
Guide List
What Happens When You Delete Your Apple ID What to Do Before Deleting Your Apple ID Detailed Steps to Delete an Apple ID from Old Devices How to Delete an Apple ID on iPhone Without PasswordWhat Happens When You Delete Your Apple ID
It is not difficult to erase an Apple ID, but the action can have far-reaching effects. The main change is that you cannot log in to the Apple ID once it has been deleted.
• Apple removes your account details associated with your Apple login.
• The history of your purchases in the App Store, iTunes, and Apple Pay will be removed permanently.
• Your data in iMessage, iCloud, and FaceTime will be erased too.
• Apple Store appointments and AppleCare support cases will be canceled as well.
• Your subscriptions linked to your account will be automatically canceled at the end of your order, but you cannot access them with your Apple ID.
• After you remove your Apple ID, anyone cannot reactivate it including Apple.
What to Do Before Deleting Your Apple ID
Since your Apple ID is essential to access your purchases, downloads, content, and data on your device, there are some things you should do before deleting your Apple ID. To avoid data loss, you should:
1. Back up your data that is stored and backed up in iCloud to your computer using iTunes/Find.
2. Download the messages and contacts in iMessage and FaceTime to your computer.
3. Cancel activations for the App Store, Apple News+, Apple Fitness+, Apple Arcade, Apple TV+, and Apple Music.
4. Disable Find My.
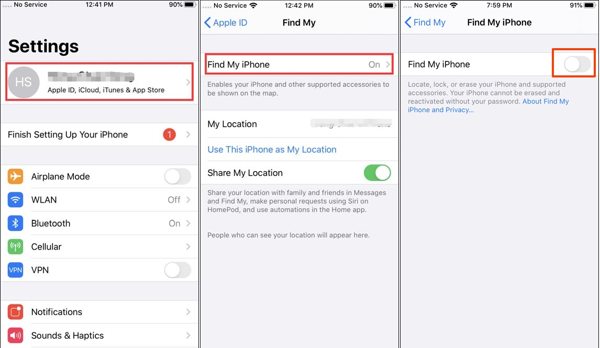
Disable Find My on iOS 13 and above:
Step 1Tap on your name in the “Settings” app.
Step 2Choose “Find My”, tap “Find My iPhone”, and toggle off “Find My iPhone”.
Step 3When prompted, input your Apple ID password, and confirm to turn off Find My iPhone.
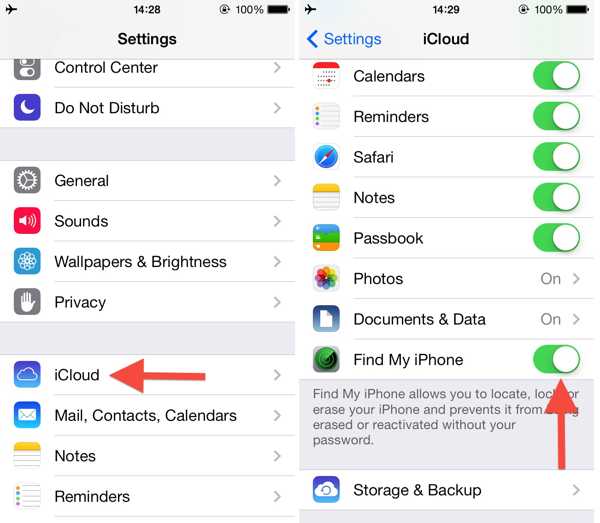
Disable Find My on iOS 12 and earlier:
Step 1Open the “Settings” app, choose “iCloud”, and tap “Find My iPhone”.
Step 2Toggle off “Find My iPhone”.
Step 3 If prompted, enter your Apple ID password and confirm removing your Apple ID from your iPhone.
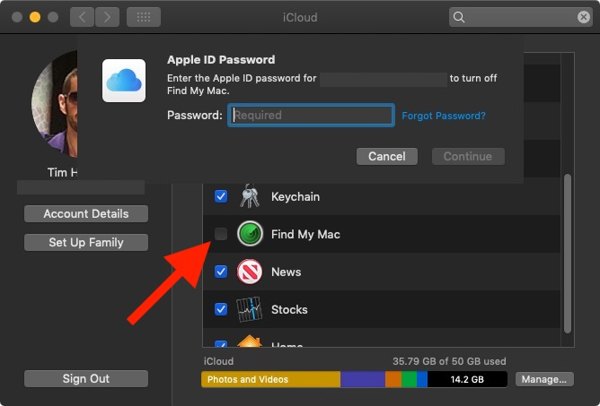
Disable Find My on Mac:
Step 1Go to the “Apple” menu, and choose “System Settings” or “System Preferences”.
Step 2Click your name, choose “iCloud”, and hit “Show All” under “Apps Using iCloud”.
Step 3Uncheck “Find My Mac”, and enter your Apple ID password if prompted. Click “Continue” and confirm it.
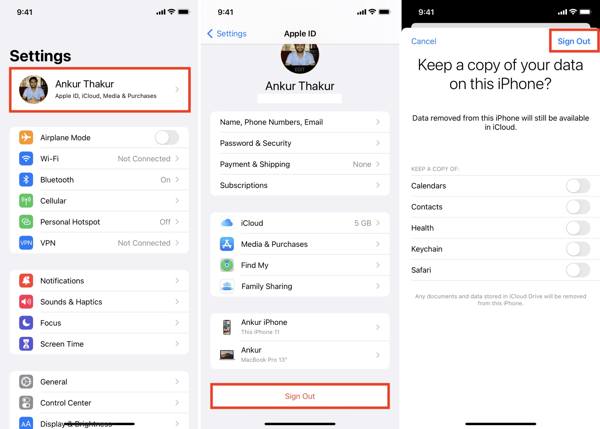
Sign out of iPhone/iPad:
Step 1Tap on your profile in the Settings app.
Step 2If you have disabled Find My iPhone, tap “Sign Out” at the bottom directly. If not, turn off Find My iPhone and move on.
Step 3Select the data types that you wish to keep a copy of, and tap “Sign Out” again.
Sign out of Mac:
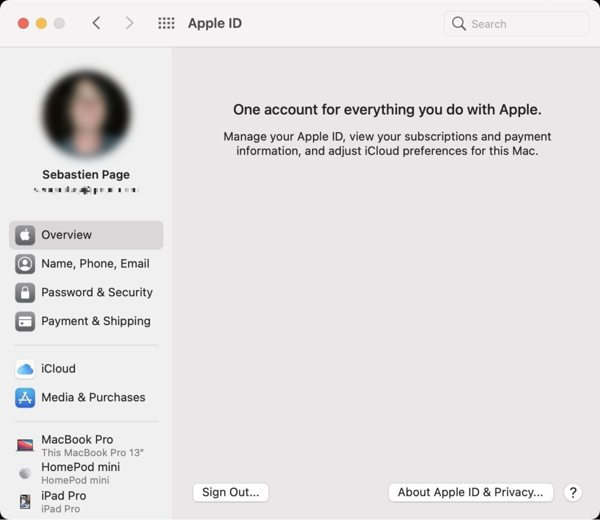
Step 1Head to the “Apple” menu, and choose “System Settings” or “System Preference”.
Step 2Click “Apple ID”, and hit “Overview” on macOS Mojave or later. Or click “iCloud” on macOS High Sierra or older.
Step 3Click the “Sign Out” button.
Step 4Check the desired data types and click “Keep a Copy” if you want to download a copy of iCloud data. Hit “Keep on This Mac” if you want to save the data to your Mac.
Detailed Steps to Delete an Apple ID from Old Devices
Step 1Visit the official iCloud website in a web browser, and sign in to the Apple ID to delete. If you turn on two-factor authentication, input the verification code on your screen.
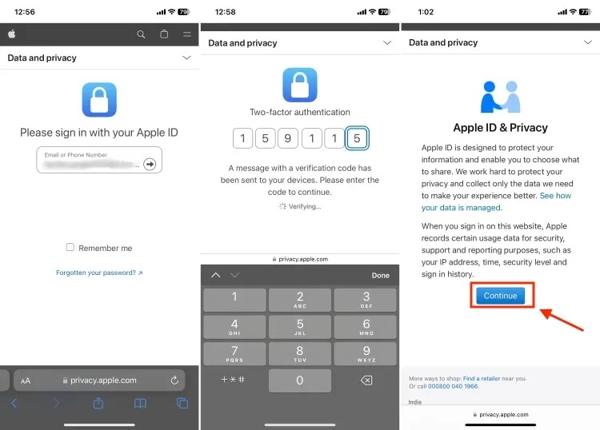
Step 2Click or tap “Continue” to begin deleting your Apple ID. Click or tap the “Request to delete your account” link under “Delete your account”.
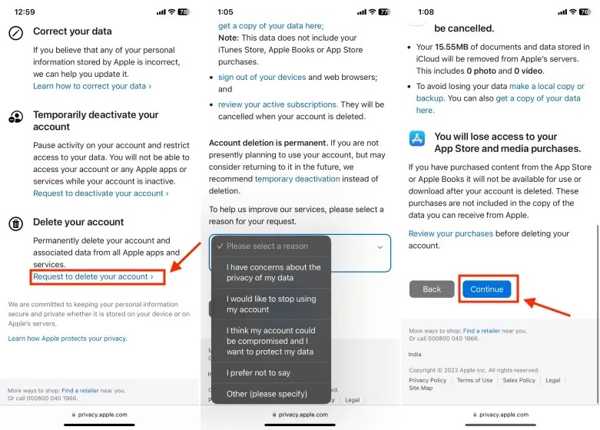
Step 3Choose a reason for Apple ID deletion, and hit “Continue”. Read the disclaimer and click or tap “Continue”.
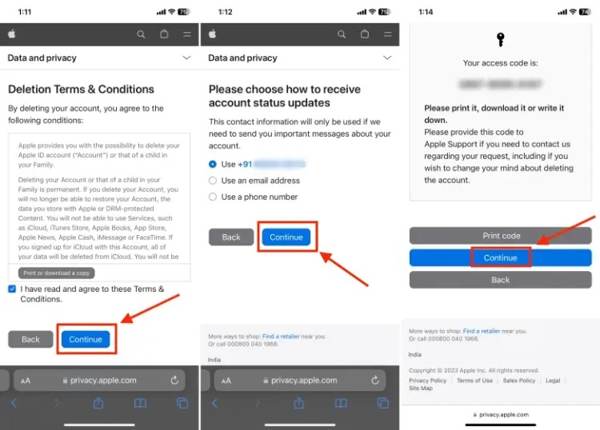
Step 4Check “Agree to the conditions” on the next page, and choose a way to receive account status updates. Tap the “Continue” button to receive an access code.
Step 5Input the access code in the field, and continue to tap “Delete account”. Finally, tap the “Sign out” button to confirm it. It will take seven days to delete your Apple ID permanently.
How to Delete an Apple ID on iPhone Without Password
If you forget your Apple ID password, you cannot delete your Apple ID from your iPhone. Thus, you should rely on 4Easysoft iPhone Unlocker, which can remove the Apple ID of previous owner without password. Moreover, it will guarantee no data loss during the process. In this way, you can easily log in to the Apple account with a new ID.
Erase the Apple ID and its password without password from iOS device.
Support all the latest iPhone and iPad models, including iPhone 16/15.
Remove iCloud Activation Lock and other restrictions like Screen Time.
Only remove the Apple ID without deleting other important data on iPhone.
100% Secure
100% Secure
Here is the process to delete your Apple ID from your iPhone without a password:
Step 1Run the best Apple ID removal tool after installing it on your computer, and choose “Remove Apple ID”. Connect your iPhone to the same machine with a Lightning cable.
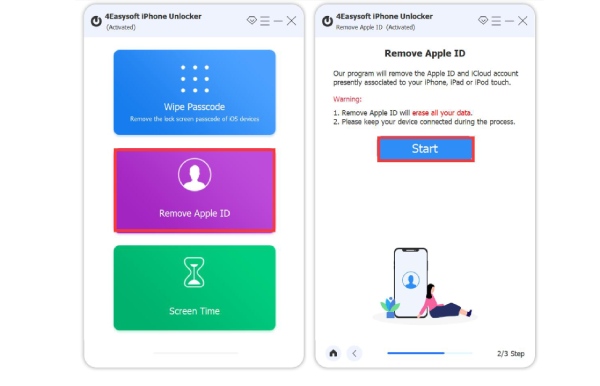
Step 2Click the “Start” button, and the software will delete your Apple ID immediately if Find My is disabled. If not, you will face two situations:
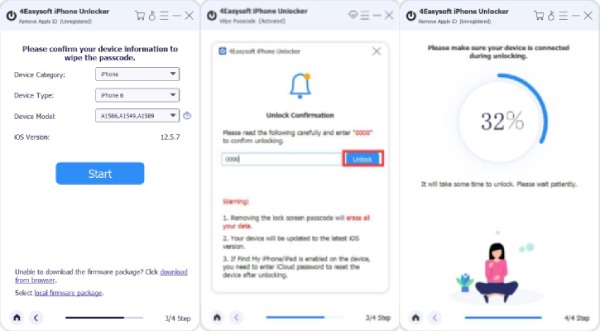
On iOS 11.3 or earlier, reset all settings on your iPhone and the software will do the rest of the job.
On iOS 11.4 or above, enable two-factor authentication. Input “0000”, confirm your iPhone information, and click “Start” to download the firmware. Next, enter “0000” and click “Unlock”.
Conclusion
This guide explained how to delete an Apple ID permanently. You need the password to delete your account on the web. However, it is possible to erase the old Apple ID and password from an iPhone or iPad using 4Easysoft iPhone Unlocker. If you have other questions or suggestions, please contact us.
100% Secure
100% Secure


