Backup all iOS data on Windows/Mac and restore them to other devices easily.
DFU Mode iPhone: How to Restore iPhone with/without Using It?
The Put iPhone in DFU Mode or the Device Firmware Update is a state that can help your iOS device work properly as it fixes issues in the firmware and software. It is much like the Recovery Mode but more of a comprehensive approach. However, what can it do exactly? Except for the fact that it can put your device into properly, it can be tricky, so when putting DFU Mode iPhone, do it at your own risk. Fortunately, this post will walk you through of restoring iPhones with or without DFU Mode. Check it out now!
Guide List
Part 1: What is DFU Mode on iPhone and How to Use it to Restore? Part 2: The Best Way to Restore iPhone without DFU Mode [No Data Loss] Part 3: FAQs about the DFU Mode on iPhone 16Part 1: What is DFU Mode on iPhone and How to Use it to Restore?
When encountering issues on your iPhone, and every solution you tried cannot solve the problem, you might need the approach of DFU Mode iPhone.The Recovery Mode is what people mostly use when encountering issues, and they use the DFU Mode when necessary. This is clearly the last resort in mind to fix issues on iPhone when nothing else works. Besides working on iPhones, it works well on any model of iPad and iPod.
Putting your iPhone in DFU Mode will resolve simple and even complex issues on your device. It allows the device to be back in the proper place by working and communicating with iTunes and Finder. Although it is not difficult to enter this mode, as mentioned earlier, it will restore your device, which can be a little tricky. Before knowing how to enter DFU Mode, learn first in what situation you will be required to use it.
- Go for the DFU Mode iPhone if you wish to downgrade the updated version of the iOS running on your device.
- If you want to remove an expired beta version of iOS, put your device in DFU Mode.
- Use DFU Mode iPhone if you want to jailbreak or un-jailbreak your device.
- Lastly, DFU Mode can help fix your iPhone that won’t start and is stuck in the Apple logo.
Ensure to make a backup of your device on a PC or iCloud before taking this approach. Furthermore, please don’t use it when iPhone is damaged because of water. Once ready, follow along with the complete guide below on how to enter DFU Mode, depending on your iPhone model.
How to Put an iPhone Into DFU Mode For 15, 14, 13, 12, 11, X, 8, and SE:
Step 1Make use of USB cable to link your iPhone to Mac or Windows PC. Press and quickly release the "Volume Up" button and do it again with the "Volume Down" button.
Step 2After that, press and keep holding the "Side" or "Power" button for at least 10 seconds until the screen goes black. Keep on holding and press the "Volume Down" for 5 seconds.
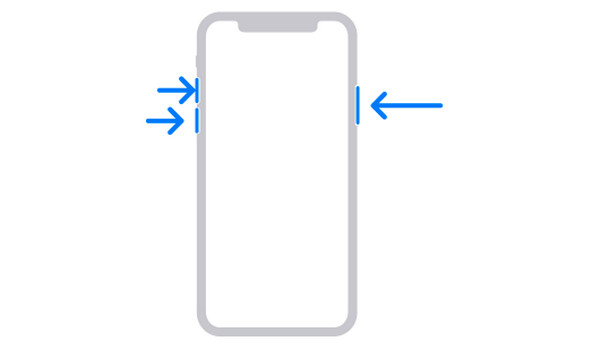
Step 3Release the "Side" button but still keep the "Volume Down" on hold for another 10 seconds.
Step 4On your PC screen, when the pop-up in "Finder" or "iTunes" says, Mac has detected an iPhone in DFU Recovery Mode. Click "OK", then "Restore iPhone".
If you see your iPhone restarts, you didn't follow the guide correctly, so ensure to read it carefully and follow the process.
How to Put an iPhone Into DFU Mode For 7 and 7 Plus:
Step 1Just like what you did on iPhone models that don't have the Home button, connect your iPhone via USB cable as well to Mac or Windows PC.
Step 2Press and hold your iPhone's "Power" button for 3 seconds. It goes the same with the "Volume Down" button while holding the "Power".
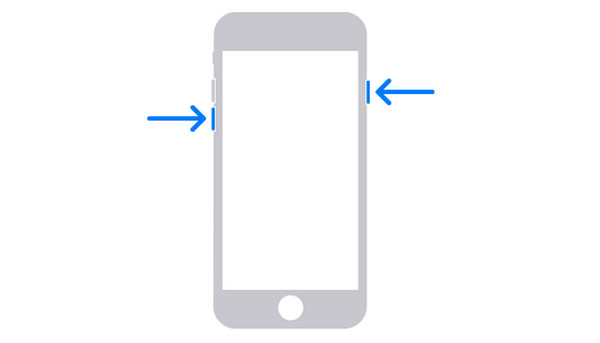
Take note that both buttons should be held for at least 10 secs. And if the Apple logo appears on the screen, you hold them for too long, and it turns out unsuccessful.
Step 3Release your holding for the "Power" button but keep the "Volume Down" on hold for 5 seconds more.
Step 4You will know your iPhone has entered "DFU Mode" if iTunes or Fidner alerts you, saying that they detect your iPhone. Finally, click "Restore iPhone".
How to Put an iPhone Into DFU Mode For 6s and Earlier Models:
Step 1Connect your iPhone to Mac or Windows PC using a USB cable. Press then keep on holding the "Power" button for 3 seconds.
Step 2Afterward, press and hold the "Home" button of your iPhone while still holding the "Power" button.
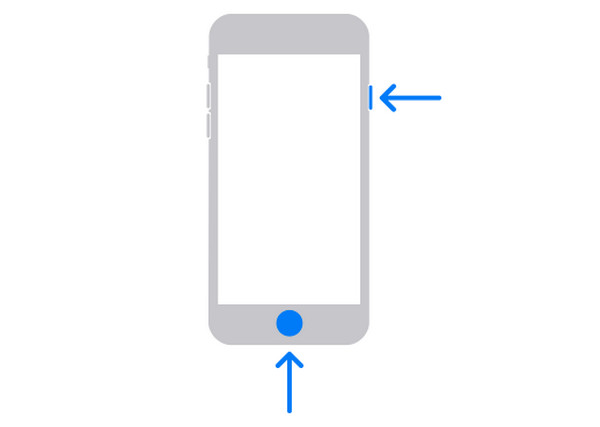
For 10 seconds, keep holding both buttons and don’t wait for the Apple logo to appear since it means that the process of putting on DFU Mode is unsuccessful.
Step 3Release after 10 seconds, but still hold the "Home" button for 5 seconds more until your iPhone screen turns black, which means you entered "DFU Mode".
Step 4iTunes or Finder will also alert you if you have successfully entered the DFU modeon iPhone; click the "Restore iPhone" button.
Part 2: The Best Way to Restore iPhone without DFU Mode [No Data Loss]
As said, doing DFU Mode iPhone is a little tricky since you need to restore the system when you come out, then it might delete all your data on iPhone. So, how can you restore your iPhone without entering DFU mode? Do it conveniently and safely with 4Easysoft iOS Data Backup and Restore. The software has the capability of backing up and restoring data of iOS devices, not just iPhones, but iPad and iPods as well. This program gets the job done at a high success rate, with no quality drop and no data affected. Furthermore, it safely detects all problems on your iPhone and recovers lost files in many situations, such as forgotten passwords, system crashes, device stuck, and more.
iOS Data Backup and Restore serve users a high success rate and no data loss.
Support recovering lost data, such as messages, photos, contacts, apps, etc.
Provide a preview of all data and backup selected from your iPhone.
Assist all Phone, iPad, and iPod models and versions, including the latest release.
100% Secure
100% Secure
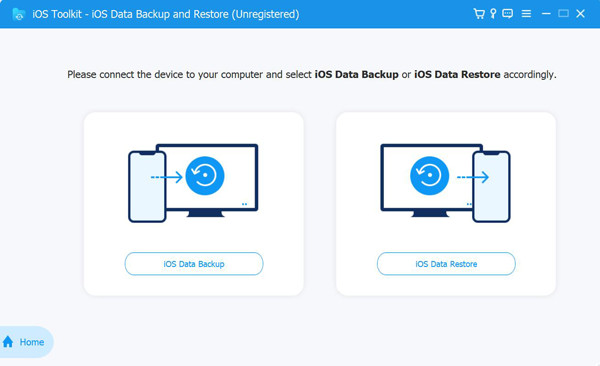
Step 1First, free download and open the program 4Easysoft iOS Data Backup and Restore.
Connect your iPhone to Windows PC or Mac via a USB cable, then go for the iOS Data Restore, among any other.
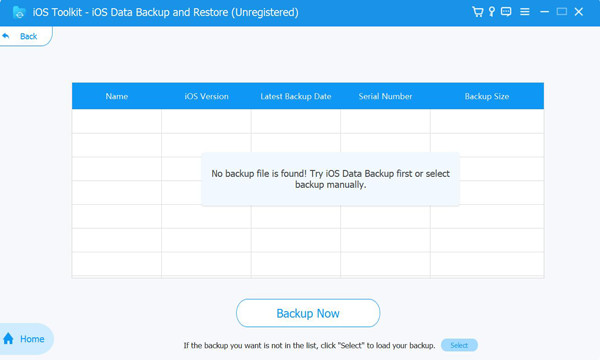
Step 2Once your device is detected, you can view all backups you have made alongside the information about your device, size, and time.
Step 3Select the desired backup, then click "View Now" to browse in detail. After that, pick the data you wish to restore.
Part 3: FAQs about the DFU Mode on iPhone 16
-
How to quit the DFU Mode iPhone?
To exit DFU Mode, force restart your device, and this is done depending on what iPhone model you do have. For iPhone 6S, iPhone SE, and earlier, hold the Home and Power buttons. For iPhone 7 and Plus, press and keep holding the Power and Volume Down buttons. Meanwhile, press the Volume Up and Volume Down for iPhones with no Home buttons and iPhone 8, then hold the Power button.
-
Does entering DFU Mode delete iPhone data?
Yes. It completely removes data from your iPhone since you will have to reset your device after this mode. Ensure to back up all files before entering DFU Mode.
-
Is DFU Mode the same as Recovery Mode?
The DFU Mode is much deeper than Recovery Mode. Using Recovery Mode represents the way to put iPhone to be open again since it stopped working due to an issue. Meanwhile, DFU Mode is built to fix issues in the iPhone's firmware and software.
-
Does putting DFU Mode iPhone update iOS?
It can be used to downgrade and upgrade the iOS version with the help of Finder on Mac and iTunes on Windows PC.
-
How does entering DFU Mode harm iPhone?
Although it is necessary to fix some issues, it includes the risk of harming your device's hardware. If you wish to downgrade the OS or jailbreak your device, DFU Mode can harm it and violate warranty benefits.
Conclusion
Indeed, DFU Mode iPhone has the best chance of fixing problematic iPhones. However, this is the last option if nothing else works; restoring iPhone in DFU Mode has certain drawbacks, like the possibility of losing all iPhone data or worse than that. So, for a fast and high success rate of restoring an iPhone without the need to enter DFU Mode, use the
4Easysoft iOS Data Backup and Restore. With the iOS Data Backup and Restore feature, you can quickly restore your device and recover lost files using other powerful features.
100% Secure
100% Secure


