How to Rip All DVD to USB for Easy Carrier and Playback
As someone who collects DVDs, you have probably come to the point of thinking of moving DVDs’ videos to other storage, like copying DVD to USB device. You might want to do that to avoid losing them due to scratches/damage, save more space (if you use DVDs as storage), or to easy playback. Well, whatever the reason might be, the best option you can do is to rip the DVD to USB! How will you do that? Then continue reading this post, which features 3 easy ways to rip DVDs to USB.
Guide List
2 Ways to Rip Home-made DVDs to USB [No Copy Protection] Best Way to Rip All Kinds of DVDs (Commercial Included) to USB How to Transfer DVD to USB Drive without Computer FAQs about How to Copy DVD to USB DriveBeside the normal digital formats, USB drive also support ISO, VOB, and other raw files from DVD disc.
2 Ways to Rip Home-made DVDs to USB [No Copy Protection]
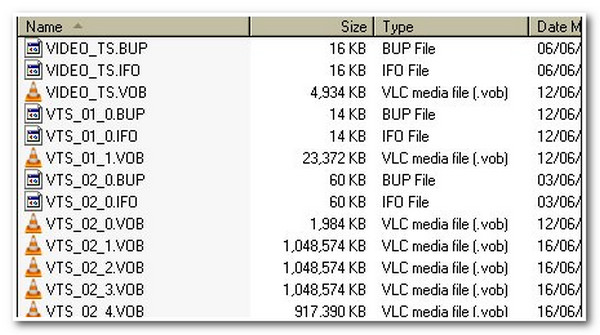
Method 1: Directly Copy DVD to USB Drive:
The task of ripping DVDs to USB is an easy thing to do. You can copy it directly on the DVD and then paste it on your USB flash drive. However, there are a few limitations you need to consider before doing this method. Here is the list of limitations for this method.
- Directly copying DVDs to USB can only be performed with non-protected DVDs. Most DVDs are protected with different copy-protected schemes, hindering you from copying DVD videos to other storage.
- Once you have copied DVD videos, whether on a DVD folder, ISO image, VOB videos, etc., expect that you experience incompatibility issues playing those videos.
- Directly copying a DVD to a USB requires enough space to hold the DVD’s video. Usually, DVD videos come with a massive file size. In that case, you must ensure your USB has enough space to store them.
Step 1Insert the DVD you wish to rip/copy the content to your computer’s disk drive. Then, plug in your USB drive to your computer’s USB port.
Step 2Next, double-click the DVD drive, and from the list, copy and paste all the content and files you wish to transfer. Then, head to the USB drive and paste the copied contents.
Method 2: How to Rip DVD to USB with Handbrake
Handbrake is also a free way to copy DVDs to USB on Windows/Mac. Though this open-source DVD ripper offers features to rip DVDs, it can only deal with home-made DVDs without copy protection, unless you also install libdvdcss plugin. Moreover, Handbrake exports low-quality content and few formats, like MP4, WebM, etc. So, how do you rip a DVD to a USB using a Handbrake? Here are the steps you should follow:
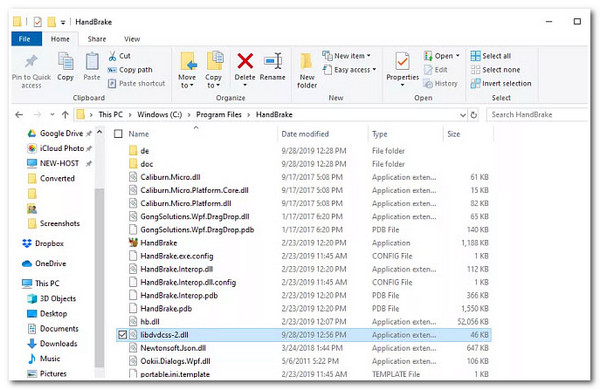
Step 1Download and install the "Handbrake" tool and "libdvdcss" file on your computer. Once you have downloaded the file, move it to the installation folder of Handbrake. Next, launch the Handbrake, insert the DVD into your computer’s disc driver, and plug in your USB drive.
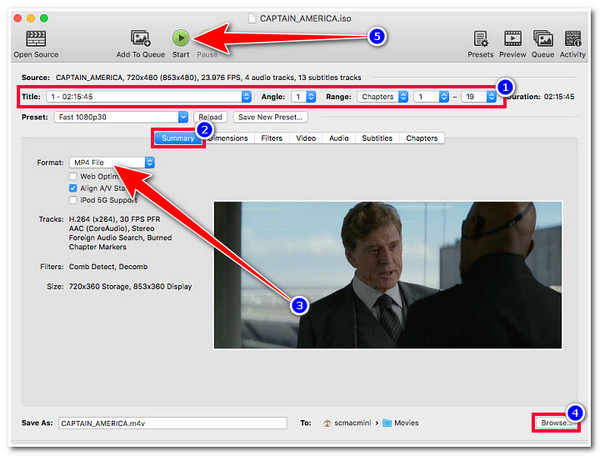
Step 2Next, wait for the tool to load the "DVD" under its "Source Selection" section and scan all the DVD titles stored on it. Once done, select which Title, Angle, and Chapter you wish to move to USB.
Step 3Afterward, head to the "Summary" tab to choose a specific "format" where you want to export the ripped content. Then, tick the "Browse" button and select the "USB drive" location. Next, tick the "Start" button to initiate the ripping and transferring process.
Best Way to Rip All Kinds of DVDs (Commercial Included) to USB
The first tool you can use to rip/copy DVDs to USB is the professional 4Easysoft DVD Ripper. Unlike other DVD ripper tools, this tool is integrated with GPU-accelerated technology that rips DVD content with a 60X faster speed ripping process. Moreover, it is also equipped with a multi-core processor that provides a smooth and flawless process. Furthermore, despite having that ripping speed, it doesn’t compromise the original quality of the DVD content. Apart from that, it also provides you an option to transfer the ripped content to your USB flash drive directly.
Rip unprotected and copy-protected DVDs/ISO/DVD Folder without restrictions.
Support 600+ media and device preset formats to convert the DVD content.
Compress the video size of the DVD content while preserving its original quality.
Offer video editing options, including adding subtitles, filters, effects, etc.
100% Secure
100% Secure
How to Rip/Copy DVD to USB Using 4Easysoft DVD Ripper:
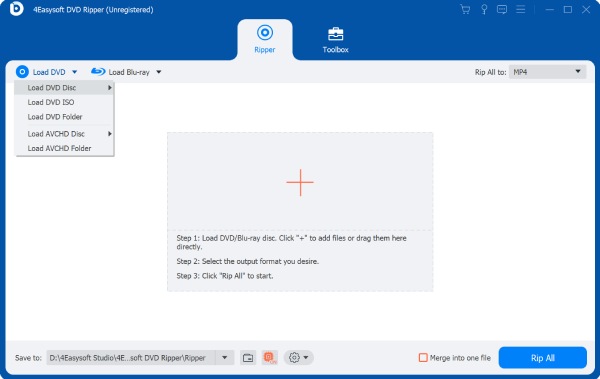
Step 1Launch 4Easysoft DVD Ripper, insert the DVD into your computer’s disk driver, and plug in your USB flash drive. After that, click the "Load DVD" dropdown button and select the "Load DVD Disc" option.
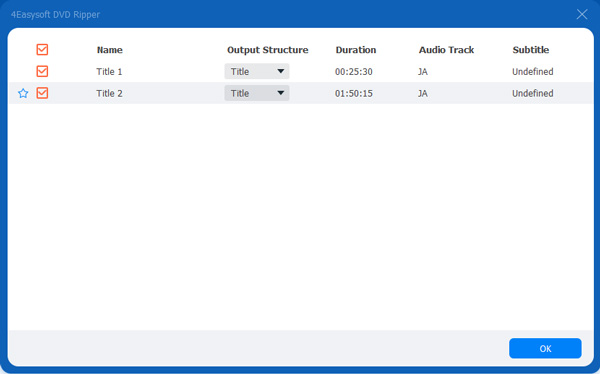
Step 2Next, once the tool is done loading your disc, tick the "Full Title List" button. Then, select all the titles you wish to copy/rip to USB from the list of titles. After that, click the "OK" button.
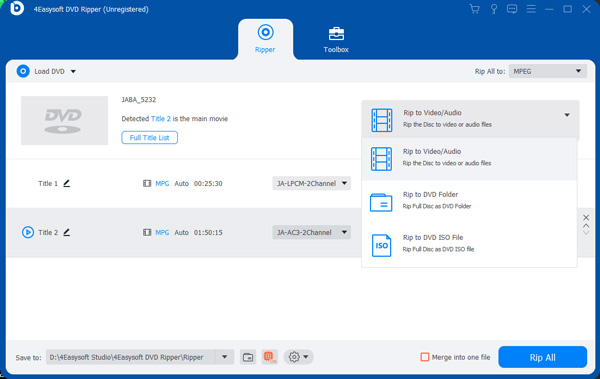
Step 3Then, tick the "Rip All to" dropdown button at the upper right corner and select the "Rip to Video/Audio" option. Next, select the "Video" tab and choose a format you want to save your video. You can also tweak its output by accessing the "Custom Profile" section.
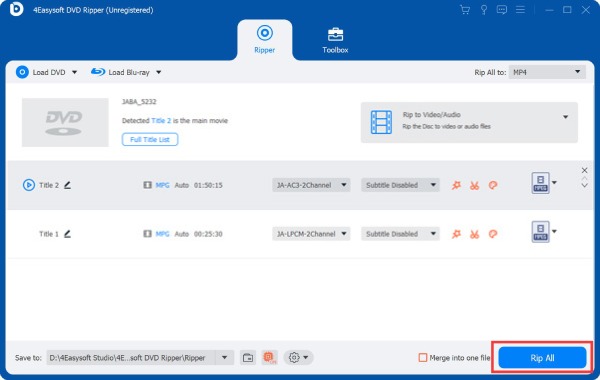
Step 4Once you finish the above setup, click the "Open output folder" below, and select the USB drive. Then, click the "Rip All" button at the lower right corner to initiate the ripping process. And that’s it! That’s how you use this tool to rip/copy DVDs to USB.
How to Transfer DVD to USB Drive without Computer
If you don't have computer right now, you can also rely on some third-party services to transfer DVD to USB. Read the following introductions to them, and bring your DVD disc to the desired store near by you.
| Service | Price | Supported Disc | What You Get | Time Spent |
| Walmart Photo | $12.96 for the first 30 minutes digital copy, with extra $5.46 per 30 min and $12.96 for more USB | YesDVD, Walmart DVD, DVD, VCD, CVCD | USB or digital copy on cloud (expire in 60 days) | 3-4 weeks |
| YesVideo | $32.99 per 90 minutes and extra $16.49/USB | YesDVD, CVS YesDVD, DVD, CD, VCD | USB & digital copy only (expire in 60 days) | Less than 1 month |
| CVS Photo | $34.99 per 90 minutes; $18.99 for extra USB | YesDVD, CVS YesDVD, DVD, CD, VCD, MiniDVD | USB or digital copy only (expire in 60 days) | About 3 weeks |
| Forever Studios | $15/DVD digitalizing with $29/USB | YesDVD, CVS YesDVD, DVD, CD, VCD, MiniDVD | Forever USB or digital copy | About 1 month |
FAQs about How to Copy DVD to USB Drive
-
How long does Handbrake rip a DVD to USB?
Usually, Handbrake takes 30 to 50 minutes of ripping a DVD content. It also goes beyond 50 minutes, depending on the size and quality of the video.
-
Can I use Handbrake to rip DVDs without using the libdvdcss file?
If you are ripping an unprotected DVD, you can use Handbrake without needing a libdvdcss file. But, if you want to rip a protected DVD, you must use a libdvdcss file to make it happen.
-
How do I identify if my DVD is protected?
To identify whether your DVD is copy-protected, you can look at its physical disc and check whether there’s a copy-protected icon imprinted on it. Another way you can do this is to use a third-party tool. Most of them can read whether your DVD is copy-protected or not.
Conclusion
There you have it! Those are the 3 efficient ways to rip DVDs to USB! With these 3 ways, you can now transfer all the contents from your DVDs and achieve your purpose of doing it. If your DVD is copy-protected and you want to copy its high-quality content, then you can use the 4Easysoft DVD Ripper tool! This tool can handle different DVD restrictions. It can also rip its contents quickly, efficiently, with high quality, and without restrictions! To discover more about this tool, visit its official website today!


