Transfiera y administre todos los datos entre dispositivos iOS, dispositivo y computadora, e iTunes y dispositivos.

Guía 2024: Cómo transferir fotos desde el iPhone a una unidad flash

publicado por paula pailaga a Transferencia de iOS 12 de octubre de 2024
Si bien tu iPhone tiene una forma de almacenar tus recuerdos capturados, siempre es una buena idea tener una copia de seguridad, como compartir estas fotos en una unidad flash. Transferir fotos desde el iPhone a la unidad flash no solo libera espacio de almacenamiento valioso en tu dispositivo, sino que también te permite tener una copia de seguridad tangible a la que puedes acceder y almacenar fácilmente. Por lo tanto, en la guía de hoy, aprenderás las cuatro formas de transferir fotos desde el iPhone a la unidad flash, cada una con pasos detallados.
Lista de guías
Método 1: forma rápida de transferir fotos del iPhone a una unidad USB Método 2: transferir fotos desde el iPhone a la unidad flash a través de Fotos de iCloud Método 3: Método integrado para transferir fotos con la aplicación Fotos en Windows Método 4: Utilizar la captura de imágenes para transferir fotos del iPhone a USB en MacMétodo 1: forma rápida de transferir fotos del iPhone a una unidad USB
Como las herramientas de transferencia de fotografías han avanzado tanto hoy en día, uno de los programas que se destaca como una solución integral y eficiente para manejar los medios de su iPhone es el Transferencia de iPhone 4EasysoftCon este software, puede transferir rápidamente fotos desde su iPhone a una unidad USB, lo que reduce el riesgo de pérdida de datos. También tiene la función de seleccionar fotos individualmente antes de transferirlas, lo que le permite elegir solo las imágenes que desea tener en su unidad USB. Independientemente de lo extensa que sea su colección de fotos, el programa está optimizado para la transferencia a alta velocidad, por lo que puede manejar bibliotecas de fotos extensas con rapidez. No es necesario ser un experto en tecnología, ya que cualquiera puede navegar por el software rápidamente con su diseño limpio y controles sencillos.
Le permite transferir datos de iOS entre computadoras y dispositivos Apple.
Cubre una variedad de tipos de medios, incluidas fotos, videos, música y más.
Tiene una ventana de vista previa para verificar el medio seleccionado para transferir primero.
Le permite administrar y editar datos, como fotos, música, contactos, etc.
100% seguro
100% seguro
Paso 1Ejecute el Transferencia de iPhone 4Easysoft en la pantalla. Conecte su iPhone a su PC mediante un cable USB. Si es necesario, toque el botón "Confiar" en la notificación que aparece en su iPhone y, después de un tiempo, verá la información de su iPhone en la pantalla principal.
Paso 2Vaya a "Fotos" a la izquierda y seleccione las que desea transferir. Antes de continuar con los pasos que aparecen en pantalla, inserte su unidad USB y determine su carpeta.

Paso 3En el programa, haz clic en "Exportar a PC" para transferir las imágenes seleccionadas. Busca la carpeta de la unidad USB en la ventana y selecciónala como destino. Una vez hecho esto, haz clic en "Seleccionar carpeta". ¡Así de fácil fue transferir fotos desde el iPhone a la unidad flash!

Método 2: transferir fotos desde el iPhone a la unidad flash a través de Fotos de iCloud
Para los iPhone, Apple tiene una solución basada en la nube diseñada para todos los usuarios: Fotos de iCloud. Al aplicar el enfoque de Fotos de iCloud, puede acceder rápidamente a toda su biblioteca de fotos desde cualquier dispositivo conectado a su cuenta sin conexión y asegurarse de que sus recuerdos más preciados estén respaldados de manera segura. A continuación, se explica cómo transferir fotos desde el iPhone a una unidad flash con Fotos de iCloud.
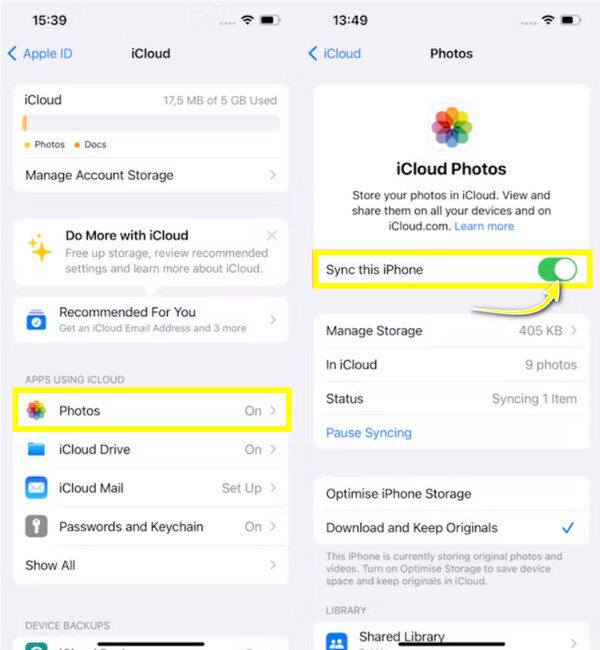
Paso 1En tu iPhone, abre la aplicación Configuración, toca tu nombre en la parte superior, luego ingresa a "iCloud" y luego dirígete a la sección "Fotos". Asegúrate de que el botón de cambio de "Fotos de iCloud" esté activado.
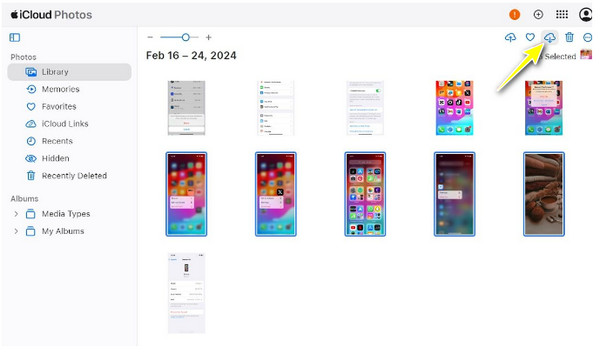
Paso 2Adquiera cualquier dispositivo y luego abra el sitio web de iCloud en un navegador con su ID de Apple iniciada sesión. A continuación, vaya inmediatamente a "Fotos" para ver su biblioteca de fotos de iCloud.
Paso 3Desde esta página, seleccione las fotos individuales que desea guardar en una unidad flash. Una vez que lo haya hecho, guárdelas haciendo clic en el botón "Descargar".
Etapa 4Prepara tu pendrive e introdúcelo en el puerto USB de la computadora. Busca las fotos descargadas desde tu iPhone; si están en un archivo ZIP, extráelas primero.
Más tarde, si están listos, arrastre y suelte las imágenes en la carpeta de la unidad flash para transferir fotos desde el iPhone a la unidad flash.
Método 3: Método integrado para transferir fotos con la aplicación Fotos en Windows
En cuanto a este método, la aplicación Fotos es una herramienta potente para editar, administrar y compartir tus colecciones. Con funciones como creación automática de álbumes, herramientas de edición e integración sencilla con el sistema de tu PC, la aplicación es una de las formas ideales de transferir fotos desde el iPhone a una unidad flash. Así que, sin más dilación, ¡sigue los pasos a continuación para comenzar!
Paso 1En primer lugar, establece una conexión entre tu iPhone y tu ordenador mediante un cable USB. A continuación, asegúrate de seleccionar "Confiar en este ordenador" en la notificación que aparece en tu iPhone.
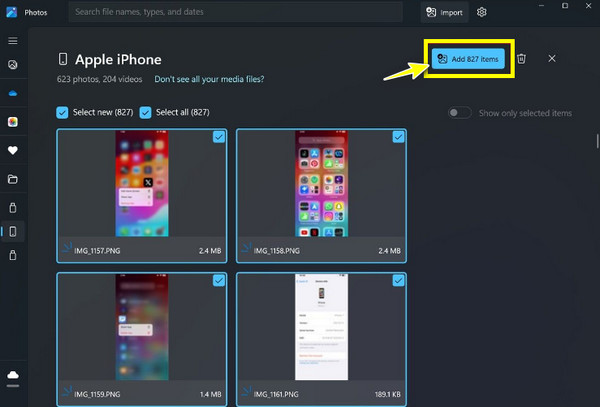
Paso 2Abra la aplicación Fotos y cargue las fotos de su iPhone haciendo clic en “Importar” y eligiendo “Apple iPhone” u otras opciones similares a USB.

Paso 3Una vez que se muestran todas las fotos, puedes revisarlas y seleccionar las que deseas transferir. A continuación, haz clic en "Agregar [número] elementos" para comenzar el proceso.
Cree una carpeta o déjelas guardar en la carpeta “Imágenes” automáticamente; haga clic en “Importar” para continuar.
Etapa 4Prepara tu unidad flash en tu PC y luego ve a su carpeta inmediatamente. Luego, muévete a la carpeta donde se guardaron las imágenes importadas. Allí, puedes seleccionar las imágenes, presionar "Ctrl + C" para copiar, ir a la carpeta de la unidad flash, hacer clic derecho en cualquier lugar y luego "Pegar".
Método 4: Utilizar la captura de imágenes para transferir fotos del iPhone a USB en Mac
Mientras tanto, Image Capture es una utilidad versátil y a menudo pasada por alto en los sistemas macOS. Proporciona una interfaz sencilla, por lo que transferir archivos multimedia desde iPhones, escáneres y cámaras digitales será muy fácil. A diferencia de otras aplicaciones, Image Capture tiene control directo sobre el proceso de importación, en el que puedes especificar con precisión dónde quieres guardar tus archivos, lo que la convierte en la herramienta perfecta para que los usuarios de Mac transfieran fotos desde el iPhone a una unidad flash. A continuación, te indicamos cómo puedes lograrlo:
Paso 1Consigue el cable USB y úsalo para conectar tu iPhone a tu Mac. Si se te solicita, asegúrate de seleccionar "Confiar en esta computadora" en tu iPhone.
Paso 2En Captura de imagen, haga clic en su iPhone en la lista "Dispositivos" en el lado izquierdo; luego se mostrarán todas las fotos disponibles para importar.
Paso 3Inserte ahora su unidad USB en su Mac. Luego, en la parte inferior, haga clic en "Importar a" y elija "Otro". Aquí, determine la carpeta de la unidad USB como destino para sus fotos. Haga clic en "Elegir" para confirmar la ubicación.

Etapa 4Regresa a la ventana principal de Image Capture, explora tu biblioteca de fotos, selecciona las fotos que deseas importar o haz clic en "Seleccionar todo" para importar todo. Una vez que estés de acuerdo, haz clic en "Descargar" o "Descargar todo" en la parte inferior derecha para transferir fotos desde el iPhone a la unidad flash.
Conclusión
Ya sea que quieras usar Fotos de iCloud o Captura de imágenes en Mac, existe un método perfecto para transferir fotos desde el iPhone a una unidad flash. Hoy en día, puedes ver que hacerlo es una forma práctica de hacer una copia de seguridad de tus recuerdos más preciados y liberar espacio de almacenamiento en tu iPhone. Entre los métodos que se analizaron, si buscas una solución rápida y sencilla, Transferencia de iPhone 4Easysoft ¡Sigue siendo el mejor! Además de simplificar el proceso de transferencia de fotos desde el iPhone a la unidad flash, tiene una gran velocidad de transferencia y amplias funciones de gestión de medios. Con ellas, puedes tener una forma eficiente de proteger tus recuerdos y mantener tu colección organizada.
100% seguro
100% seguro