Convert, edit, and compress videos/audios in 1000+ formats with high quality.
How to Add Keyframes to Video? 3 Workable Ways You Should Do
Have you struggled to make your video’s applied text or image animate according to your preferences? Well, you definitely haven’t tried adding Keyframes, which can provide a flow of changes over a certain amount of time to the text or image. Don’t know how to add KeyFrames? Don’t worry! In this post, you will discover 3 easy ways how to add Keyframes to your video to make your applied text, images, effects, etc., animate accordingly! Start diving below!
Guide List
Detailed Steps on How to Add and Edit Keyframes in After Effects How to Add Keyframe to Videos with Premiere Pro The Best Alternative to Add Preset Transitions to Videos FAQs about How to Add Keyframes to Videos on Windows/MacDetailed Steps on How to Add and Edit Keyframes in After Effects
The first option you can do to add Keyframes to your video is by using After Effects. After Effects is a well-known motion graphics and compositing editor that is usually used to create animations for videos, and this is made achievable by using Keyframes. Through this Keyframes option by the editor, you can control specific points in time where changes occur. Additionally, Keyframes in this editor allows you to choose whether to change the effect’s position, scale, or rotation. Now, how to add Keyframes in After Effects? Here are the steps you need to go after:
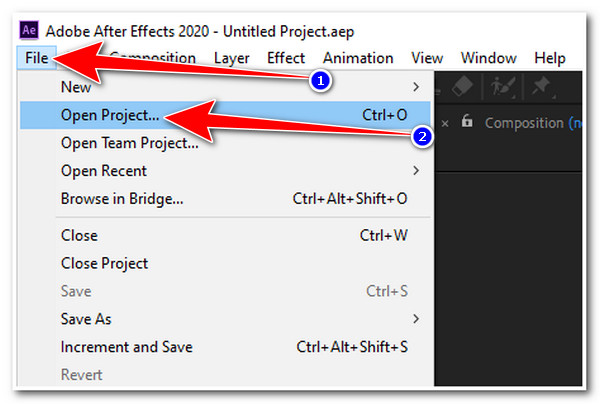
Step 1Launch "Adobe After Effects" on your computer. After that, if you want to animate an existing file, click the "File" tab, select the "Open Project" option, and tick the video you want to animate.
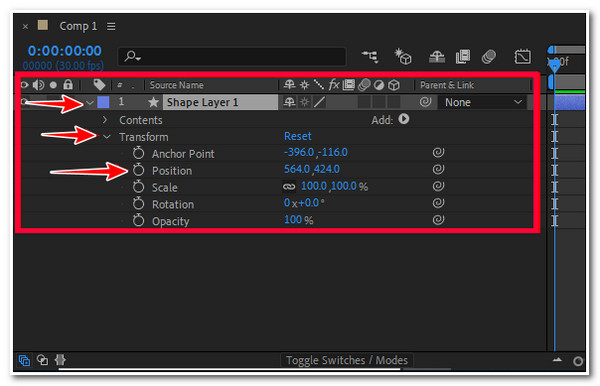
Step 2Then, in the lower left corner, you’ll see your imported file’s "Layers." Any object present in your file will be given a layer. Select the layer’s "Dropdown" button that you want to add Keyframes. Then, click the "Transform" dropdown menu to access all the Keyframes.
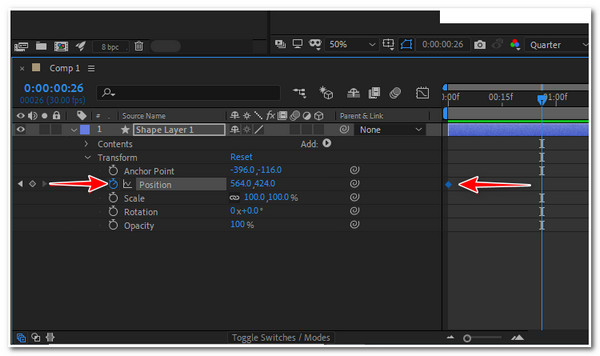
Step 3Now, to animate a shape by giving it a movement (moving from left to right), select the "Stopwatch" icon of the "Position" option. Then, a "Small Blue Diamond" will appear on the editor’s timeline. This blue diamond indicates that a Keyframe has been successfully added.
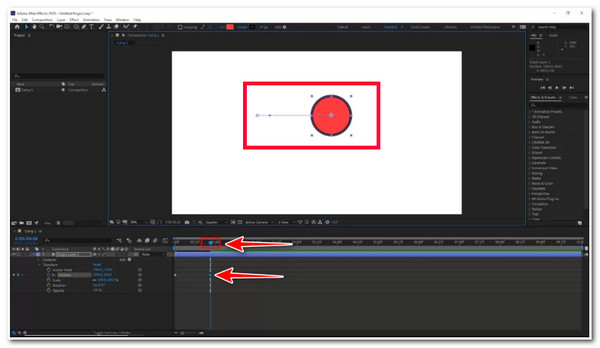
Step 4Next, move the "Current Time Indicator (CTI) or Playhead" icon to the part where you want to end the effect. You also need to move the object after moving the Playhead. Then, a Keyframe will automatically be added, indicating the effect’s endpoint. You can also edit the value of this Keyframe if you want to. You can play it to see how it works.
How to Add Keyframe to Videos with Premiere Pro
Otherwise, using Premier Pro, you can also animate your video’s elements using its built-in Keyframes option. Like After Effects, Premiere Pro enables users to animate a particular object to their video by adding Keyframes. It supports changing the video’s attributes, such as its Position, Rotation, Opacity, etc. So, how to add keyframes to Premiere Pro? Here are the steps you must follow:
Step 1Open Premiere Pro on your computer and import the video you want to add Keyframe animation. After that, click the "Effects Controls" tab, and you’ll see all the Keyframes on the left side of your screen.
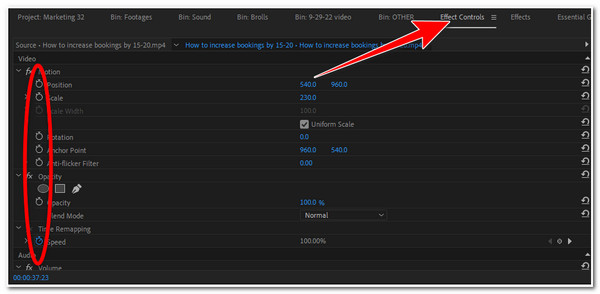
Step 2Then, to add a Keyframe, begin with the area you want to start a Keyframe. After that, tick the "Stopwatch" icon of your preferred Keyframe option. Like After Effects, you can add another Keyframe as an endpoint of your chosen effect.

The Best Alternative to Add Preset Transitions to Videos
Now that you have the basic knowledge of what is Keyframes and how to access and use them in After Effects and Premiere Pro, it’s time for you to explore them more deeply to master them efficiently. As you have noticed, by using Keyframes, you’re not just adding an animation to your video, but it also creates nice transitions. However, using those Adobe products to create transitions or animations is quite complex if you only work with a simple video.
Thankfully, the 4Easysoft Total Video Converter has what it takes to provide you with many preset transitions that will surely bring jaw-dropping animations to your video! This tool is integrated with an MV Maker feature that supports a library of Themes. Each of these Themes is equipped with different transitions and graphical animations automatically applied to your video or photo slideshow. This tool is much more impressive because it is also rich with video customization options that you can use to redefine your video!

Integrated with various Video Editing features, such as video Rotator, Cropper, Trimmer, Add Effects, Filters, Watermark, etc.
Equipped with AI-driven Video Enhancer that you can use to Upscale Resolution, Reduce Noise, Shakiness, etc.
Support Video Tweaking options that you can use to alter your video’s Resolution, Quality, Frame Rate, etc.
Offer various High-Quality video formats, such as MOV, AVI, MP4, etc., to export your output.
100% Secure
100% Secure
Steps to Add Preset Transitions to Video Using 4Easysoft Total Video Converter as an Alternative Way for Adding Keyframes in After Effects and Premiere Pro:
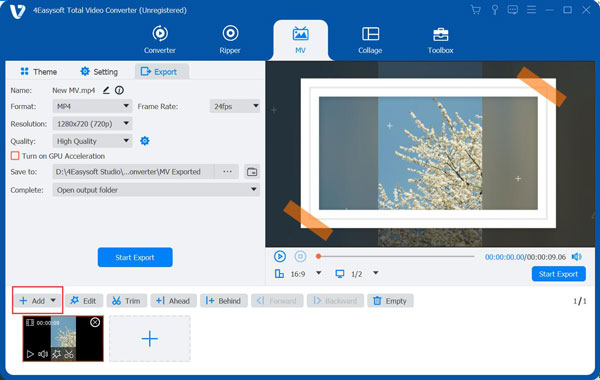
Step 1Download and install the 4Easysoft Total Video Converter tool on your Windows or Mac computer. Then, launch the tool, select the "MV" tab, and tick the "Add" button to import the video that you want to add preset transitions.
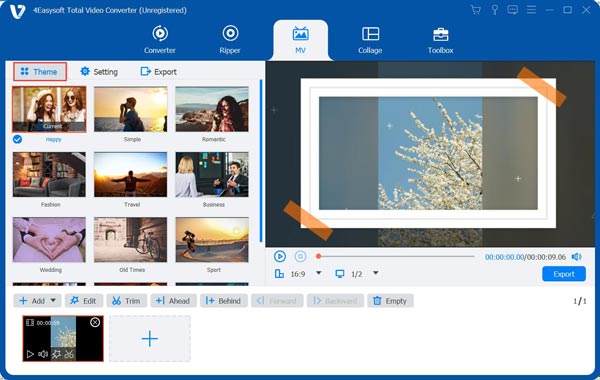
Step 2Next, on the "Theme" section, select the preferred Theme you wish to apply to your video. Each of these themes has its own transitions and graphic animations. You can add the keyframes and tick the "Play" icon on the Preview to see what each theme looks like.
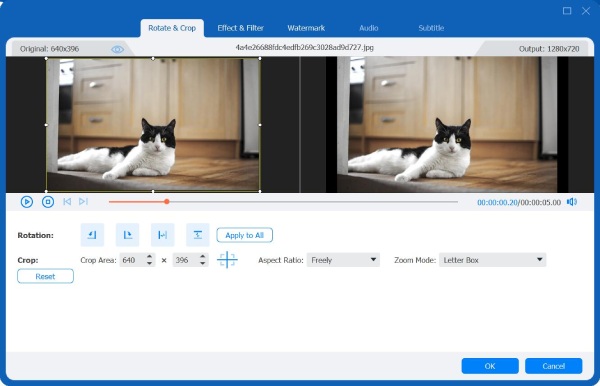
Step 3Then, to tweak your video’s parameters, you can click the "Edit" button with the "Starwand" icon to access the tool’s video editing features. On the new window, you can Rotate, Crop, and add Effects, Filters, etc., to your video. Once done with it, tick the "OK" button.
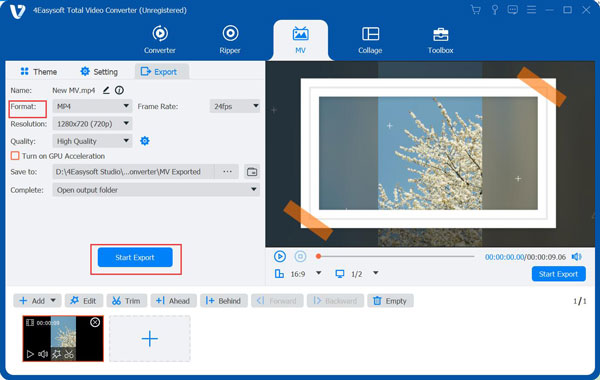
Step 4If you are satisfied with the overall looks of your video, click the "Export" tab, and here you can modify your output’s Format, Resolution, Quality, Frame Rate, etc., to acquire a high-quality result. If you finish it, tick the "Start Export" button to save your video.
FAQs about How to Add Keyframes to Videos on Windows/Mac
-
How to add a text layer on After Effect on an existing file to be added by Keyframe?
If you want to animate or embed a transition to a text, right-click on the layer’s panel, click the New button, and select the Text option. After that, tick the Text tool to add a text, and modify the looks of your added text. Then, click the Transform dropdown button on the Text layer and add a Keyframe depending on your desired animation.
-
Can I move added Keyframes to a new position?
Yes, you can! To do this, you must select the Keyframe you wish to move. Then, use the editor’s pointer tool to click and drag the Keyframe to its new position.
-
How to remove Keyframes in After Effects?
To delete any number of added Keyframes, select all of them, and press the Delete key on your keyboard. Otherwise, if you want to delete all the added Keyframes on a single layer, click the added Keyframes’ Stopwatch icon to deactivate them.
Conclusion
There you have it! Those are the 3 easy ways how to add Keyframes to your video. By knowing how to add Keyframes, you can now animate any text, objects, images, etc., on your video to make it more entertaining and livelier. If you are only working with a simple video and want to easily and quickly bring unique transitions with graphical animations, let the 4Easysoft Total Video Converter help you! This tool offers tons of Themes that support jaw-dropping preset transitions that will surely bring redefining changes to your video! Feel free to visit this tool’s official website to discover its other powerful features!
100% Secure
100% Secure


