Transfer and manage all data between iOS devices, device and computer, and iTunes and devices.

2 Efficient Ways to AirDrop Photos Your iPhone 16 to Mac

Posted by Paula Pailaga to iOS Transfer Oct 14, 2024
iPhones are known for having excellent cameras that produce high-quality photos. Now, if you take many photos on your iPhone, this will eventually lead to insufficient storage. But you can overcome that by transferring them to your Mac using AirDrop! To teach how you will do that, this post features 2 ways how to AirDrop photos from iPhone to Mac. So, without further ado, start exploring each of them below!
Guide List
What You Should Do to AirDrop Photos from iPhone to Mac Detailed Steps to AirDrop Photos from iPhone to Mac Best Alternative Way to AirDrop Photos from iPhone to Mac FAQs about How to AirDrop Photos from iPhone to MacWhat You Should Do to AirDrop Photos from iPhone to Mac
Before jumping into this post’s two featured ways how to AirDrop photos from iPhone to Mac, there are things you must do before performing that process. These will help you avoid possible issues and acquire the best AirDrop file transfer experience. So, here they are:
- Ensure that your iPhone runs iOS 7 or later. In terms of the Mac, it should be running Mac OS X Lion (Mac OS X 10.7) or later.
- Personal hotspots should be turned off before AirDropping photos from your iPhone to Mac.
- Wi-Fi and Bluetooth should be turned on on both devices until the process is complete.
- Both devices should be placed within the Bluetooth range to avoid connection failures.
You need to ensure that you have executed those things before you start exploring this post’s 2 ways how to AirDrop multiple photos from iPhone to Mac.
Detailed Steps to AirDrop Photos from iPhone to Mac
There you have it! Those are the things that you need to consider before learning how to AirDrop photos from iPhone to Mac. If you have checked all the boxes, it is time to get your hands dirty! This post featured simple yet detailed steps on utilizing AirDrop to transfer photos from your iPhone to a Mac. So, without further ado, explore the steps below:
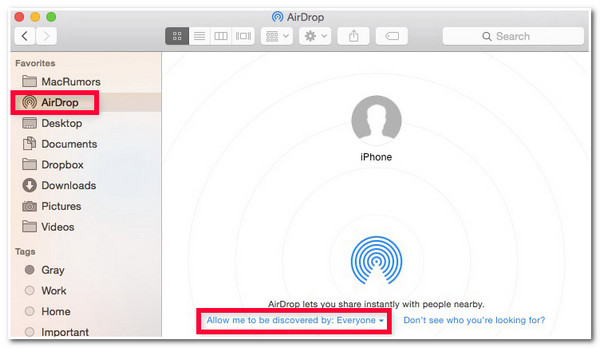
Step 1Head on the Mac, turn on its Wi-Fi connectivity and run the "Finder" program. Then, on Finder, select the "AirDrop" option from the sidebar and put a checkmark on the "Allow me to be discovered by:". After that, select the "Everyone" option.
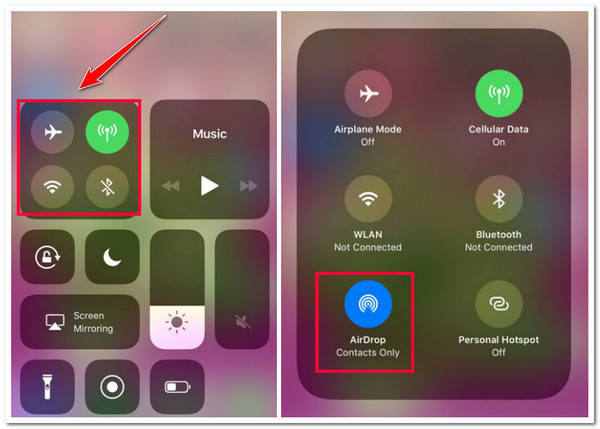
Step 2Next, once you are done above, head to the iPhone and access the "Control Center" by sweeping up the bottom of your device. Then, long press the "square" (as shown on the image) on the pop-up box, tap the "AirDrop" to turn it on, and select "Everyone".
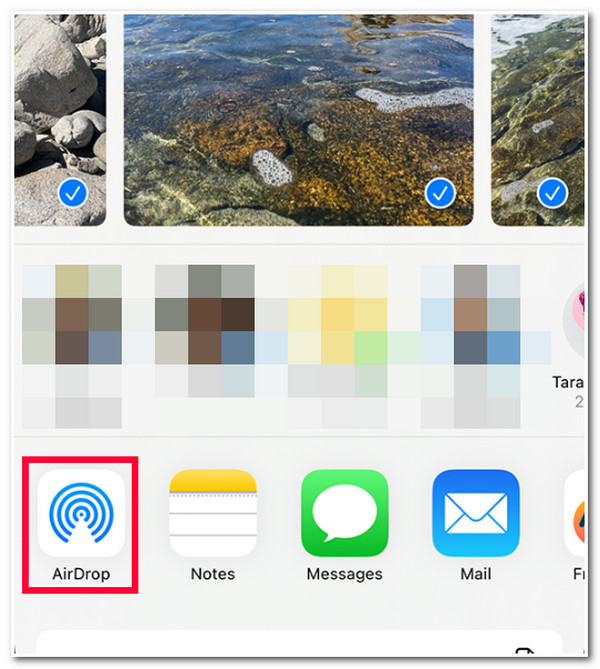
Step 3Then, run the "Photos" app on your iPhone, tap the "Select" button, and select all of the "photos" you wish to transfer. Then, tap "Share" at the lower left, select "AirDrop", and tap "Mac/User ID". And that’s it! Those are the steps on how to AirDrop photos from iPhone to Mac!
Best Alternative Way to AirDrop Photos from iPhone to Mac
That’s it! Those are the simple steps on how to AirDrop photos from iPhone to Mac. What if you can’t use AirDrop because of iOS version conflicts? Or you may find out that AirDrop takes a lot of time to transfer multiple images. Thus, you can use an alternative tool like the 4Easysoft iPhone Transfer! This Windows and Mac-compatible tool lets you simultaneously transfer different files, including photos, to various devices. It lets you transfer photos to iOS devices, computers, and iTunes without data loss and at a fast speed. Moreover, unlike AirDrop, this tool supports all iPhone and Mac versions and models.

Provide an advanced preview that lets you easily and quickly see and select files.
Allow you to transfer all file types, including valuable, media, and social data.
Support seamless, safe, fast photo transfer from your iPhone to Mac.
Manage your files with photo manager, contact assistant, and music editor.
100% Secure
100% Secure
How Do You AirDrop Photos from iPhone to Mac Using 4Easysoft iPhone Transfer Tool as an Alternative:
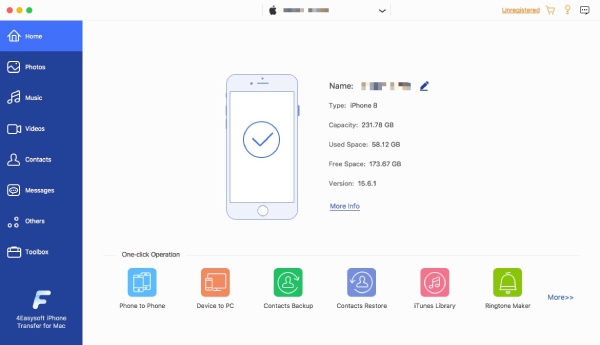
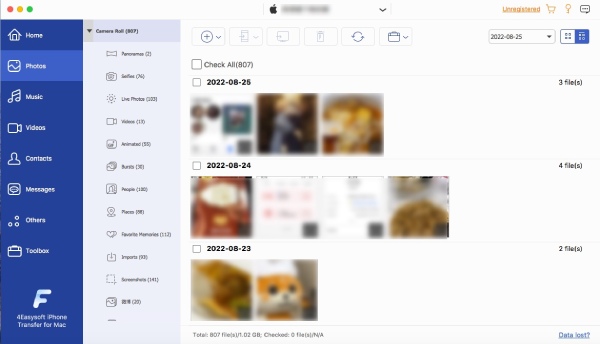
Step 1Download and install the 4Easysoft iPhone Transfer tool on your Mac. Next, launch the tool and link your iPhone to the computer by utilizing a USB cable. Then, wait for the tool to detect your device. After a few minutes, the tool will display information about your device.
Step 2Next, head on the tool’s left side, click the "Photos" tab, and select all the "photos" you wish to transfer from different categories.
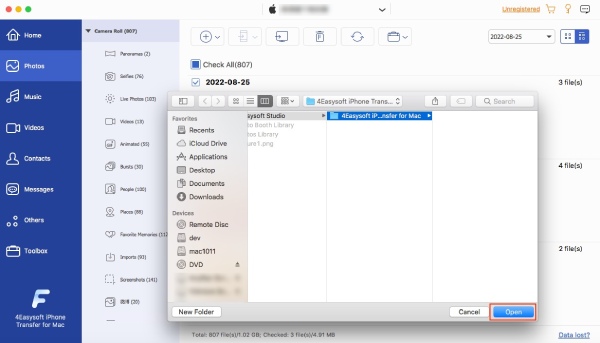
Step 3After that, click the "Export to PC" icon at the upper part of the tool’s interface. Then, select a "folder" to store the files and click the "Open" button.
Step 4Then, once the transfer process is done, you can go directly to the folder you selected earlier, and from there, you can see all the transferred photos. That’s it! Those are the steps on how to use this tool as an alternative to the steps on how to Airdrop photos from iPhone to Mac.
FAQs about How to AirDrop Photos from iPhone to Mac
-
How many photos can I AirDrop from iPhone to Mac?
There’s no limit on how many photos you can send simultaneously using AirDrop. Thus, you can AirDrop as many photos from your iPhone to AirDrop as many as you want. However, the process might take a little longer if these photos are high quality with large file sizes.
-
Why does AirDrop not send photos from iPhone to Mac?
The reason why AirDrop is not sending photos might be due to Wi-Fi and Bluetooth being turned off, and both devices are not in the Bluetooth range. To address these, you can update both devices’ versions, place them in a 30-foot distance, and turn on Wi-Fi and Bluetooth.
-
Where can I find the AirDropped photos on my Mac?
You can find the AirDropped photos in your Mac’s Download folder. To access this folder, run the Finder program, click the Go button, and look for the Download folder from there. Once you see it, tap on it and find the AirDropped photos.
Conclusion
Now those are the 2 efficient ways how to AirDrop photos from iPhone to Mac! You can now save more space on your iPhone through these post-featured guides (things you need to do before AirDropping photos and steps on how to do it). If things don’t go well while using AirDrop, you can use the professional 4Easysoft iPhone Transfer tool as an alternative! With this tool’s powerful features, you can acquire the best photo-transferring experience! To discover more about this tool, visit its official website today!