A 2025 Guide: How to Clean Disc Safely and Properly?
Discs like DVDs, CDs, and Blu-rays hold treasured memories, classic movies, or irreplaceable music. The problem? Dust or minor scratches can prevent us from playing these correctly, but why not learn how to clean the disc instead of saying goodbye to them? With just a little know-how and techniques, you can clean a disc, bring your collections back to life, and store them for years. So, start it today!
Guide List
What You Need to Prepare to Clean A Disc Detailed Steps to Clean A Disc Carefully Tips to Clean A Disc without Damaging It Save the Data on the Computer before CleaningWhat You Need to Prepare to Clean A Disc
Before diving into the world of disc cleaning, it’s nice to gather the right tools first to ensure a safe and effective process. Here’s what you will need to clean a disc:
• Soft, lint-free cloth. In cleaning a disc, a soft cloth is your primary weapon against dust and fingerprints. It is best to opt for a microfiber cloth primarily used for cleaning glasses or a soft cotton t-shirt. Please avoid anything with rough textures.
• Cleaning solution. Though optional, distilled water usually works for light cleaning. For tougher grime, isopropyl alcohol is an ideal option, but use it sparingly. Don’t use any harsh chemicals.
• Flat, clean surface. Find a well-lit, dust-free area to reduce the risk of additional contamination while you clean a disc.
Bonus items:
• Disc sleeve or case. After cleaning your discs and making sure they are dry enough, you can store them properly to prevent future dust buildup.
• Empty spray bottle. If you use an isopropyl alcohol and distilled water solution, fill the bottle for a more straightforward application.
Detailed Steps to Clean A Disc Carefully
Now that you are armed with the necessary tools, it’s time to get down to business to clean a disc! Below is a detailed guide on how to clean disks safely and effectively:
Step 1Kick-off by washing your hands thoroughly to eliminate any dirt or oils that could transfer to the disc. Next, hold the disc by the edges and avoid touching the shiny and non-printed sides.
Step 2Take time to examine the disc for any major scratches. Check if there are deep scratches that likely affect the playback and might need a professional resurfacing. If not, minor ones can be addressed with proper cleaning.
Step 3Use the dry microfiber cloth to gently wipe the disc in straight lines from the center outwards, following its radial direction. Don’t wipe in circular motions.
Use the cleaning solution to clean stricter grime. (Optional: Mix the distilled water and isopropyl alcohol in a spray bottle.) Lightly mist a cloth and wipe the disc using the straight-line method.
Step 4Afterward, dry it completely before storing it. You could let it air dry for a few minutes by placing it on a clean, soft surface. Or, use a fresh, dry cloth to gently wipe the disc to dry it off.
Now, you can try playing it on your player or drive to see if it does not freeze or malfunction. Later, store it properly to prevent the dust buildup. Make sure to place it in its original case or sleeve.
Tips to Clean A Disc without Damaging It
Tips to Clean A Disc without Damaging It
• Handle the disc with respect. Beyond washing your hands, always hold the disc by the edges, avoiding any contact with the data sides with your fingers so as not to leave smudges or attract dust.
• Don’t use rough stuff. Paper towels, tissues, and some cloths with rough textures that can scratch the delicate surface of your disc must be ditched. Stick to a soft, clean microfiber cloth.
• Use a few amount cleaning solutions. Less is more when using cleaning solutions. A single drop of water or a lightly misted microfiber cloth is enough. Don’t soak the disc or use an excessive amount of liquid.
• Avoid using compressed air. It might seem like a quick way to remove dust to clean the disc, but the truth is that it can force debris further into the disc’s surface, potentially causing more harm than good. It’s best to stick to gently wiping with a microfiber cloth.
• Skip circular motions. Always wipe the disc in straight lines, moving from the center and holding outwards in a radial direction. Doing so will prevent dust from getting trapped in the groove.
• Don’t scrub aggressively. Suppose your disc has stubborn grime or a tight fingerprint; avoid forcing it as it can worsen scratches. Instead, apply minimal pressure with a slightly dampened cloth with a cleaning solution.
• Store them properly. While you know how to clean discs, the best way to keep them clean is to minimize the need for cleaning in the first place. Hence, store them properly in their cases or sleeves when unused, and don’t expose them to dust or excessive handling.
By following these techniques alongside the steps on how to clean Blu-ray discs, DVDs, and CDs, you can become a disc-cleaning champion, guaranteeing all your collections stay playable and protected for a long time.
Save the Data on the Computer before Cleaning
Even if you now know how to clean the disc, you should still consider making a digital backup of the data that is still on there. To accomplish this, you’ll need to utilize a program like 4Easysoft DVD Ripper. It gives you more than 600 choices with an extensive range of output formats, including well-liked ones, such as MP4, MKV, AVI, and MOV. Even more remarkable, you can alter your disc to enhance the audio and visuals for a more enjoyable watch experience. Later on, you will witness the benefits of its GPU Acceleration as it rips discs 60 times faster without degrading the quality.

In five minutes, your disc may be reliably ripped and can be saved on your computer.
More than 600 formats with customized profiles are supported.
Adaptable output options to transform a ripped disc into a 4K quality.
Give users the power to edit videos by cropping, trimming, and more.
100% Secure
100% Secure
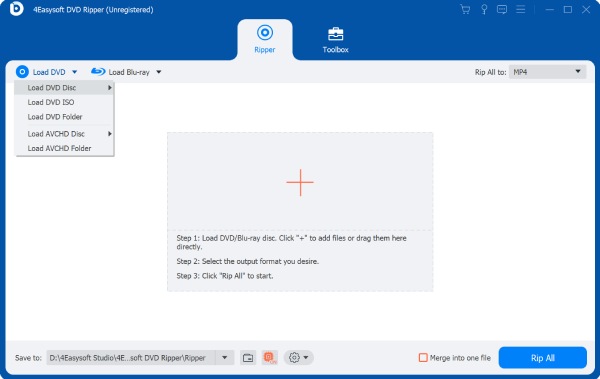
Step 1After starting 4Easysoft DVD Ripper, select the "Load DVD Disc" option from the "Load DVD" button. Remember to insert your disc into your computer’s drive in advance for a faster loading time.
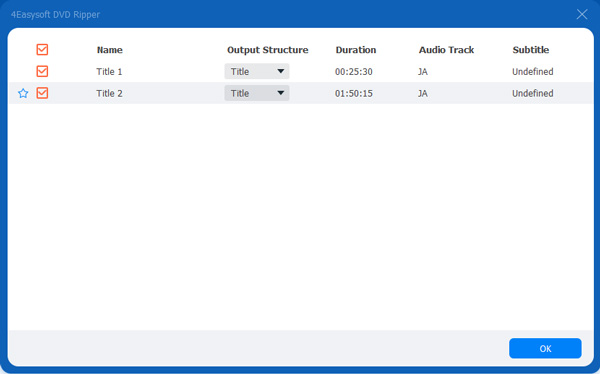
Step 2Every disc tile you own will show up on the screen. Click the "OK" button after making sure the desired titles are checked.
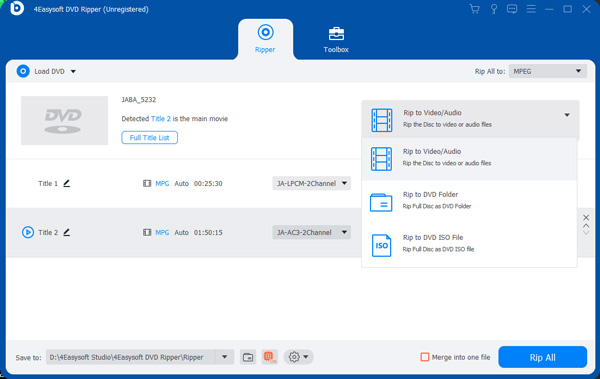
Step 3From the "Rip to" menu, choose "Rip to Video/Audio" to open a window containing all export formats. Pick the best one for you with your desired resolution, or make manual adjustments.
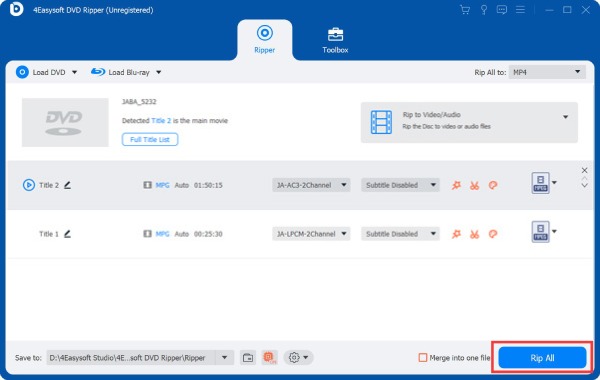
Step 4After finishing everything, use the "Star Wand" and "Scissors" icons to make more changes and trimmings. Once finished, select "Rip All" to complete the process and instantly download the ripped disc.
Conclusion
With a bit of know-how to clean disc and techniques, you can breathe new life into your disc collection. So, the next time you face a freezing disc, you can be confident that you can get your discs cleaned and shiny again. For extra tips to get your disc data saved and stored safely on your computer, don’t forget the 4Easysoft DVD Ripper. The program rips discs to digital formats that are playable on whatever devices you have. Now, go forth and shine a light on all your disc collections!
100% Secure
100% Secure


