Convert, edit, and compress videos/audios in 1000+ formats with high quality.
4 Easiest Ways How to Merge Subtitles with Video Permanently

Posted by Paula Pailaga to Edit Video/Audio Aug 12, 2024
You are probably looking for a way to merge subtitles with video permanently after having difficulty understanding the movie. Well, that is frustrating, especially if you really want to watch the movie. Thankfully, you landed here! This post features 4 workable ways to merge subtitles with video permanently! Through these ways, you can embed a subtitle into the movie and enjoy watching it without having difficulty understanding what is being said. Explore them now!
Guide List
Best Way to Merge and Sync Subtitles with Videos Permanently How to Merge Subtitles with Videos Permanently via VLC Merge Subtitles with Videos Permanently with iMovie on Mac Use Handbrake to Embed Subtitles with Videos Permanently FAQs about Merging Subtitles with Video PermanentlyBest Way to Merge and Sync Subtitles with Videos Permanently
If you are looking for the best way how to merge subtitles with video permanently, then the 4Easysoft Total Video Converter is what you are searching for! This tool is infused with a subtitle feature that lets you permanently embed and sync subtitles to your downloaded movie. Moreover, it also supports customization options that let you modify the embedded subtitles. These options include changing the font, size, color, position, etc. Furthermore, this tool also supports a great preview that lets you see your changes easily in real time! These are just a glimpse of this tool’s advanced features. If you want to discover more, explore the list below!

Let you sync the embedded subtitle with the movie using the tool’s delay feature.
Allow you to embed subtitles that are saved on SRT, SSA, and ASS format.
Support other features to modify the movie's looks, such as rotation, effects, filters, etc.
Offer various formats to convert the movie and enhance its output quality.
100% Secure
100% Secure
How to Merge Subtitles with Video Permanently Using 4Easysoft Total Video Converter:
Step 1Download and install the 4Easysoft Total Video Converter tool on your Windows or Mac computer. Next, launch the tool and click "Add" with the "Plus" icon to import the downloaded movie you wish to add subtitles. Finally, click the "Open" button to import the movie.
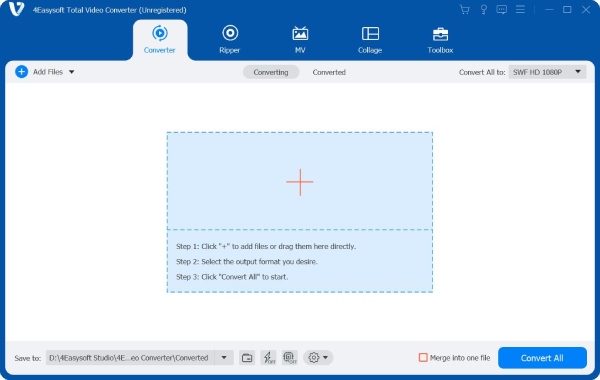
You must also prepare the subtitle file (either you downloaded it on the internet or created it by yourself) that you will add to the movie.
Step 2After that, click the "Subtitle Disabled" dropdown button and select the "Add Subtitle" option. Then, on the file folder pop-up window, access the subtitle file, select it, and tick the "Open" button to import and embed it on the downloaded movie.
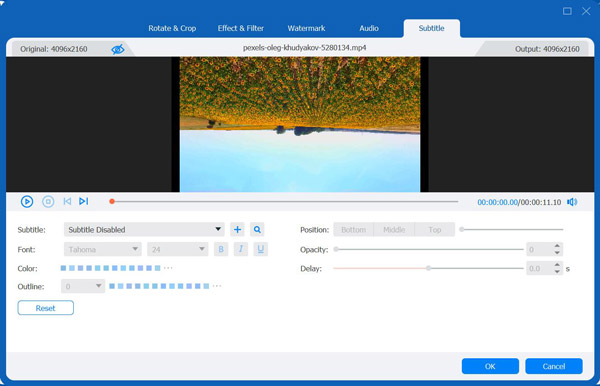
Step 3Then, click the "Edit now" button on the pop-up dialogue box. On the "Subtitle" window, you can edit the subtitle’s "Font, Color, Position, Opacity, and more". You can adjust the "Delay" using the slider if the downloaded movie and subtitle are not syncing.
Step 4Once you are done with the above setups, click the "OK" button, and on the tool’s main interface, tick the "Convert All" button to initiate the merging and saving process of the downloaded movie with an embedded subtitle.
Ensure the output format is set to "MP4" or "Same as source" format. You can check on this by clicking the "Convert All to" dropdown button.
How to Merge Subtitles with Videos Permanently via VLC
There you have it! That’s the best way how to merge subtitles with MP4 video permanently using a professional tool! You can also use the open-source multi-platform VLC Media Player to merge subtitles with videos. The great thing about VLC is that merging subtitles is easy to execute. You don’t need to have advanced knowledge about this tool for you to merge subtitles properly. However, the merged subtitles will not stay embedded in the video forever. Once you merge it, you can watch it immediately with subtitles. But the embedded subtitles will not be there the next time you watch the video. Now, if you still want to try VLC, then here are the steps on how to merge subtitles with video permanently VLC:
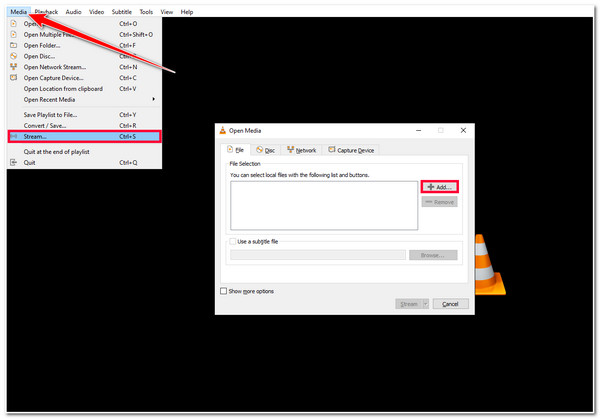
Step 1 Launch the VLC on your computer, click the "Media" button at the menu bar, and select the "Stream" option. Next, click "Add" to import the video you wish to embed a subtitle.
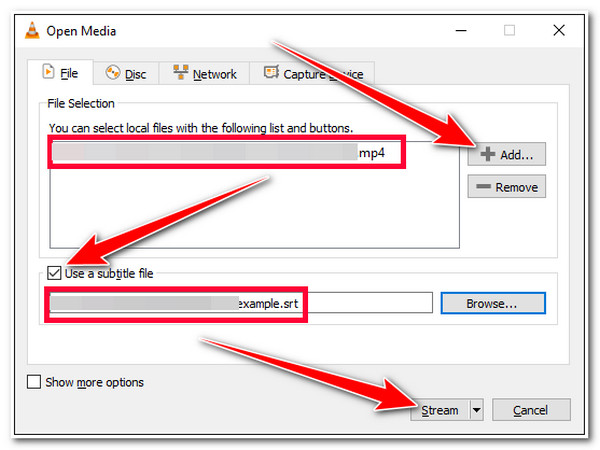
Step 2Next, click the "Use a subtitle file" checkbox and import the subtitle file you wish to embed on the video by ticking the "Browse" button. After that, click the "Stream" button and select the "Next" option.
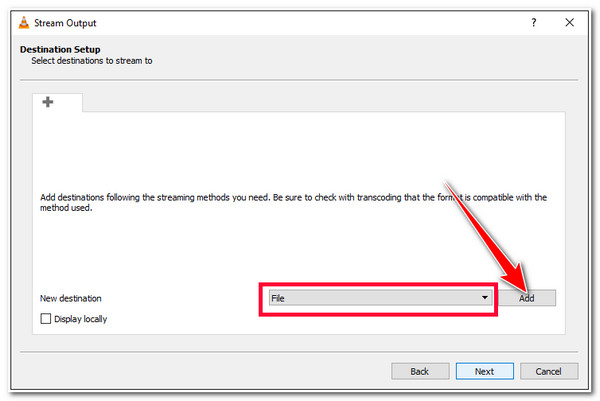
Step 3Then, select a folder by ticking the "File" dropdown button and click the "Add" button. In the new window, tick the "Browse" button and type a name for your video. Ensure that the video’s name has a ".mp4" extension. Next, tick "Save", select a folder, and click "Next".
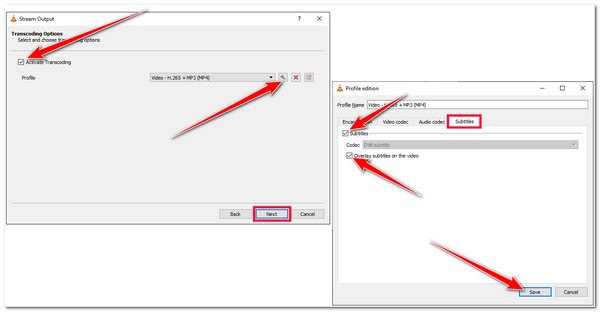
Step 4After that, tick the "Activate Transcoding" checkbox button, click the "Edit selected profile" button with the "Wrench" icon, and access the "Subtitle" tab. Then, tick the "Subtitles and Overlay subtitles on the video" checkboxes. Next, click the "Save" button and tick "Next".
Step 5On the new window, tick the "Stream" button and wait for the VLC Media Player to process everything. Once it is done, you can find the video with subtitles in the folder you selected earlier.
Merge Subtitles with Videos Permanently with iMovie on Mac.
That’s it! Those are the steps on how to merge subtitles with video permanently in VLC. Now, if you use a Mac, you can use iMovie to merge subtitles with videos! iMovie is a free video editing tool made by Apple for iOS devices such as Mac, iPhone, and iPad. This tool offers many video editing features, including adding captions, titles, and subtitles. However, unlike the first two tools above, iMovie does not have built-in support for importing SRT files directly into the tool. You must manually type subtitles or copy the subtitle file’s text and paste it on iMovie. Although it sounds laborious, if you still want to try iMovie, then here are the steps on how to merge subtitles with video permanently using this tool:
Step 1Launch the iMovie on your Mac, select the "Project" option, and click the "Create New" button. After that, tick the "Movie" button with the "Plus" icon. Then, click "Import Media" and choose the video you wish to add the subtitle.
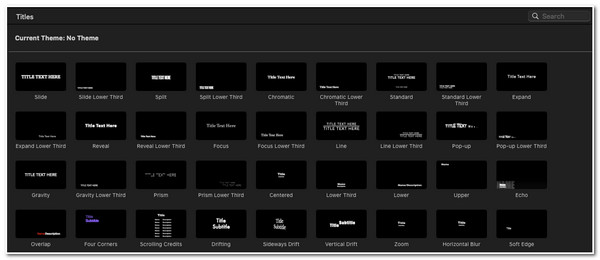
Step 2Next, wait for the video to appear in the tool’s upper left section. Once it shows up, you need to move it on the timeline by dragging it down. After that, tick the "Titles" button and select the one you prefer from the options.
Step 3After that, drag the "title style box" down to the timeline and select when you want the subtitles to begin. You can add title boxes as many as you want, depending on how many subtitles the video needs.
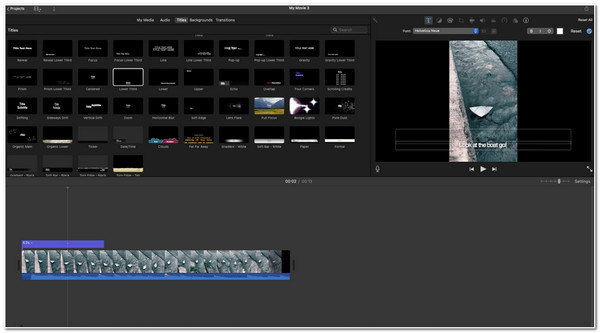
Step 4Once you are done adding title boxes, you can now type in or paste the subtitles on each box. You can also modify the looks of the subtitles by clicking the title box, heading to the top right of the screen, and ticking the "font" options.
Step 5If you are satisfied with your modifications and setups, click the "File" tab at the top of the tool’s interface, select the "Share" option, and choose "File" again. After that, tick the "Next" button, name your video, and click the "Save" button.
Use Handbrake to Embed Subtitles with Videos Permanently
There you go! Those are the simple steps on how to merge subtitles with video permanently using iMovie! The last tool you can use to execute the same process is Handbrake. Like VLC and iMovie, Handbrake is an open-source, cross-platform video transcoder tool that lets you emerge subtitles. However, unlike the tools above, Handbrake doesn’t offer a great preview that will let you check the changes you’ve made to your video and subtitle. This tool also offers a simple way of merging subtitles and is much easier to execute than iMovie. So, how to merge subtitles with video permanently using Handbrake? Here are the steps you must follow:
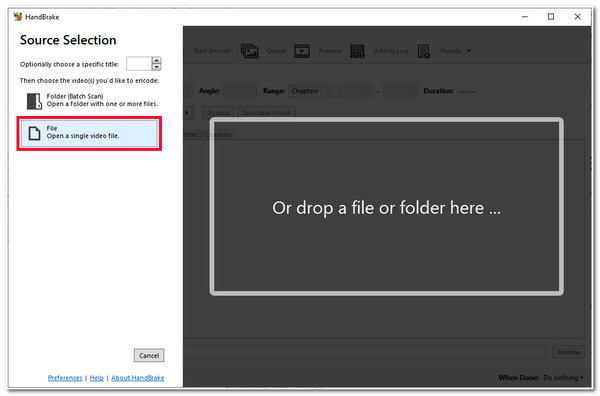
Step 1Download and install the Handbrake tool on its official website. After that, launch the tool, click the "File" button on the left section, and select the video you wish to merge with the subtitle.
Step 2After that, tick the "Subtitles" tab, tick the "Tracks" dropdown button, and select the "Import subtitles" option to import a subtitle file. Then, click the "Burn In" checkbox at the end of the subtitle "Source" bar.

Step 3Then, click the "Browse" button at the lower right corner of the tool and select where you want to store the output. Next, tick the "Start Encode" button at the top of the tool’s interface to initiate the subtitle and video merging process.
FAQs about Merging Subtitles with Video Permanently
-
1. How to merge subtitles with MP4 video permanently on Android?
To permanently merge subtitles with MP4 video on Android, you can utilize the VLC mobile version. Open the app, access the video, tap the Player icon, and expand Subtitles. Then, tap Download subtitles, and select a subtitle by tapping the download button. That’s it!
-
2. Can iMovie automatically add subtitles to videos?
Unfortunately, iMovie can’t generate subtitles for videos. But you can copy subtitle texts from an SRT file and paste them on the title box just like the steps featured in this post’s part 3.
-
3. Are there any online tools for merging subtitles with a video?
Yes, there are online tools available on the market that let you merge subtitles with a video without performing any installation process. These online tools support various video and subtitle formats and provide an easy-to-use interface.
Conclusion
Now those are the 4 doable ways how to merge subtitles with video permanently! Through these ways, you can fully understand everything being said in a movie! If you are looking for the best way to merge subtitles with videos, then the professional 4Easysoft Total Video Converter tool is what you are searching for! With this tool’s great subtitle feature, you can easily and quickly add subtitles, modify their looks, and change their delay! To discover more about this tool, visit its official website today.
100% Secure
100% Secure