Completely scan your iOS devices and delete all junk files on your iPhone, iPad, and iPod.
How to Permanently Delete Messages on iPhone with No Sweat?
Are you shocked when you see the iPhone text messages you’ve deleted upon searching them? Worry not cause it’s not just you; many people are asking how to permanently delete messages on iPhone. In this case, you would need the perfect tool to achieve it flawlessly, which is why you’re here. Today’s post will cover how to completely delete text messages from iPhone, so any crucial data won’t be at risk of being disclosed. Read on!
Guide List
The Secured Way to Delete Messages on iPhone Permanently How to Delete iPhone Text Messages Directly How to Delete Messages on iPhone via iCloud Backup Use Factory Reset to Delete Messages on iPhoneThe Secured Way to Delete Messages on iPhone Permanently
Of course, before anything else, you first wish to understand how to permanently delete messages on your iPhone and not just delete them. Doing so will require you to use a tool like 4Easysoft iPhone Cleaner. This program is useful for permanently eliminating all sensitive data, including text messages, as well as other data like photos, videos, apps, and more. Aside from scanning your iPhone, it has support for your other Apple devices, too, like iPad and iPod, all models and versions. With just a handful of steps, you are able to quickly clear up all text messages on your iOS device without affecting other existing ones inside your iPhone.
Advanced algorithms are used to permanently delete messages and other data.
It lets you pick specific data to delete or choose to fully wipe them all.
Can preview the selected data you’re about to erase for double-checking.
Hold 3 cleaning modes with different levels and security to delete permanently.
100% Secure
100% Secure
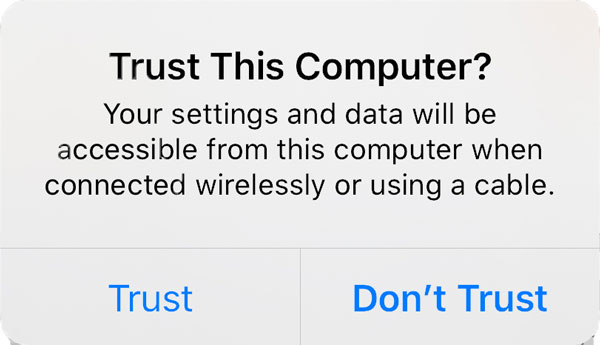
Step 1Upon launching the 4Easysoft iPhone Cleaner, connect your iDevice to your computer using a lightning cable. Please tap the “Trust” button on the “Trust This Computer” notification on your iPhone screen.
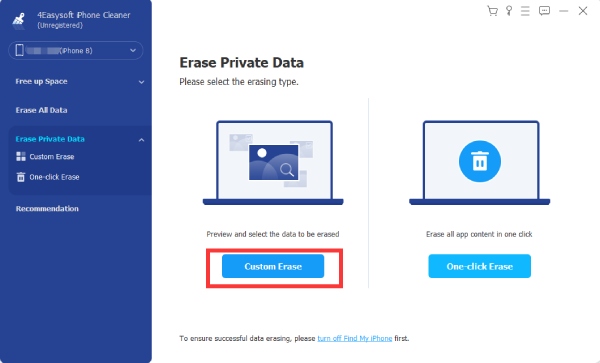
Step 2Once it gets detected by the program, make sure to turn off “Find My iPhone” first, then navigate to the “Erase Private Data” section, and here you can select either “Custom Erase” or “One-click Erase”.
Step 3Suppose you choose “Custom Erase”. The program will start scanning your iPhone’s private data, including text messages. Go to the “Messages” app, among other options; put all check marks on all text messages you want to delete.
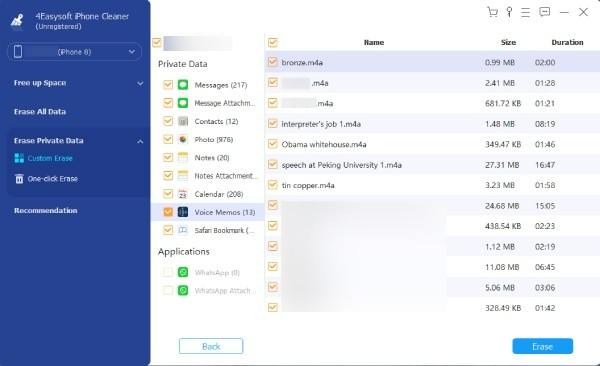
Step 4After getting everything checked, click the “Erase” button to wipe them all. Now, all your text messages on your iPhone are deleted permanently.
How to Delete iPhone Text Messages Directly
If you don't have much time to remove iPhone text messages with extra steps, then you could achieve it by deleting it directly. Doing so will require you to eliminate them one by one inside the Messages app; here’s how to delete messages on iPhone directly:
How to delete iPhone text messages entirely:
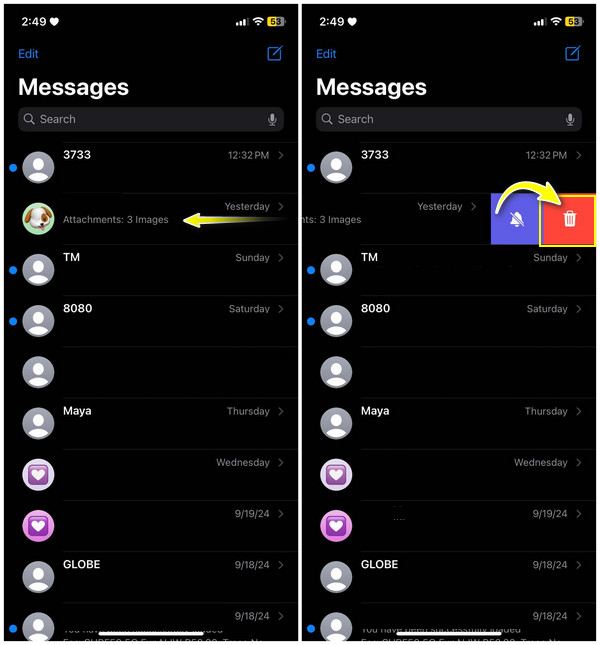
• After opening the Messages app, determine all the text messages you want to get deleted. You could swipe left the conversation, then choose the “Delete” button.
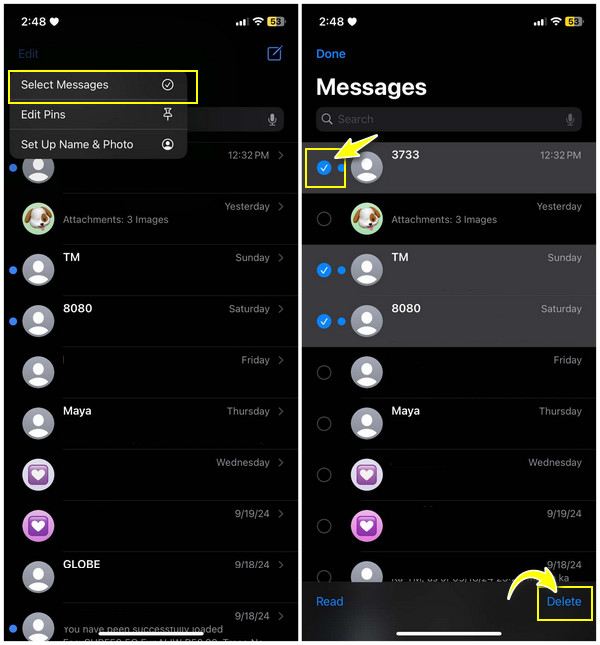
• Otherwise, go for the “Edit” option above to select them all at once, then tap “Select Messages”. Here, you will have to put a checkmark on all must-delete messages; once you’re done, tap “Delete”.
How to delete the desired messages on iPhone:
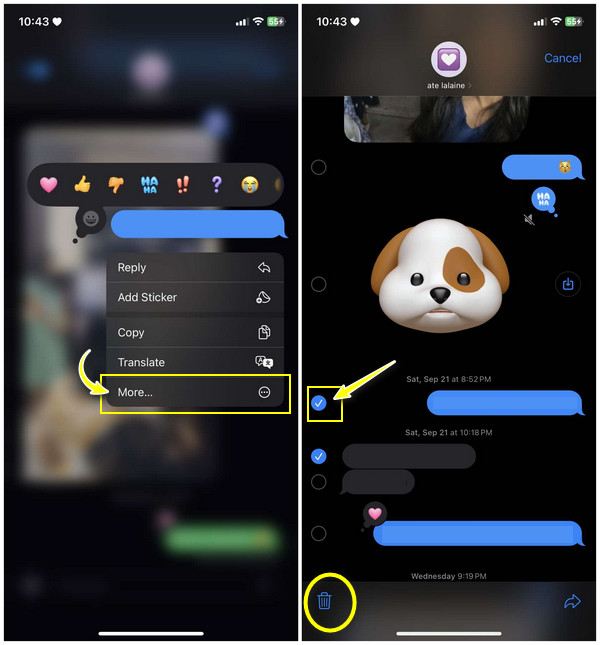
• Inside the Messages app, go to the conversation holding the text message you wish to delete. Next, find the specific text inside the conversation.
• Once you’ve found it, press and keep it on hold until other options appear. Please choose “More”, then tap on the “Delete” button to delete the message.
How to delete all old messages on iPhone:
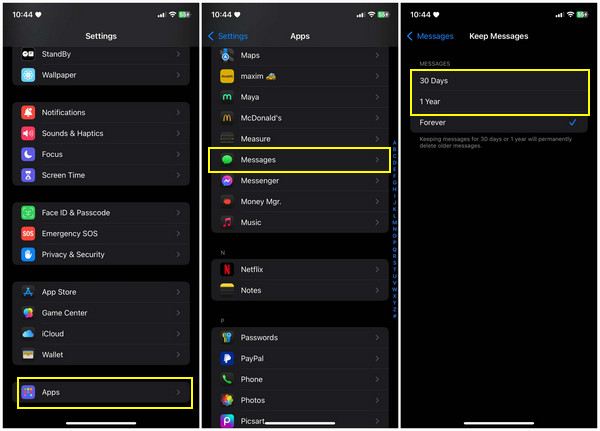
• Meanwhile, to delete messages entirely, head to the “Settings” app and scroll down to find the “Apps” section, where you can see the “Messages” app.
• After tapping on it, find your way to the “Keep Messages” option, then tap on “30 Days” or “1 Year” to delete all of your older messages.
How to Delete Messages on iPhone from iCloud Backup
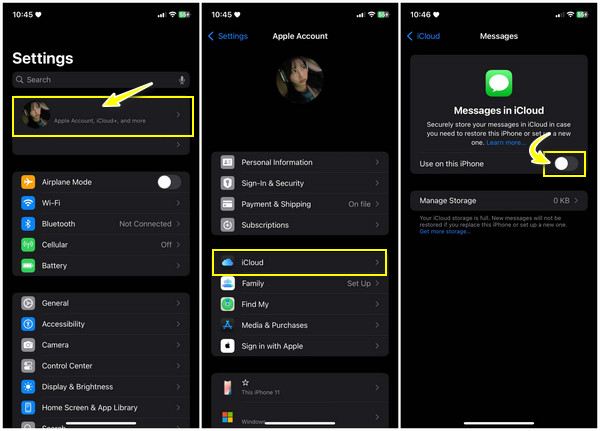
What if you enable iCloud Backup for your text messages? This only means one thing: your iPhone text messages still exist in iCloud. Deleting them from iCloud will help free up space in your account. So, if you’ve deleted text messages directly via the Messages app, here’s how to delete messages on iPhone from iCloud:
Step 1From the Settings app, tap on your “Apple ID” above, then head to the “iCloud” section. Under the “Apps Using iCloud”, ensure to toggle the “Messages” button off.
Step 2Then, from the same page, tap on the “Manage Storage” option, select “Backups”, then determine the messages you wish to delete.
Use Factory Reset to Delete Messages on iPhone
While the previous methods helped you learn how to delete messages on your iPhone, performing a factory reset action would not just delete messages but also all data on your iPhone. This solution is necessary for deleting all apps, photos, and more personal data from your iPhone, so here’s how:
Step 1It’s always a nice idea to back up the data you wish to keep first before starting the factory reset operation. You can do it via either the iCloud Backup or iTunes/Finder Backup.
Step 2If you’re ready, head to the Settings app, open the “General” section, then scroll down to locate “Transfer or Reset iPhone”. From the list of options, tap “Erase All Content and Settings”. To confirm the deletion, enter your iPhone password or your Apple ID password.
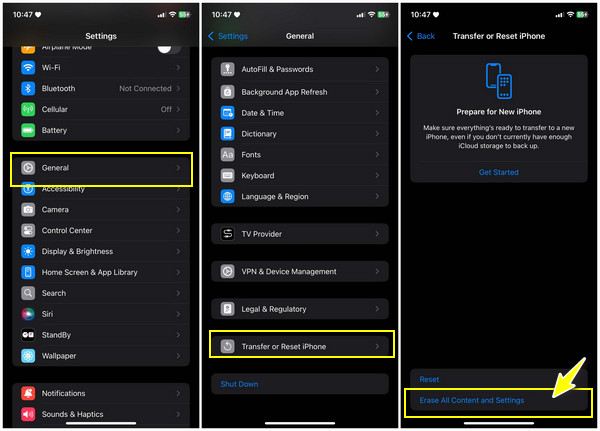
Step 3Once finished, your iPhone will automatically be restarted and display the setup page. That’s how you delete messages on iPhone via the Factory Reset!
Conclusion
That’s how to permanently delete messages on iPhone! Today, you’ve learned the four easiest methods to remove your unwanted text messages on your iDevice, whether you want them to be still recovered or not. For someone who wants to free up space on their iPhone and even iCloud storage, you would like to use the 4Easysoft iPhone Cleaner. The program deletes all data on your Apple devices permanently and smoothly, either selecting them one by one or all at once. Download this valuable tool now for your Apple devices’ data management!
100% Secure
100% Secure


