Record video, audio, gameplay, and webcam to record precious moments easily.
Here are 3 Ways to Teach You How to Record a FaceTime Call on Mac/iPhone
Many people are seeking how to record a FaceTime call. FaceTime is getting popular nowadays, friends will use it to get in touch with others or conferences will be held on FaceTime. So many people want to know how to record a FaceTime call for keeping the joy moment between friends or do the video minutes for conferences. Do not worry, this post will give you 3 ways to do it without much trouble.
Guide List
Part 1: How to Record a FaceTime Call on Mac Part 2: How to Record a FaceTime Call on iPhone Part 3: FAQs about How to Record a FaceTime CallPart 1: How to Record a FaceTime Call on Mac
Method 1: 4Easysoft Mac Screen Recorder
If you are seeking an ultimate screen recorder to capture FaceTime call, you can use 4Easysoft Mac Screen Recorder. It is a user-friendly software that has a simple interface and easy operation. Maybe you have heard about the built-in recording function of Mac But the resolution and convenience of 4Easysoft Mac Screen Recorder are far beyond the built-in recorder in Mac.

Restore the original voice on the FaceTime call in the recorded video.
Have the GPU and CPU tec to record FaceTime video without lag.
Keep the best resolution for those portrait images in FaceTime calls.
Edit the video during the recording time for the FaceTime call conference.
100% Secure
100% Secure
And here are steps on how to record a FaceTime call with audio on this software:
Step 1Launch the screen recorder and click the Video Recorder button to capture the screen with audio if your FaceTime camera is on.

Step 2Click the Full option to capture the whole screen of your computer. If you click the Custom button, you can select the desired window or fix the resolution, including 1080p, 720p, 480p, etc. And no matter what region you have chosen, you can still pull the borderlines freely to adjust the capture area according to your requirement.

Step 3To record FaceTime call with audio, you can click the System Sound button to turn on sound. You can also click the Microphone capture button to record your sound simultaneously. Don’t forget to change the volume by pulling the slider.

Step 4After all settings are done, click the REC button on the right side to start recording your screen. Then a toolbox will pop up, and you can use it to add shapes, lines, callouts, and take screenshots while recording FaceTime call.

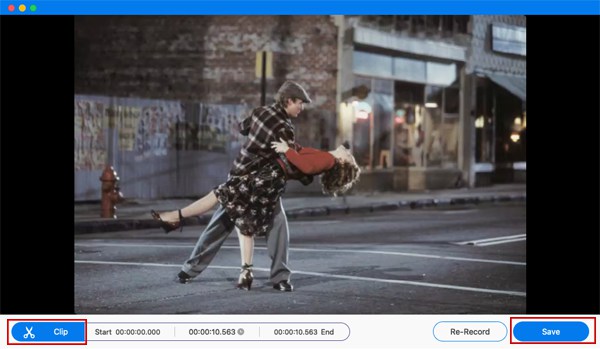
Step 5Click the Stop button to finish the recording. In the preview window, you can choose to clip the unwanted beginning and ending parts and then click the Save button to export the recording.

Method 2: Mac Built-in Recorder
There is a built-in screen recording function in the Mac. Although you do not have to download third-party software, the recorded video size is pretty large with the built-in recorder. And the question many people asked about how to record a FaceTime call with audio will not be perfectly solved with this software. Because you cannot change the volume during the recording or record microphone and system sound at the same time.
Here are the steps about how to record a FaceTime call with Mac built-in recorder:
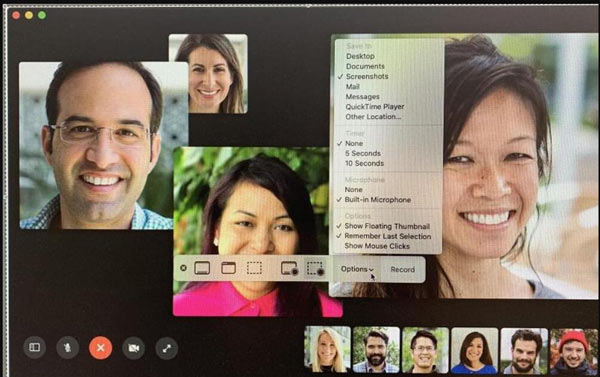
Step 1Press the Command + Shift + 5 keys to open the screenshot tools. You will see options to take standard screenshots as well as Record Entire Screen or Record Selected Portion. Choose the one that you require.
Step 2If you want to record FaceTime call with the entire screen, just click the Record button that appears beside Options. (If you have more than one screen, click and hold on the Record button and you will see the options Screen 1 and Screen 2.)

Step 3If you want to record a portion of the screen, click the Record Selected Portion button. You can select the area you want to record before triggering the recording, or just drag the box over it.
Step 4Since you want to record the audio too you need to choose a microphone device from the Settings menu, so click the Options button and choose Built-In Microphone. If you don’t do this the audio will not record.
Step 5When you are ready to start recording click the Record button. You’ll see a small Stop button appear in the menu at the top of the page. You need to click this when you are ready to stop recording FaceTime call.
Part 2: How to Record a FaceTime Call on iPhone
If you are using iPhone to have FaceTime calls, it will be easier for you to record. And here are the steps about how to record a FaceTime call with audio on iPhone:
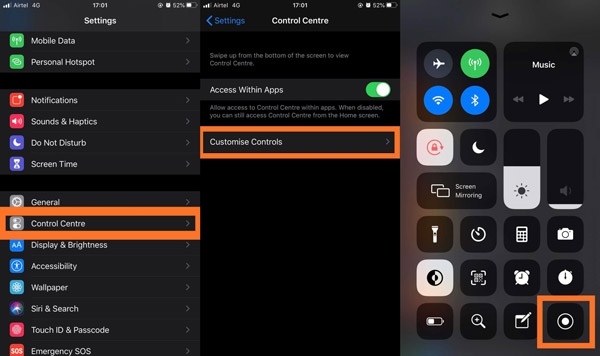
Step 1Tap Control Centre from Settings on your iPhone. Make sure that you turn on the toggle switch for Access within Apps.
Step 2This will show you a list of apps which are allowed to appear in the Control Centre. To add the recording app, you can tap Add with a plus sign.

Step 3Once the call starts ringing, you need to open the Control Centre. Tap on the Screen Recorder will start a recording, this will only record the FaceTime screen with no sound.
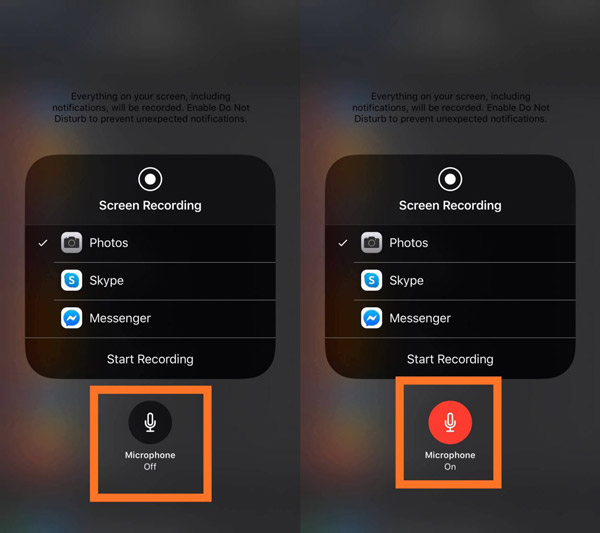
Step 4Keep pressing on the Screen Recorder, and you will see all the options while recording. It shows a sign for a microphone that appears greyed out and says Microphone Off. Tap Microphone, and it will show you the sign get colored, and the command shown below changes to Microphone On.

Step 5Tap Start Recording and this will immediately start a countdown to record your FaceTime call. Remember everything on your iPhone screen is recorded along with the audio. Therefore, close any notifications or sounds turned on for them to avoid interruption on recording FaceTime with sound on iPhone.
Part 3: FAQs about How to Record a FaceTime Call
-
Can you record a FaceTime call without them knowing?
Yes. FaceTime does not alert the other person if you record the call using the screen recorder.
-
Why can't I screen record FaceTime with audio?
By default, voice recording is disabled. On iPhone, you should long press the recording to see if the microphone is on. and On Mac, you should check if the microphone option is on.
-
How to record a FaceTime call on Android?
Since there is no FaceTime app on Android, you can only participant in a FaceTime call by tapping the inviting link. After that, you can directly pull down the control panel and tap the screen recorder button to record a FaceTime call.
Conclusion
After reading this post, you must know how to record a FaceTime call on iPhone and Mac. You can easily do it on your iPhone. But when you have FaceTime on Mac, you should use 4Easysoft Mac Screen Recorder to give you the best-recorded video.
100% Secure
100% Secure


 3 Workable Method to Convert FLV to MP4