Record video, audio, gameplay, and webcam to record precious moments easily.
3 Easy Ways on How to Record Gameplay on Windows PC without Lag
With the continuously evolving gaming platforms today that offers epic game, undoubtedly, it became one of the best pick content to stream and record on social media. If you are a hardcore player who wants record gameplay on your PC and publicize them on various social media platforms, this post is for you! Continue reading this article, for it features 3 workable ways how to record gameplay on PC Windows 10. Explore them now!
Guide List
Part 1: The Best Way to Record Gameplay on PC with High Quality Part 2: How to Record Gameplay on PC via Xbox Game Bar - the Default Way Part 3: Record Gameplay on PC through Nvidia Shadowplay Part 4: FAQs about How to Record Gameplay on Windows PCPart 1: The Best Way to Record Gameplay on PC with High Quality
High-quality gameplay recording is necessary when you want to publicize it on various social media or video-sharing platforms. Because through this, you can provide your audiences with the best viewing experience. So, if it deals with recording gameplay with high quality on PC, then the 4Easysoft Screen Recorder tool is what you need! This tool offers a Game Recorder feature, integrated with CPU and GPU technologies, that provides high-quality gameplay recordings without lag issues. Moreover, aside from recording the gameplay, this tool lets you capture your reactions on a webcam during the gameplay recording. Furthermore, features, buttons, and customization settings are all well composed, which definitely provides users with ease of use vibes. Can’t wait to try this up? Explore the steps on how to record gameplay on PC through this tool now!

Support output customization settings where you can tweak your video, bitrate, frame rate, and more.
Infused with customizable hotkeys, which you can use to modify the default key combinations according to your preferences.
Offer a lot of lossless video output formats to export your recorded gameplay to attain high quality.
Equipped with the ability to capture various parts of your screen, window, or whole computer display.
100% Secure
100% Secure
How to Record Gameplay on PC using 4Easysoft Screen Recorder Tool with High-Quality:
Step 1Download and install the 4Easysoft Screen Recorder tool on your Windows PC. After that, launch it and click the Game Recorder option. Then, go to the game you want to capture.

Step 2Next, click the Select the game button and choose the game you want to record. After that, turn On the System Sound to record the gameplay with a sound by ticking its Switch button. You can also turn On the Webcam by using its corresponding Switch button.

Step 3Then, to keep your gameplay recording smooth and high-quality. Select the Record Setting with the Gear icon. On the Preferences window, set the Frame rate to 60 fps and select Lossless under the Video quality. After that, click the OK button to proceed to the next step.
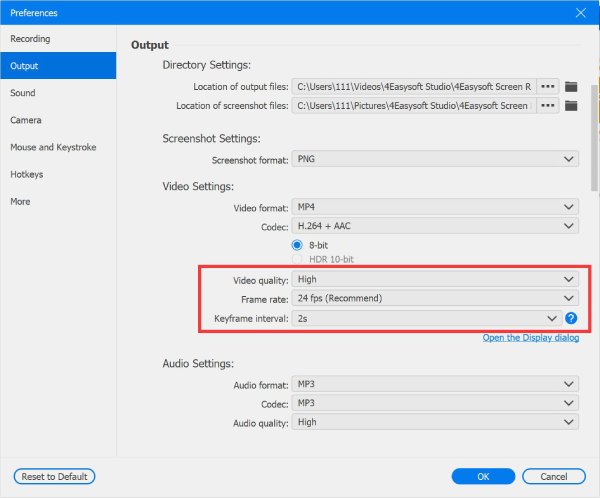
Step 4After that, tick the REC button to initiate the recording process. Once the 3 seconds count down is done, a toolbox pops on your screen, which you can use to take snapshots, pause, stop, etc.

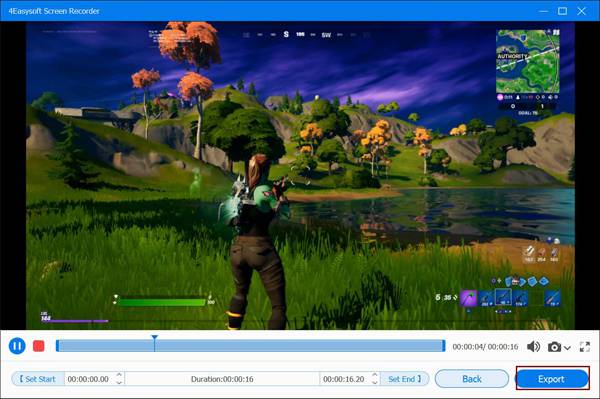
Step 5Once you are done recording your gameplay, click the Stop icon. Then, in the preview section, you can cut those unwanted beginning and ending parts of your recordings using the tool’s Advanced Trimmer. If you are satisfied with the result, tick the Save button. That’s it! These are the steps on how to record and edit gameplay on PC using this tool.
Part 2: How to Record Gameplay on PC via Xbox Game Bar - the Default Way
Now that you know the best way how to record gameplay on PC Windows 10, and you can also use the built-in game recorder on Windows - Xbox Game Bar. This Windows 10 Xbox Game Bar is easy to use because it only takes key combinations to initiate this built-in feature. However, it doesn’t have options to edit your recordings and offers few options for gameplay captures. But this is the best option if you need an easy way to record your gameplay. Here are a few simple steps you need must follow to record gameplay on PC.
Step 1Click the Windows + G on your keyboard to access the Xbox Game Bar interface. After that, launch the game you want to record.
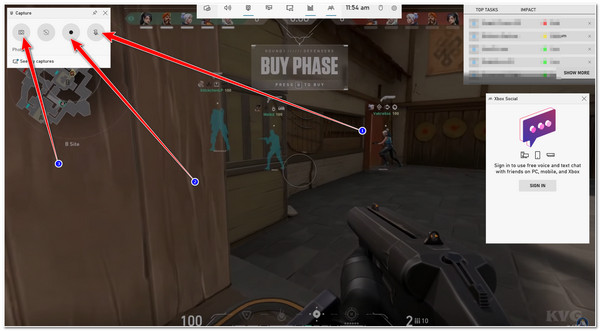
Step 2After that, if you want to record your voice during the recording process, you can click the Microphone icon to turn it On or press Windows + Alt + M on your keyboard. Then, tick the Start recording button with the Circle icon to start recording gameplay on your Windows PC. You can also press Windows + Alt + R key combinations to initiate the recording. Additionally, you can also take screenshots while recording your gameplay by clicking the Take screenshot button with the Camera icon.
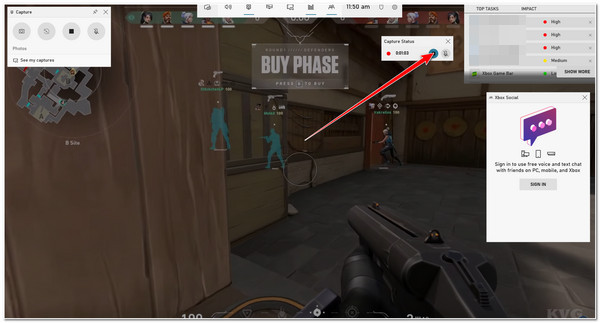
Step 3Once you are done recording, tick the Stop icon on the small toolbox to finish the recording. Then your recorded gameplay will then be stored in a local folder.
Part 3: Record Gameplay on PC through Nvidia Shadowplay
Alternatively, you can also record gameplay on your PC using Nvidia Shadowplay. If your PC is integrated with Nvidia graphics hardware, you can easily capture any on-screen gameplay on your PC. This is made possible by Nvidia graphic card built-in Nvidia ShadowPlay. Moreover, this feature enables users to record their gameplay with high-quality screenshots and live streams. However, you can only acquire this function once you have an Nvidia graphics card model GTX 700 or much newer. How to record gameplay on PC with Nvidia? Explore the steps below to learn how:
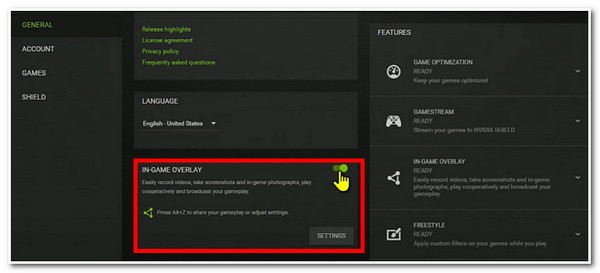
Step 1Download and install the GeForce Experience on your PC. After that, launch it and click the Settings button at the upper row of the tool’s interface and browse down to the features. Turn On the IN-GAME OVERLAY by ticking its toggle switch.
Step 2After that, click the Next icon to initiate the toolbox overlay and tick the Record button. You can also enable the camera and audio to capture yourself and your voice during the recording.

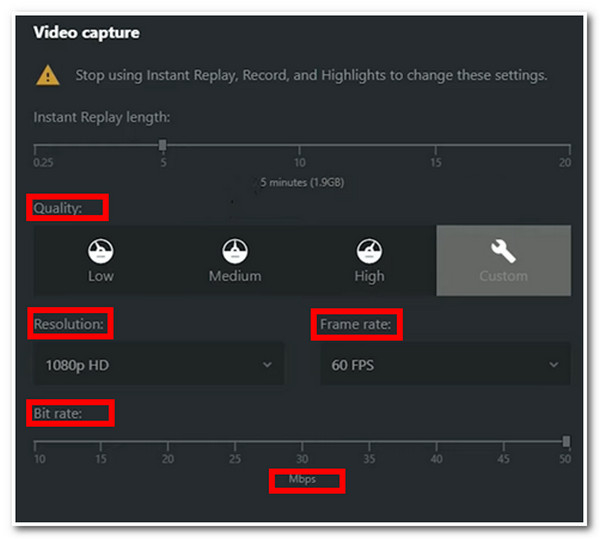
Step 3Next, you can adjust some setup settings; click the Gear icon. Change the recording’s Quality, Resolution, Frame rate, and Bitrate on the new window. In this way, you can enhance the quality of the gameplay recordings. After that, if you are satisfied with your setups, press the Alt + F9 on your keyboard to initiate the recording process. That’s it! Those are the ways how to record gameplay on PC with Nvidia.
Part 4: FAQs about How to Record Gameplay on Windows PC
-
1. Can I record gameplay on PC without losing quality?
Yes, you can. Nvidia ShadowPlay can record games without losing FPS. It also supports hardware acceleration technology and lets you share your gameplay on various platforms. However, if you can’t use Nvidia ShadowPlay for some reason, the 4Easysoft Screen Recorder is your best alternative.
-
2. Why does my gameplay recording keeps lagging?
You need to remember that screen recording is a CPU-exhaustive process. In this case, lag issues may occur during the recording process, especially if other applications or programs run in the background while you are recording.
-
3. What Frame rate should I use to record high-quality gameplay on PC?
The best frame rate is 60 fps. The game recorder you will use should offer or possess the ability to record any gameplay with 60 fps without comprising the smoothness recording and quality drop.
Conclusion
There you go! Those are the best ways how to record gameplay on PC Windows 10. If you want to record gameplay easily, you can use your Windows PC built-in screen recorder named Xbox Game Bar. Otherwise, if you have Nvidia graphics hardware on your PC, you can obtain the features of its built-in functionality named Nvidia ShadowPlay. However, if you want a professional yet easy-to-use screen recorder tool, the 4Easysoft Screen Recorder is the best pick. This tool has powerful features and is integrated with technologies that aim to provide you with a high-standard gameplay recording on PC and give you and your audience the best viewing experience! Feel free to download this tool on your Windows PC to witness its powerful capabilities today!
100% Secure
100% Secure


