Record video, audio, gameplay, and webcam to record precious moments easily.
How to Record Oculus Quest 2 Gameplay: 3 Helpful Ways Here!
Since Oculus Quest 2 is a VR game, it might be difficult to record with the best virtual reality experience, especially without any other external connections. What’s more, if you want to record Oculus Quest 2 with its original high performance, you need to find a high-quality screen recorder, which will produce better images than the built-in recorder. Through this post, you will learn how to record on Oculus Quest 2 by default and other two professional and easy ways worth trying.
Guide List
Part 1: The Default Way on How to Record on Oculus Quest 2 Part 2: 2 Best Way to Record Oculus Quest 2 Gameplay with High Quality Part 3: FAQs about How to Record on Oculus Quest 2 GameplayPart 1: The Default Way on How to Record on Oculus Quest 2
Since Oculus Quest 2 has a built-in recorder, capturing those wonderful virtual reality experiences comes so easily. Besides recording, you are allowed to take screenshots and even cast videos to a much larger screen. With its built-in recording feature, you can quickly capture the gameplay and share recordings. It comes with an excellent menu to record without lag. Without further ado, here's how to record on Oculus Quest 2 by default.
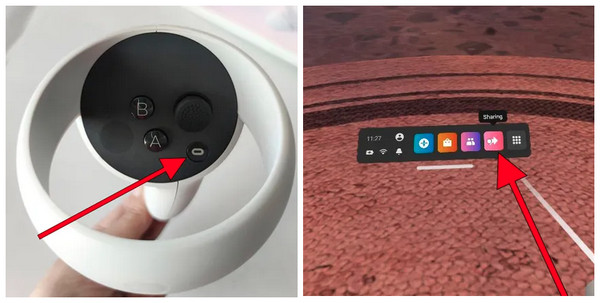
Step 1Firstly, hit the Oculus button on your headset’s right controller. Then, look for the Share icon to open the Sharing menu.
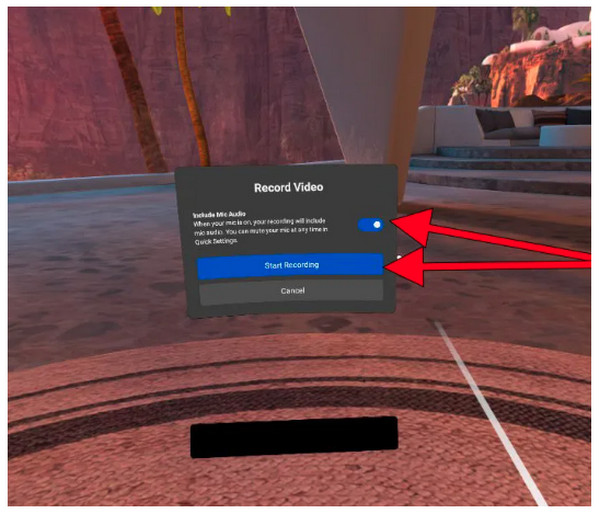
Step 2Select the Record Video with a Camcorder icon, among other options you can see under the Share window. A new window will appear for Record Video, letting you choose if you want to record your voice from the microphone simultaneously with the sound of the content. Click the Start Recording option to start. A yellow dot will be visible on-screen, indicating that all content is being recorded
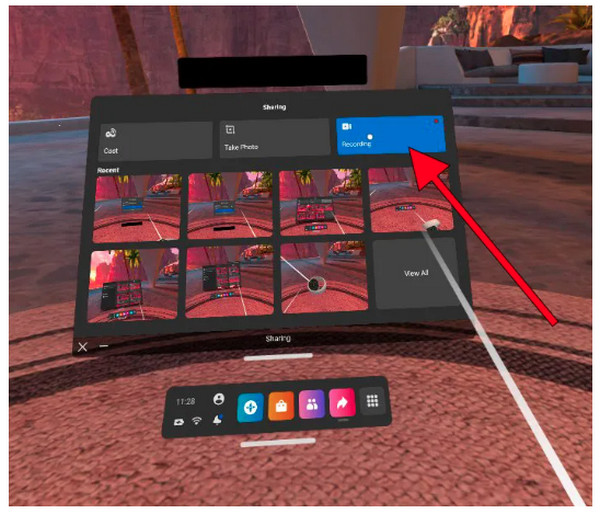
Step 3Now, to stop, go to the Sharing window once again, then click the Blue button with the text Recording.
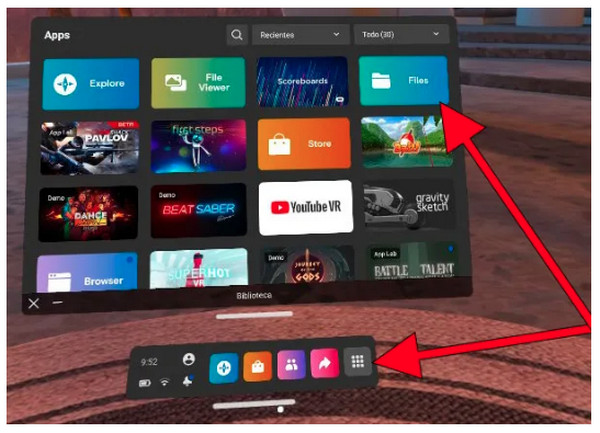
Step 4When finished recoridng Oculus Quest 2, press the Oculus button on the right controller to access the main menu. Find your way to Files, then press the trigger on your controller to open. From there, you can share recorded videos quickly.
Part 2: 2 Best Way to Record Oculus Quest 2 Gameplay with High Quality
Although recording on Oculus Quest 2 built-in recorder is practical, consider using alternatives for more adjusting in video and audio settings for recording screens, such as customizing resolution, output formats, quality, etc. Below are the two ways that are worth trying to learn how to record Oculus Quest 2 gameplay with excellent quality.
1. 4Easysoft Screen Recorder
If you find the output quality is not good when recording Oculus Quest 2 with the built-in, you should know a more professional gameplay recording program, the 4Easysoft Screen Recorder. The program works flawlessly on Windows and Mac, and as a screen recorder, it works more conveniently compared to other programs. It gives users options for recording the screen, such as recording the entire screen, a window, or customizing part of the screen only. It comes with a built-in Game Recorder, wherein you can quickly record games and upload all of them on social media platforms.
You can also make adjustments in video settings to get the quality you want. Aside from that, it has support for a wide range of formats from which you choose to export your recorded gameplay. On the other hand, recording using the built-in Oculus Quest 2 only has one format supported.

A Game Recorder that enables users to record gameplay with convenience.
Custom hotkeys when recording for quickly starting, stopping, pausing, resuming, and taking screenshots while recording.
Supports CPU and GPU Acceleration tech, allowing you to have a high-quality recording with no lag.
Has a Preview window where you can trim gameplay recording to delete extra parts.
100% Secure
100% Secure
Step 1After launching the program, 4Easysoft Screen Recorder, hit the Game Recorder option on the main interface. Then go to the Oculus Quest 2 gameplay.

Step 2For high-quality gameplay recordings, click the Gear icon and make some adjustments. When done, click the OK to apply changes.
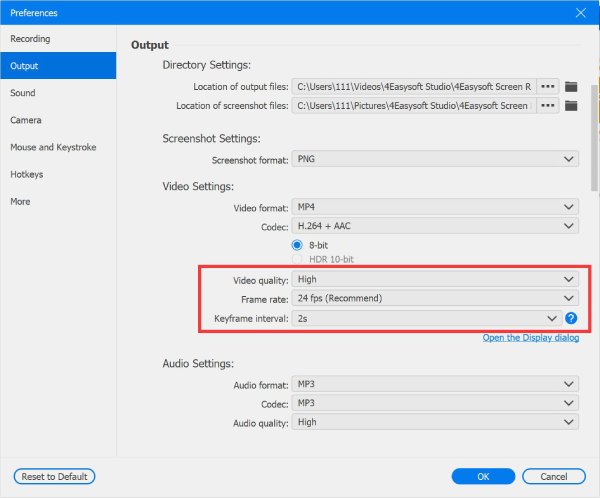
Step 3If ready, hit the REC button, then a 3-second countdown will start for you to go back to the gameplay window.

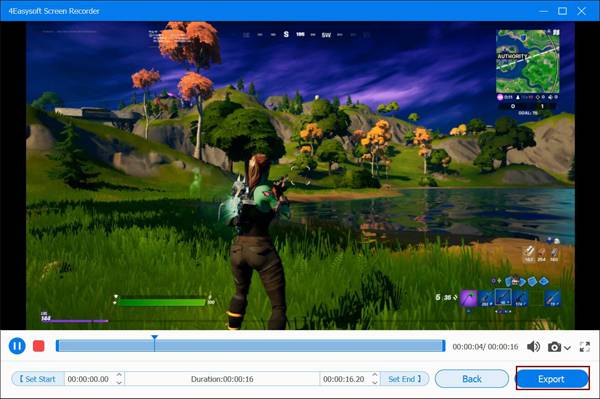
Step 4To finish the recording, click the Stop red icon. You can then check the recorded Oculus Quest 2 in the Preview window to remove unnecessary parts before exporting. And that’s how to record Oculus Quest 2 gameplay with the said program.
2. OBS
OBS Studio is another ideal program to answer how to record Oculus Quest 2 gameplay. Aside from recording the screen, it can also record your webcam at the same time. Additionally, it adds text, overlays, manages live streaming sources, and other various tasks. Plus, OBS makes it easy to add a virtual background with its superb Green screen feature, which many competitors don't have. You can also record audio from your computer system and microphone. It offers more than you think, and if you want to get to know more about it, you can download and use OBS for free on its website.
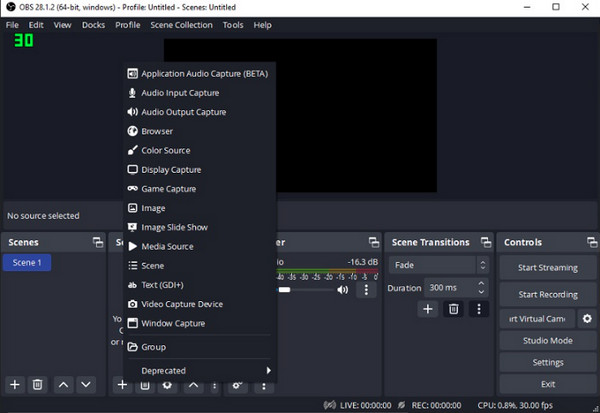
Step 1Once you get the OBS Studio, on its main interface, click the Plus sign under the Sources. Then hit Display Capture.
Step 2A new screen window will appear; tap Create New. Afterward, you will need to choose the display source on the menu.
Step 3After that, to start recording the Oculus Quest 2 gameplay, click Start Recording under Controls. Then it will start recording the Oculus Guest 2 gameplay.
Step 4To end it, click the Stop Recording from the program, then navigate to File from the above menu. Locate Show Recording to watch your recorded gameplay. And that’s it; you just learned how to record Oculus Quest 2 gameplay with OBS.
Part 3: FAQs about How to Record on Oculus Quest 2 Gameplay
-
Why are recorded Oculus Quest 2 videos blurry?
Sometimes, the cause of blurriness on Quest 2 is the IPD mismatch. Make sure you have used the correct settings on your Oculus Quest 2.
-
How long can I record on Oculus Quest 2?
The limit of recording on Oculus Quest 2 depends on the storage you have. If you’re using the one with 128Gb or 256GB, you can record many videos.
-
Where do recordings on the Oculus Quest 2 store?
Once you finish recording, all videos are saved in the Files app. To go there, press the right controller to access the main menu. Select the Camera, then Record Video.
Conclusion
Now, you have learned how to record on Oculus Quest 2 by default. And the other two ways offer a complete process for you to find out how to record Oculus Quest 2 gameplay on a computer. Regardless of how many ways there are, it is much easier with the 4Easysoft Screen Recorder, one of the best screen recorder for Window/Mac. Here, you can record gameplay, video, audio, webcam, etc., with the highest possible quality. Try it out now!
100% Secure
100% Secure


