Record video, audio, gameplay, and webcam with precious moments on Computers.
Don't Know How to Screen Record on Chromebook? 3 Effective Ways

Posted by Aira Lesly Escoto to Record Video Dec 09, 2022
Maybe you do not know how to screen record on a Chromebook when you get this kind of new laptop. You will find that you can't install every tool you want on Chromebook, and the screen recorders as well. Luckily, this post will tell you three methods of how to screen record on a Chromebook. You can find the convenient default way, and the professional online screen recorder to help you get the best recordings on Chrome, including meetings, games, video calls, or anything else on your screen.
Guide List
Part 1: How to Screen Record on Chromebook via Professional Tool Part 2: Detailed Steps to Screen Record on Chromebook with Default Tools Part 3: FAQs about How to Screen Record on ChromebookPart 1: How to Screen Record on Chromebook via Professional Tool
Actually, the best way to screen record on Chromebook is to use professional tool like 4Easysoft Free Screen Recorder. This software could help you to capture your screen with the desired screen area and better effect. There is no time limitation or lag out even compared with the default tool. And you could record anything you want with this software, such as games, video calls, and even the view of the webcam. There are also customized settings for you to change the hotkeys and outpur formats. You can decide which format and quality want to record the screen on Chromebook.
◆ Provide high quality up to 60fps and 4K resolution and even lossless quality to export recordings.
◆ Add text, arrows, lines, shapes, and callouts during recording which cannot be done when using the default tool to record Chromebook.
◆ Set customized hotkeys and video settings to export high-quality output.
◆ Record audio on the computer and your voice from the microphone.
Here are the steps on how to screen record on Chromebook by 4Easysoft Screen Recorder:
Step 1Go to the official website of 4Easysoft Free Screen Recorder and click the Record Now button to capture the screen on Chromebook.
Step 2Here you can see the rectangle of screen area, and you can drag it to choose the recording area of your Chromebook. You can drag it freely to capture the whole screen of your Chromebook or the customized part of your screen.
Step 3If you want to record a video with audio, you can adjust the Speaker and Microphone to capture all sound. Don’t forget to change the volume by pulling the slider. You can also open the Camera option to make a tutorial video.
Step 4After all settings are done, click the REC button on the right side to start recording screen on Chromebook. Then a toolbox will pop up, and you can use it to add shapes, lines, and callouts and take screenshots during the recording time.
Part 2: How to Screen Record on Chromebook with Default Tools
There are also two ways how to screen record on Chromebook with default tools. It will be convenient to use the default tool, but the disadvantages are pretty much. For example, you may have lag out when recording the games, or there is no external audio during the recording times.
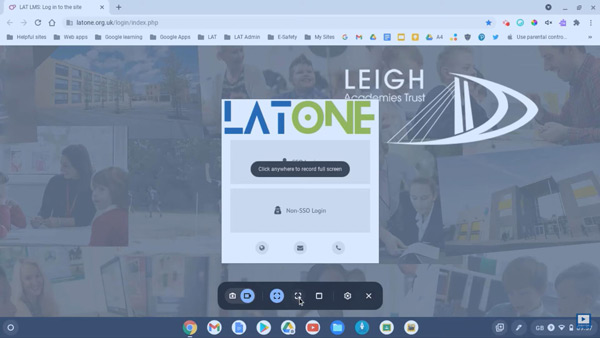
1. Using a Screen Capture Option
The first way is using the screen capture option on Chromebook. Although this is a default tool, you still need to download an extension to record your screen, otherwise, you can only screenshot your Chromebook.
Now let us take a look at how to screen record on a Chromebook with this default tool:
Step 1First of all, you need to install the extension from the Google Chrome Web Store. You can download Screencastify or other extensions.
Step 2Once installed and enabled, you can click the Screencastify in your Screen Capture toolbar to start recording. Nonetheless, you’ll need to set up an account before you start recording for more than a minute at a time.
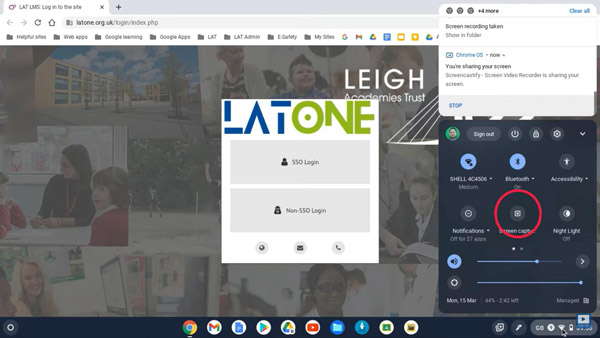
Step 3To screen record on Chromebook with the extension, you first need to use the built-in screen capture option by pressing Ctrl + Shift + Switch Window keys. This will open up a small menu in the bottom right corner of your screen, where you can choose whether you want to record the entire screen or just a portion of it.
2. Using Keyboard Shortcuts
There is also another default way to record your Chromebook, which is to use the keyboard. Before you get into details of how to screen record on your Chromebook with keyboard shortcuts, it is important to note that they come in two types: global and browser specific.
Global shortcuts: it will work no matter what app or window you have open. Now that’s out of the way, here are some global keyboard shortcuts to help you know how to screen record on Chromebook:
Ctrl + Alt + R – starts/stops a recording.
Ctrl + Shift + P – pauses/resumes a recording.
F11 – full-screen mode.
Esc – stops a recording or exits full-screen mode.
Ctrl + Alt + Shift + R – displays the recording options dialog box.
Browser-specific shortcuts: it only works in Chrome windows and when a browser extension has been installed. You also have some browser-specific shortcuts that you can use to record your Chromebook screen:
Ctrl + Shift + H: starts and stops video recording.
Ctrl + Shift + U: it takes a screenshot of what’s currently on your screen.
Further Reading
 How to Record Gameplay on PS4/5 with Audio and Webcam
Part 3: FAQs about How to Screen Record on Chromebook
-
How do you record your screen with Face Cam on a Chromebook?
You need to use an external recorder app. There is no default tool to record face cam on Chromebook. 4Easysoft Screen Recorder offers the cam recorder for Chromebook to record many things like gameplay, Webex meetings, and so on. There are many features to adjust your camera recording in this software.
-
Where to find recording videos which are recorded by default tools?
Recordings and screenshots get saved to your Downloads folder. You can change where your recordings or screenshots are saved. You can press Shift + Ctrl + Show Windows keys. At the bottom, click the Settings button and then choose the save path.
-
How to screen record on Chromebook if my Chrome OS is too old?
Many people will find out that their Chrome browser version is too old to use the default tools to record screens. You can use a third-party software, or you can use the Flags feature to record the screen. many Flags are in the testing stages before being rolled out in future updates. You just have to copy and paste this into your browser: chrome://flags#screen-capture. And the Flags feature will be enabled.
Conclusion
There are three ways introduced to you to tell you how to screen record on Chromebook. And you will find out that the default tools need you to install extra extensions and the output recordings are not good. So, if you want to record your screen with a good experience, you should use 4Easysoft Free Screen Recorder. You can also download its professional version on your Windows/Mac to use more functions.
100% Secure
100% Secure