Record video, audio, gameplay, and webcam to record precious moments easily.
How to Screen Record Videos in 4K on Mac with High Quality

Posted by Ethan Brooke to Record Video Apr 03, 2025
If you have ever wanted to capture crystal-clear screen recordings on your Mac, you’re not alone. Whether for tutorials, gameplay, or video calls, you cannot deny the appeal of having 4K resolution. How to screen record vids in 4K on Mac, then? Luckily, so many options are out there, but which one works best? In this post, you’ll learn the top 4 methods on how to screen record vids in 4K on Mac; each offers a different approach and features.
Guide List
Method 1. Best Way to Record in 4K with 4Easysoft Screen Recorder Method 2. Use Mac’s Built-in Recorder to Capture Video in 4K Method 3. Record in 4K with Mac’s QuickTime Player Method 4. Make a 4K Recording with Record Go for FreeMethod 1. Best Way to Record in 4K with 4Easysoft Screen Recorder
When it comes to having flawless 4K recorded videos on your Mac, 4Easysoft Mac Screen Recorder does not disappoint! This lightweight yet powerful software gives you high-definition recording power up to 4K, ensuring your videos will be crisp and clear. Regardless of whether you want to record for tutorials, gameplay, or presentations, the advanced technology of this program ensures the highest quality remains throughout the entire session. Besides knowing how to screen record vids in 4K on Mac, the best part is it also supports both system, mic audio, and a webcam, making it a versatile choice for every recording task! Moreover, you can use its drawing tools during the process to annotate areas in real-time, as well as its editing tools, letting you play around with your video as much as you want.

High-quality recording is ensured with up to 4K and 60 fps.
Allow you to choose to record the full screen or select a specific region.
Let you save recordings in popular formats like MP4, MOV, AVI, etc.
Adjust recording settings, such as resolution, based on your requirements.
100% Secure
100% Secure
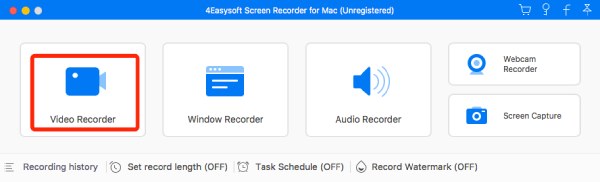
Step 1Launch the 4Easysoft Screen Recorder on your Mac. To get started, click the "Video Recorder" option. You can head to the "Settings" button above to adjust recording settings like quality, frame rate, format, and more.
For the recording area, you can record the entire screen by selecting "Full" or a specific area by selecting "Custom". Whatever you choose, you can still move their borderlines to adjust the capture area.
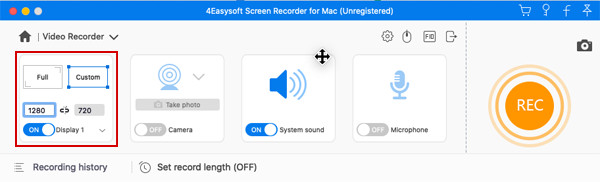
Step 2Now, determine if you want to include "System Sound" or "Microphone" in your recording. If so, please turn on their respective switch buttons. You may also pull their sliders to change their volume.

Step 3Upon choosing all settings, it’s time to click the "REC" button on the right side. Using the pop-up toolbox, add shapes, lines, callouts, and even take screenshots during the recording.

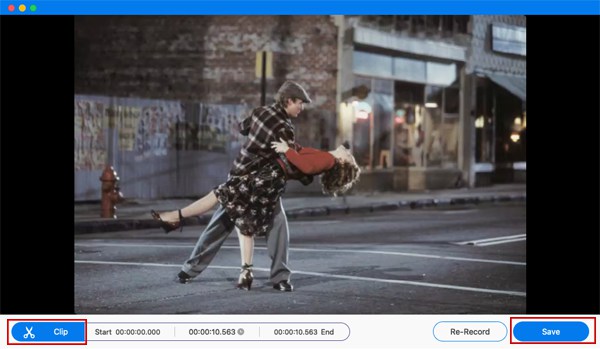
Step 4Once everything is finished, click the "Stop" button to halt the recording and bring up the preview window, where you can remove portions of the start and end of the video. Click the "Save" button to download the recorded video in 4K on Mac!
Method 2. Use Mac’s Built-in Recorder to Capture Video in 4K
Meanwhile, you can learn how to screen record vids in 4K on Mac, too, without installing anything. How? With Mac’s built-in screen recording feature! This tool supports high-resolution displays, where you can quickly record your Mac screen in 4K, as long as your Mac supports it. Mainly ideal for quick recordings of apps, presentations, walkthroughs, and more, this built-in record is a solid option for basic 4K recording needs. However, you cannot expect a bunch of editing tools that some apps do have. If you don’t mind, check out the steps below to screen record vids in 4K on Mac:
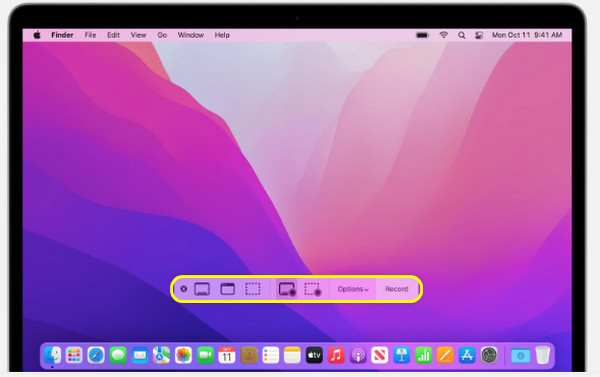
Step 1Access the screenshot toolbar by pressing the "Shift + Command + S" keys. Then click the "Options" dropdown menu to determine your desired "Audio" and "Microphone", and "Save to" preferences.

Step 2Select the recording area right after, like full screen, or select a specific portion. Once done, click the "Record" button to begin screen recording on Mac and the "Stop" button to conclude the operation.
Method 3. Record in 4K with Mac’s QuickTime Player
For those looking for a straightforward solution to screen record vids in 4K on Mac, QuickTime Player offers you that! While it is primarily known for media playback, a built-in screen recorder can also be found in its hands, supporting high-definition capture. With just a few clicks on your Mac, you can access QuickTime’s recording feature and get pristine 4K resolution. But you should note that you can’t use it to record the system sound on Mac. Though it does not hold as many advanced settings as other apps, it is still excellent and the perfect tool for casual users. Here’s how to screen record vids in 4K on Mac using its default QuickTime Player:
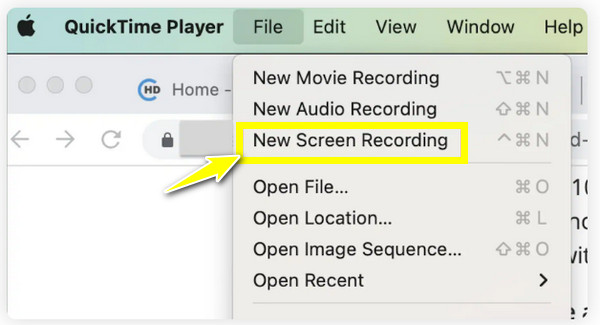
Step 1Open QuickTime from the "Applications" folder. Navigate to the "File" menu above and choose the "New Screen Recording" option.
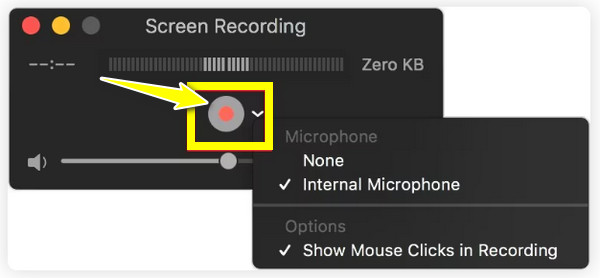
Step 2From the "Record" button, click the "Arrow" next to it to choose whether or not to add microphone and cursor clicks. Click the "Record" button to begin. Click anywhere on your Mac screen for a full screen; for specific areas, drag the cursor to choose a portion.
Step 3Click the "Stop" button to finish the recording session. Your recording will be automatically opened, and now, you can make simple edits to it and then save it.
Method 4. Make a 4K Recording with Record Go for Free
If you want a free solution to screen record vids in 4K on Mac, Record Go is one of those excellent options for Mac! Despite being cost-free, it gives high-quality 4K screen recording with no hidden charges or restrictions. Furthermore, Record Go covers tons of formats and lets you record system audio alongside your Mac screen, still guaranteeing the video quality remains intact. Thus, if you need a no-fuss tool to capture high-definition footage and is lightweight in resources, follow the instructions below on how to screen record vids in 4K on Mac with Record Go:
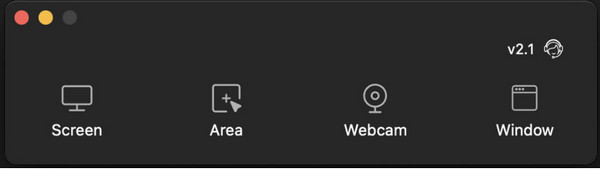
Step 1Launch Record Go on your Mac. Begin by selecting a recording mode like "Screen", "Area", "Webcam", or "Window".
Suppose you choose "Screen"; customize the settings for microphone and system sound, as well as webcam footage and mouse cursor. You can also see the frame rate and resolution options on the right side.
Step 2Once done, click the "REC" button to start capturing your on-screen activities. When you have completed the recording, click the "Stop" button.

Conclusion
As shown here, recording 4K videos on Mac does not have to be complicated. Thanks to Mac’s built-in recording tools or the free Record Go, you have solid options to learn how to screen record vids in 4K on Mac. However, for a balance of quality and versatility, the highly recommended one is the 4Easysoft Screen Recorder. With its ability to create stunning 4K recordings together with advanced features like real-time annotations and more customization options, you can be confident of capturing any of your recording tasks!