Record video, audio, gameplay, and webcam to record precious moments easily.
5 Trouble-free Ways on How to Stop Screen Recording on Mac QuickTime
Apple develops Mac QuickTime not only to play various media files but also to record Mac’s screen easily. However, people begin to experience technical errors in stopping the recording process on Mac. What makes it much worst is that it also fails to save the recordings. If you are searching for a way to solve this, well, you are on the right page! Continue to read this article to discover 4 ways how to stop a screen recording on Mac’s QuickTime and the best alternative solution!
Guide List
Part 1: 4 Efficient Ways to Stop Screen Recorder on Mac of QuickTime Part 2: The Best Way to Start and Stop Screen Recording on Mac with Hotkeys Part 3: FAQs about How to Stop Screen Recording on MacPart 1: 4 Efficient Ways to Stop Screen Recorder on Mac of QuickTime
There are a lot of ways how to stop a screen recording on Mac. However, some are failing due to technical errors. As mentioned above, this post collected 4 default ways to end a recording process on Mac QuickTime. Pick the one that works on your end.
1. Direct Way - One of the easiest options is directly stop screen recording on Mac through its Stop button. Additionally, through the Stop button, you can trim the beginning and end of your screen recording and be assured that QuickTime will be saved on your local storage. So how to stop screen recording on Mac directly through its Stop button? Go after these steps to do this method:
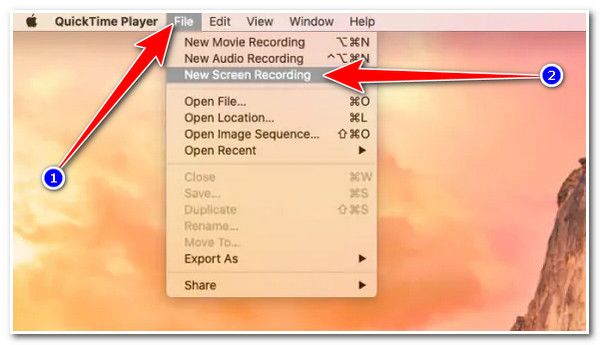
Step 1Launch the QuickTime program on your Mac, click the File tab, and select New Screen Recording.
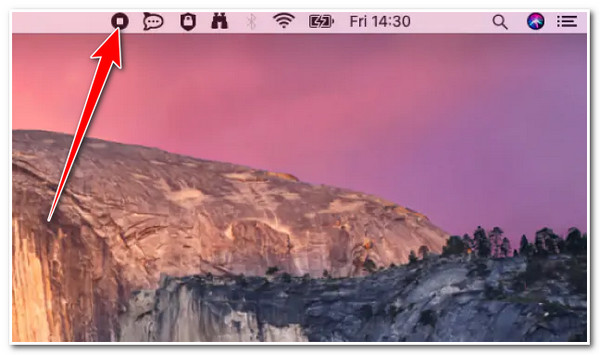
Step 2Next, to initiate the recording process, tick the Record button. Once you are done recording, select the Stop icon on the toolbar at the upper part of your Mac’s screen.
2. Shortcut - If the first method doesn’t work on your end, another way to stop screen recording on Mac’s QuickTime is by using keyboard shortcuts. If the Stop icon doesn’t appear on your toolbar on the upper part of your Mac screen, this method could help you stop recording without clicking buttons like the Stop icon. Additionally, this also helps you initiate an immediate stop recording. How to stop a screen recording on Mac? Here are the steps to this method:
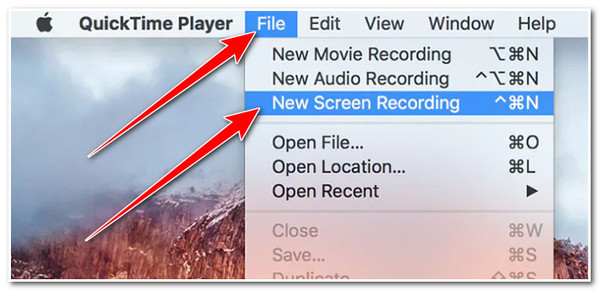
Step 1Access the QuickTime program, and instead of clicking other buttons, you can press Ctrl + Command + N simultaneously to launch a new recording.
Step 2Next, tick the Red button in a Circle icon on the recording bar to start the recording.
Step 3After that, press the Ctrl + Command + Esc altogether to stop the recording right away.
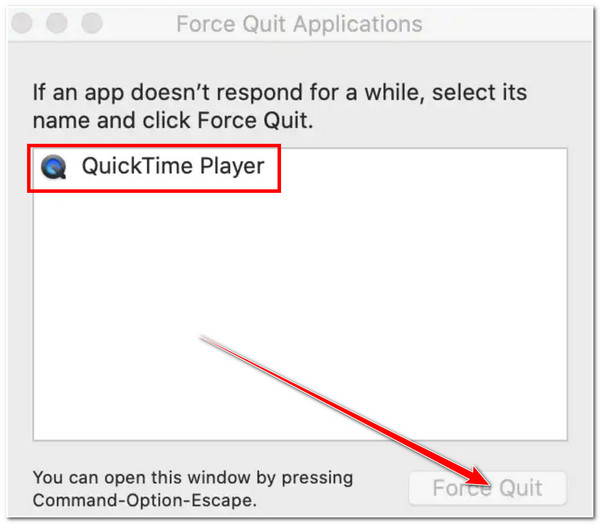
3. Force Quit - Another way to end QuickTime screen recording is to force quit. If those two methods above don’t apply to you, whether the stop button doesn’t appear on the toolbar, the keyboard shortcut is not working, or you encounter technical errors, forcing it to quit will end the recording. Here are the steps on how to stop screen recording on Mac via the Force Quit method:
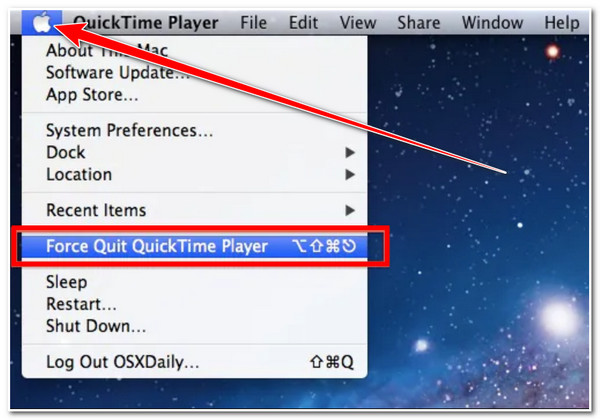
Step 1During the screen recording, click the Apple logo at the upper left corner of your Mac screen and select Force Quit from the options.
Step 2After that, from the new window, look for QuickTime Player from the list of programs, tick it, and select the Force Quit button.
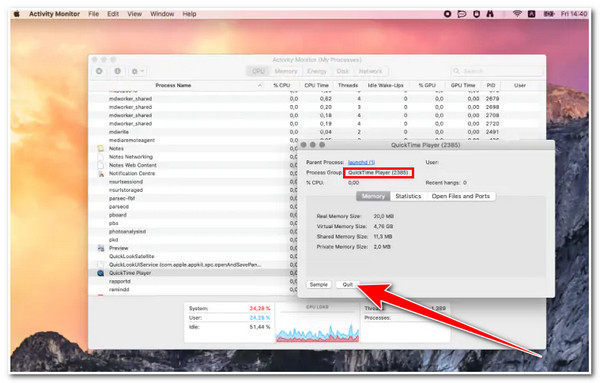
4. Activity Monitor - Last but not least, end the QuickTime screen recording process using Mac’s Activity Monitor. This program displays various applications currently running in the background, allowing you to close them temporarily. Through this program, you can terminate the QuickTime Player, which also causes to screen recording process to stop. Follow the steps below on how to stop a screen recording on Mac by using the Activity Monitor:
Step 1Access the Finder on your Mac, head to Applications, and click Utilities. After that, select the Activity Monitor.
Step 2Next, look for the QuickTime Player from the list of programs and tick it. Then, click the Quit button to close the program. However, this method often fails to save the recorded file.
Part 2: The Best Way to Start and Stop Screen Recording on Mac with Hotkeys
Now that you know how to stop screen recording on Mac QuickTime, you are now able to end QuickTime from recording your screen and save the recorded file from your local storage. But why do you need to stick with QuickTime’s screen recorder when you can use the 4Easysoft Mac Screen Recorder tool, which could do the work much more efficiently and quickly? This is made possible by the tool’s built-in hotkeys, which are well-composed for easy execution of start and stop recording. Moreover, it is also infused with an easy-to-understand toolbox that you can use to initiate the process of stopping, pausing, and adding shapes, lines, arrows, etc.

Support various lossless and high-quality media formats to export video, audio, or game recording.
Offer output tweaking options that you can use to modify and enhance the recorded file’s quality.
Equipped with customized hotkeys to start or stop recording on Mac with the desired combinations.
Intergrated with CPU and GPU acceleration technology that records on-screen activities, especially gameplays with high quality and without lag.
100% Secure
100% Secure
How to Start and Stop Screen Recording on Mac using 4Easysoft Mac Screen Recorder Tool’s Built-in Hotkeys:
Step 1Download the 4Easysoft Mac Screen Recorder tool on your Mac. After that, launch it and click the Video Recorder.

Step 2Then, click the Full option if you wish to record the entire screen of your Mac. Otherwise, tick the Custom button if you wish to capture a specific screen window or select a resolution. You can also adjust and move the borderlines to the area you want to capture.

Step 3After that, tick the System Sound’s Switch button to record any on-screen activities with sound. You can also turn On the Microphone by clicking the Switch button to record your voice during the screen recording.

Step 4Once you finish the arrangements, tick the REC button to start the screen recording process. You can add shapes, lines, arrows, and callouts and take screenshots during the recording process.

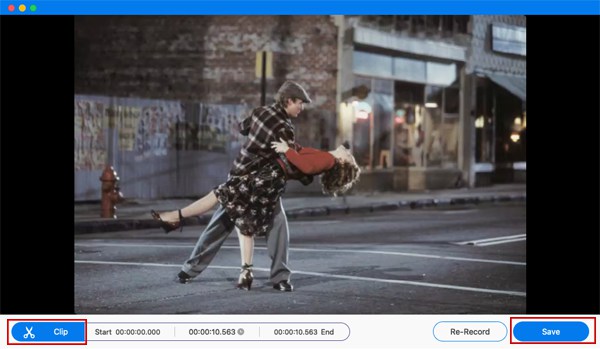
Step 5If you are done recording, tick the Stop icon to stop the screen recording on Mac. After that, you can trim your recorded file’s unwanted beginning and ending parts in the preview section. Then tick the Save button to export the recorded file to your local storage.
Part 3: FAQs about How to Stop Screen Recording on Mac
-
How to stop screen record on Mac with audio?
To stop QuickTime from recording your screen with audio is the same as the 4 methods above. You can either click the Stop icon from the toolbar, press the Command + Control + Esc on your keyboard simultaneously, force quit the QuickTime Player from the list of programs you found after clicking the Apple Logo, or through Activity Monitor.
-
Does QuickTime Screen Recorder supports video editing options?
Yes, it does. QuickTime Player offers editing, such as trimming, merging, and rotating clips. However, to edit videos with more advanced editing features, you must use other applications that offer those features.
-
Where can I find QuickTime screen-recorded files?
QuickTime screen recorder automatically stores on-screen recorded files on your desktop in MOV format. When you stop screen recording on Mac, you can also rename the file directly from the desktop or the QuickTime toolbar. Select the Save As button and rename the screen-recorded file according to your preferences.
Conclusion
There you go! Those are the 5 methods how to stop screen recording on Mac QuickTime. Now that you know how to stop QuickTime screen recording, you are now able to free yourself from the frustration of going through a lengthy screen recording, and in the end, you don’t know how to end it. If you are searching for a tool that can capture any on-screen activities quickly and without any hassle, then the 4Easysoft Mac Screen Recorder tool is what you need! With this tool’s easy-to-understand built-in Toolbox and customizable Hotkeys, you can record your Mac screen efficiently and with ease. Feel free to visit this tool’s official website to experience its powerful features firsthand. Download and install it now!
100% Secure
100% Secure


