Transfer and manage all data between iOS devices, device and computer, and iTunes and devices.
How to Transfer MP3 to iPhone: 4 Efficient Yet Doable Ways
Whether you want to transfer MP3 music from an iPhone, Windows/Mac, or iTunes, there are many file transfer tools you can use out there. However, although they are useful, you might still want to consider their imposed limitations, or you might still want to be guided on how to use them. Thankfully, you landed here! This post features 4 efficient yet doable ways to transfer MP3 to iPhone with their limitations. So, without further delay, start exploring each of them now.
Guide List
Transfer MP3 Music to iPhone Directly without iTunes iTunes/Finder to Transfer MP3 to iPhone on Windows/Mac How to Transfer MP3 to iPhone via Music App How to AirDrop MP3 Music to iPhone 16 FAQs about How to Transfer MP3 to iPhoneTransfer MP3 Music to iPhone Directly without iTunes
If you are looking for a way to transfer MP3 to an iPhone without iTunes, then the professional 4Easysoft iPhone Transfer tool is what you are searching for! This Windows and Mac-compatible tool lets you seamlessly transfer various MP3 files between iOS devices (including iPhone) and iOS devices to a computer. Moreover, this tool is also infused with an advanced preview feature that displays MP3 files comprehensively for easy preview and selection. It is also equipped with a Music Editor that you can use to manage MP3 files from an iPhone before transferring them.
Integrated with Music Editor that lets you create, convert, listen, and delete MP3 files.
Integrated with Music Editor that lets you create, convert, listen, and delete MP3 files.
Infused with a ringtone maker that lets you turn your favorite MP3 music into a ringtone.
Incorporated with an option to sync iTunes MP3 files to your iPhone or computer.
100% Secure
100% Secure
How to Transfer MP3 to iPhone Using 4Easysoft iPhone Transfer Tool:
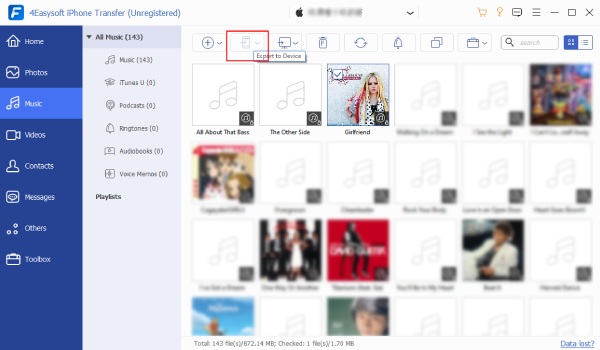
Step 1Download and install the 4Easysoft iPhone Transfer tool on your Windows or Mac computer. After that, launch the tool and link the iPhone to where the MP3 file is saved using a USB cord. Then, select the "Music" tab on the left pane.

Step 2Next, select the music you wish to transfer from the different categories. Then, once you have selected it, link your iPhone where you wish to store the MP3 music using another USB cable to the computer.
Step 3After that, click the "Export to Device" button with the "mobile device" icon at the top of the tool’s interface. Then, confirm the operation. And that’s it! Those are the simple steps to transfer MP3 to iPhone using this tool.
iTunes/Finder to Transfer MP3 to iPhone on Windows/Mac
Apart from the above method, you can also use iTunes/Finder to transfer MP3 to your iPhone. iTunes/Finder also offers an easy MP3 file-transferring process for iOS devices. However, there are limitations that you need to consider before using iTunes/Finder. These limitations include the following:
◆ Transferring MP3 files through iTunes will overwrite your iPhone's existing files.
◆ Some iTunes library’s music will not be available to sync due to uncertain errors.
◆ You might encounter unsuccessful MP3 file transferring due to configured settings.
Now, if you still want to try iTunes/Finder to transfer MP3 to iPhone on Windows/Mac, here are the 2 different guides.
If you are utilizing a PC, here are the steps on how to transfer MP3 from PC to iPhone using iTunes that you must follow:
Step 1Link your iPhone to the computer, run the current version of iTunes, and tap the "Trust This Computer" button on your iPhone (if only asked).
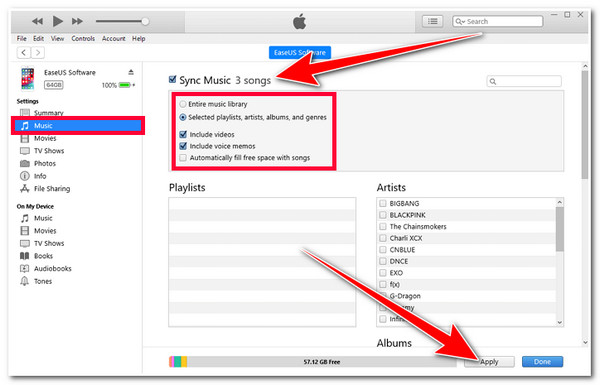
Step 2Then, wait until iTunes detects your iPhone. Once it detects your iPhone, click the "iPhone" icon at the top left menu and tick the "Music" button right below the "Summary" option.
Step 3Next, click the "Sync Music _ Songs" checkbox and choose between two of the options below, whether you want to sync the entire music library or select playlists, artists, albums, etc.
Step 4After that, you should choose whether to include videos or voice memos. Finally, you can tick the "Apply" button once you are done. And that’s it! That’s how you transfer MP3 to iPhone using iTunes on your PC.
Otherwise, if you are utilizing a Mac, here are the steps on how to transfer MP3 to an iPhone using Finder that you need to follow:
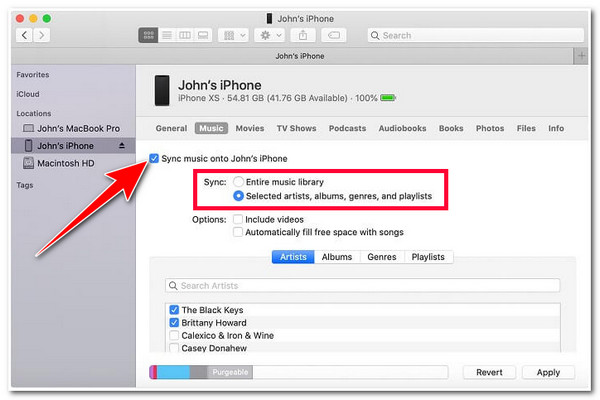
Step 1 Link your iPhone to the Mac using a USB cord, launch the Finder program, and click your "device" icon. After that, tick the "Music" tab.
Step 2Then, click the "Sync music onto [your device]" checkbox and choose whether to sync the entire music library or only selected artists, albums, genres, etc. After that, tick the "Apply" button. And that’s it! That’s how you transfer MP3 to iPhone using Finder on your Mac.
How to Transfer MP3 to iPhone via Music App
There you have it! Those steps are to transfer MP3 to iPhone using iTunes/Finder on Windows/Mac. Apart from using Finder on Mac, another easy way to transfer MP3 to an iPhone is to use a Music app. However, this method is only suitable for you if you are using a Mac. So, how do you transfer MP3 to an iPhone using the Music app? Here are the steps you must follow:
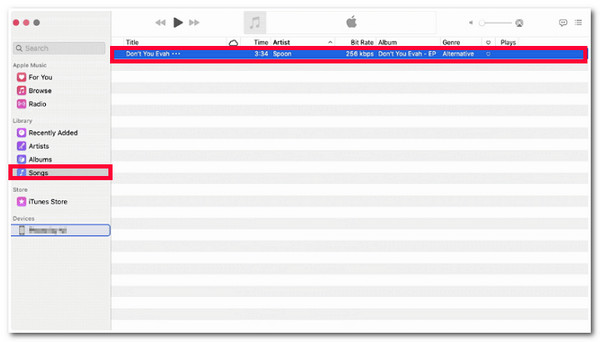
Step 1Link your iPhone to your Mac and launch the Apple Music. After that, unlock your iPhone and tap the "Trust" button to trust the computer.
Step 2Then, once your Mac recognizes your iPhone, access the "Songs" tab on Apple Music and select the "MP3" files you wish to transfer. Finally, drag and drop them on your iPhone. And there you go! That’s how you transfer MP3 to an iPhone using the Music App.
How to AirDrop MP3 Music to iPhone 16
The last method you can use to transfer MP3 music to iPhone 16 is AirDrop. AirDrop is a proprietary wireless file-sharing feature developed by Apple. It lets users quickly and easily transfer files between Apple devices like iPhones, iPads, and Macs that are nearby. However, before using AirDrop, you need to ensure that both devices are in Bluetooth range because if not, you might experience transferring issues. So, transfer MP3 from iPhone to iPhone wirelessly via AirDrop? Here are the steps you must follow:
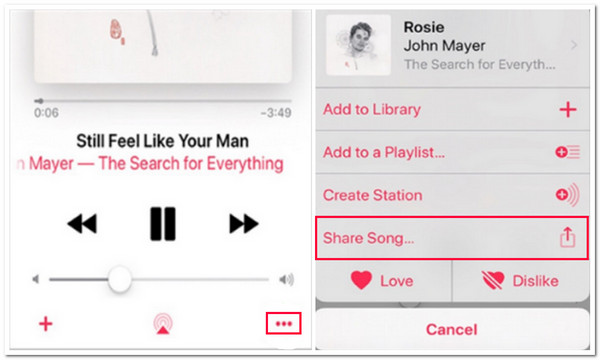
Step 1Turn on AirDrop on both iPhones. Then, on the source device, launch the Music app, access the MP3 file you wish to transfer, and tap it to play.
Step 2After that, tap the "three-dotted" icon and select the "Share Song" option. After that, you will see nearby devices; tap the AirDrop name of the iPhone where you wish to transfer the MP3 file.
Step 3Finally, head to the receiving iPhone and tap the "Accept" button to start the process of transferring the selected MP3 file. And that’s it! That’s how you transfer MP3 to an iPhone using AirDrop!
FAQs about How to Transfer MP3 to iPhone
-
1. How do I transfer MP3 files from Mac to iPhone using AirDrop?
To transfer MP3 music from Mac to iPhone using AirDrop, you must first locate the MP3 you wish to transfer on your Mac, right-click on it, and select the Share option. After that, tick the AirDrop button and select the receiving iPhone. On the receiving iPhone, tap the Accept button.
-
2. How long will it take for iTunes/Finder to transfer/sync MP3 files to iPhone?
The time it takes for iTunes/Finder to transfer MP3 to your iPhone depends on factors like MP3 file size, number of MP3 files, and connection speed, ranging from a few seconds to several minutes or even hours for larger transfers.
-
3. How can I transfer MP3 from iPhone to Android?
To transfer MP3 from iPhone to Android, you can use a cloud service platform like Google Drive on your iPhone. You can upload the MP3 music to Google Drive using your iPhone. Then, access the same Google Drive on your Android; from there, you can download the MP3 files.
Conclusion
There you go! Those are the 4 efficient yet doable ways to transfer MP3 to iPhone! You can now transfer all the music you wish to move to your iPhone through these ways! If you are hesitant to use the last three featured methods, use the professional 4Easysoft iPhone Transfer instead! With this tool’s powerful MP3 transfer feature, you can experience a seamless, seamless MP3-to-iPhone transfer process. To discover more about this tool’s features, visit its official website today!
100% Secure
100% Secure


