Transfer and manage all data between iOS devices, device and computer, and iTunes and devices.
How to Transfer Music from iTunes to iPhone: 3 Easy Ways
Whatever your reasons might be, whether you wish to transfer ringtones to your iPhone or add new music to your device’s music library, iTunes will be one of the best options you can use! However, iTunes can sometimes be complex to cope with due to bugs. But don’t worry! In this post, you will see 3 efficient and different ways how to transfer music from iTunes to iPhone that will surely achieve your desired purpose of transferring music from iTunes! Start diving below.
Guide List
How to Sync Music from iTunes to iPhone [Data Loss] How to Manually Transfer Music from iTunes to iPhone One-click Way to Transfer Music from iTunes to iPhone FAQs about How to Transfer Music from iTunes to iPhoneBefore you start the journey of exploring each of the ways how to transfer music to iPhone from iTunes in detail, you can first explore the snippet of this post’s featured ways in the table below. By exploring this table, you can set your expectations for each featured way! So, without further delay, explore the table and see how reliable the 3 efficient ways are!
| Fixes | Effectiveness | Difficulty |
| Sync Music from iTunes to iPhone | Transfer iTunes music to iPhone through automatic syncing. | Easy, but with data loss. |
| Manually Syncing Music from iTunes to iPhone | Transfer iTunes music to iPhone manually | Moderate |
| Third-party Tool’s One-click Way to Transfer Music from iTunes to iPhone | Transfer music from iTunes to iPhone or Windows/Mac. | Easy |
How to Sync Music from iTunes to iPhone [Data Loss]
Now that you have explored the table above, it is time for you to transfer your music from iTunes. The first option to show you how to transfer music from computer iTunes to iPhone is syncing. iTunes allows you to sync music library to your iPhone and other iOS devices. However, before you use this option, you must install the updated version of iTunes on your Windows. If you are utilizing a Mac with macOS Sequoia, you can use Finder. Apart from that, you should also expect that all of the music on your iPhone will be replaced (deleted) by the synced music library. If that’s okay with you, here are the steps showing you how to transfer music from iTunes PC to iPhone:
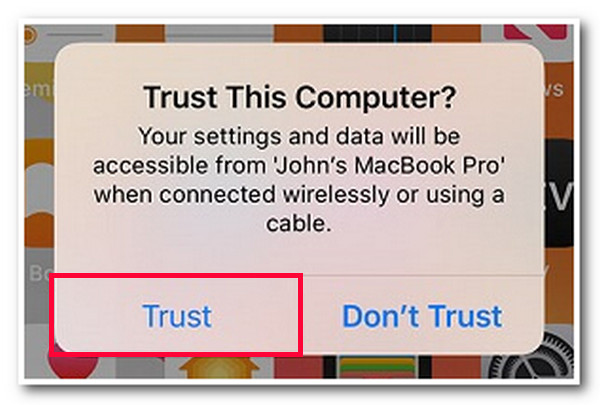
Step 1Link your iPhone to your computer by utilizing a USB cable, launch the iTunes/Finder, and tap the "Trust" button to let your computer access your device (if the Trust button doesn’t appear on your iPhone, it is okay).
Step 2Then, once iTunes successfully detects your iPhone, click the "device’s icon" at the upper panel and select your connected device. After that, select the "Music" tab and choose the entire music library you wish to sync or transfer.
Step 3Next, tick the "Sync" button at the lower part of the screen and wait for the syncing process to finish. Once done, you can access the synced music library on your iPhone. And that’s it! Those are the simple ways how to transfer music to iPhone from iTunes via sync!

How to Manually Transfer Music from iTunes to iPhone
Apart from the above steps on how to transfer music from iTunes to iPhone through automatically syncing, you can also manually transfer music from iTunes to iPhone. Now, the benefit of this is that you are stopping iTunes from auto-syncing the music library to your iPhone. In that way, you can save storage space on your iPhone. Moreover, you can manually choose which music you wish to be transferred. You can choose a piece of music based on artists, albums, and genre. Now, if you want to try this option, here are the steps showing you how to transfer music from iTunes to iPhone without syncing via manual transfer:
Step 1Run the "iTunes/Finder" on your PC/laptop and link your iPhone to the computer by utilizing a USB cord. Then, access your device, select the "Summary" tab, and click the "Manually manage music and video" button.
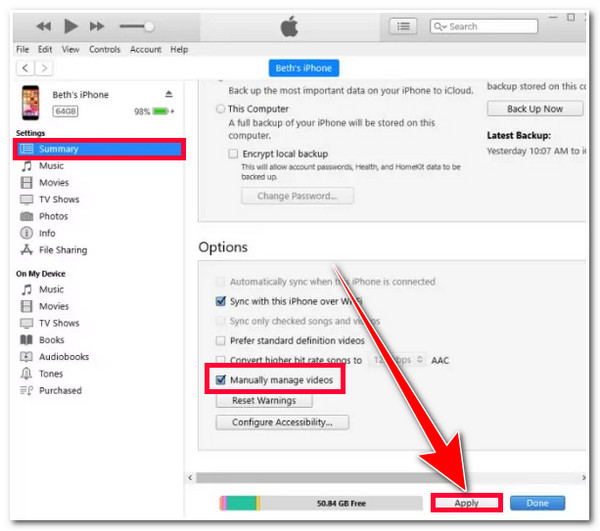
Step 2After that, tick the "Apply" button at the lower part of your screen, go to the "Library" section, and select the "Songs" option. Then, drag and drop the music you wish to transfer to your "iPhone’s Music" section on the left pane of the screen.
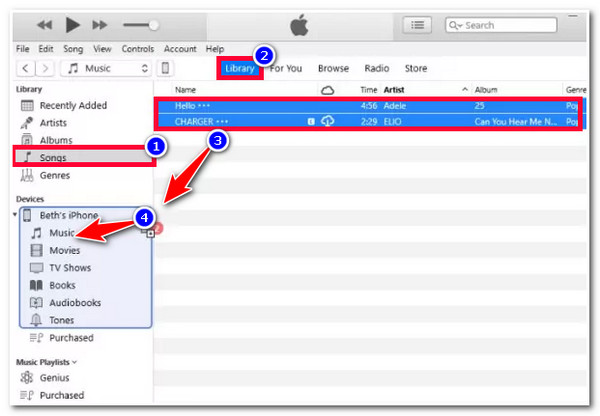
Step 3Then, after doing the above setups, wait for iTunes to finish the transferring process. Once done, you can now access the music on your iPhone. Then, there you have it! Those are the few steps on how to transfer music to your iPhone from iTunes via manual transfer.
One-click Way to Transfer Music from iTunes to iPhone
There you have it! Those are the 2 ways how to transfer music from iTunes to iPhone via sync and manual transfer. If you find those options too laborious and are hesitant to use them due to data loss, you can use the professional 4Easysoft iPhone Transfer tool as an alternative! This Windows and Mac-compatible tool supports a transfer between iOS and iTunes process that lets you sync a batch of iTunes music to your iPhone. With just one click, you can efficiently and quickly transfer your favorite music from iTunes! Moreover, you can transfer them simultaneously without losing data during the process. Now, these are just a glimpse of this tool’s powerful features. If you want to discover more, explore the list below!
Support the iTunes Library feature that lets you transfer music and video library to your iPhone with just a few clicks.
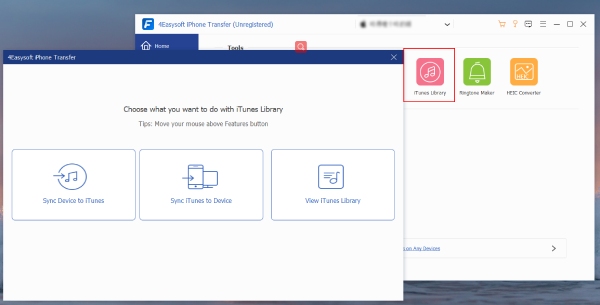
Offer two modes of synchronization: Sync Device to iTunes, Sync iTunes to Device, and View iTunes Library.
Equipped with a built-in music editor that lets you create a playlist, convert audio, edit albums, listen, and delete unwanted music.
Capable of transferring almost all kinds of data, including those categorized as necessary, media, and social media files.
100% Secure
100% Secure
How to Transfer Music from iTunes to iPhone with One-Click Using 4Easysoft iPhone Transfer:
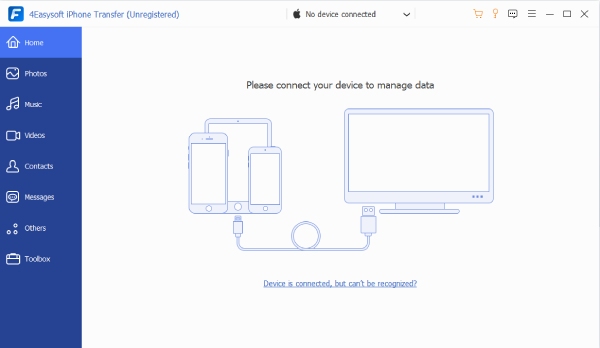
Step 1Download and install the 4Easysoft iPhone Transfer tool on your Windows or Mac computer. Then, launch the tool, insert your iPhone into your computer via a USB cable, tap the "Trust" button on your iPhone, and select the "Toolbox" tab on the lower left corner of the tool.
Step 2Next, select the "iTunes Library" option, and from the menus, choose the "Sync iTunes to Device" option. After that, on the new window, put a "checkmark" on the "Music" option and tick the "One-Click to Device" button.
Step 3After that, wait for the tool to finish the syncing process. Once done, you can now access the synced iTunes music on your iPhone. And that’s it! Those are the simple ways how to transfer music from iTunes to iPhone using this tool’s iTunes Library feature!
FAQs about How to Transfer Music from iTunes to iPhone
-
How do you transfer music from a PC to an iPhone without iTunes?
You can utilize a USB cable to transfer your PC’s music to your iPhone without using iTunes. You need to link your iPhone to your computer via a USB cord to do this. Then, you can transfer your PC’s music by copying the file and moving it to your iPhone’s local storage.
-
How do you transfer music from an iPhone to a PC?
To transfer/move music from iPhone to PC, you can use Dropbox. Install Dropbox on your PC and iPhone, sign in to both devices' Dropbox with the same account, and upload the songs you wish to transfer from your iPhone. Next, download the songs on your computer.
-
Why is some music on iTunes not syncing to iPhone?
There are many reasons why music on iTunes is not syncing on your iPhone. These reasons might be due to incompatible formats, the files being corrupted, or being embedded with copyright protection. You can transform it to a compatible file format or re-download the music.
Conclusion
That’s it! Those are the 3 efficient and different ways how to transfer music from iTunes to iPhone. With these 3 ways, you can enrich your iPhone’s music library and vibe with your favorite music anytime and anywhere! If you find the two options too laborious and hesitant to use due to possible data loss, you can use the 4Easysoft iPhone Transfer tool! With this tool’s powerful iTunes Library feature, you can easily and quickly transfer your iTunes library to your iPhone! Visit this tool’s official website to discover more.


