Record video, audio, gameplay, and webcam to record precious moments easily.
How to Upload iMovie to YouTube [with More Details!]
For Apple enthusiasts, you’ve been familiar with editing using the iMovie app, but the uploading process to YouTube has been a question for you ever since. How to upload iMovie to YouTube? This can be tricky initially since you may worry it would compromise the quality once uploaded to the streaming platform. That being said, this post will mention not just the steps for how to upload iMovie to Youtube but also the best settings for uploading to YouTube.
Guide List
Detailed Steps to Upload iMovie Videos to YouTube The Problem You May Face When Uploading iMovie Videos The Best Settings for iMovie Videos to Upload on YouTubeDetailed Steps to Upload iMovie Videos to YouTube
With a straightforward process offered by iMovie, learning how to upload iMovie to YouTube is easy. This way, you can connect with a lot of viewers across the globe. Without further ado, dive in now to this guide to seamlessly upload your iMovie videos to YouTube.
Step 1Check Your iMovie Project. Before uploading, of course, you have to ensure your iMovie video is polished and ready for the world. Review it first to check if there are any last-minute edits you should make.
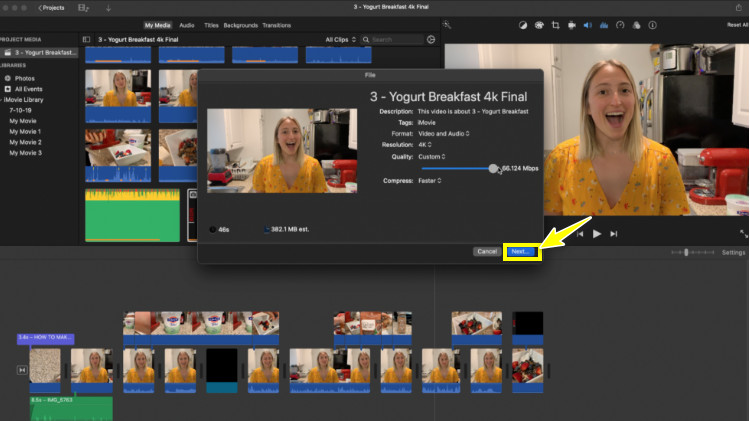
Step 2Export Your iMovie Video. Then, in the menu bar above, click on “File”, then select “Share” from the dropdown menu, and go to “YouTube”. If prompted, open your YouTube account.
Step 3Select Your Upload Settings. After that, configure your upload settings, such as the resolution, the title, description, privacy options, as well as tags; click the “Next” button to proceed, then determine your destination folder.
Then, click the “Upload” button to begin the process. You can keep an eye on the progress of uploading. Once it is done, iMovie will notify you.

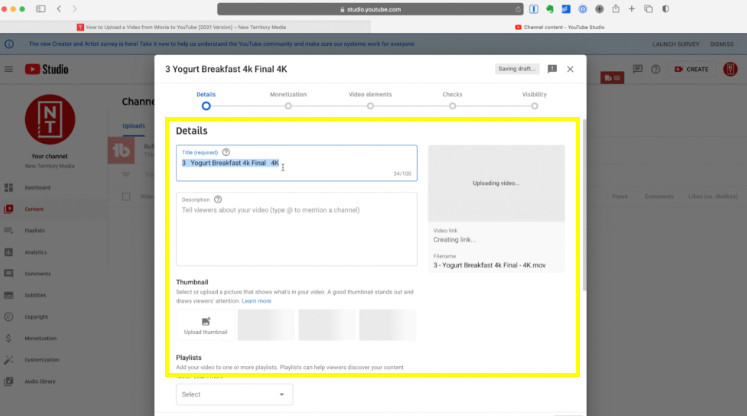
Step 4Optimize it on YouTube. Now, open your YouTube Studio, then go to “Create” and then “Upload Video” to locate the iMovie project you just exported. Later on, you can edit your video details further, e.g., thumbnails, annotations, etc.

Step 5Publish Your iMovie Video to YouTube. After finalizing, click the “Publish” button to release it to the public. Otherwise, you can schedule for a later release. That’s how you can upload iMovie to YouTube!
The Problem You May Face When Uploading iMovie Videos
While it is easy to upload iMovie projects to YouTube, it is still prone to several problems, like compatibility issues with certain file formats or quality concerns. This happens when your iMovie project does not meet the streaming platform’s requirements.
Addressing this kind of issue will require you to use a converter tool like 4Easysoft Total Video Converter. Using this powerful converter, you can convert your iMovie projects first into compatible formats and optimize them for uploading to YouTube. The program has a wide range of format support with customized profiles that you can either leave as it is or set yourself to acquire your desired resolution, quality, frame rate, and so on. In addition to these, it features editing tools, letting you enhance your videos via trimmer, cropper, rotator, apply effects, filters, and more before finally sharing them online.

Convert iMovie projects to MP4, MOV, and more to ensure compatibility.
Can convert multiple iMovie videos at once, saving time and streamlining your work.
Preview videos before and after the conversion to ensure they meet your needs.
Customizable parameters like resolution, frame rate, etc., for tailored output.
100% Secure
100% Secure
The Best Settings for iMovie Videos to Upload on YouTube
Resolution. The perfect resolution for YouTube is 1080p or 1920x1080. It is a Full HD resolution that brings more clear and sharper image quality, which is important for engaging your viewers. Meanwhile, if your iMovie videos are shot in 4K, please use the 4K resolution to take advantage of YouTube’s capabilities.
Frame Rate. When uploading iMovie to YouTube, choosing the proper frame rate is essential, too. For most content, the 30 fps works most of the time, and it is enough to provide you with a smooth watching experience. However, use the 60 fps if your iMovie project contains fast-paced scenes.
Bitrate. As for the bitrate, aim for 8 Mbps for your 1080p videos, giving you a perfect balance of quality and file size. But if you’re working with 4K videos, maximize the bitrate up to 35 to 45 MBps for high-quality visuals.
File Format. For file formats, use the H.264 codec when uploading iMovie to YouTube. Doing so will compress your video file without degrading the quality.
Audio Settings. Following video quality, audio quality is another important ground to think about. For this, utilize the AAC audio codec together with 48 kHZ sample rate for an excellent sound clarity. And make sure you set the audio bitrate to 320 kbps to ensure your music and other sound effects will be so clear.
Aspect Ratio. Finally, having the 16:9 aspect ratio is necessary for uploading iMovie to YouTube. This widescreen format is typical for this platform, guaranteeing your iMovie video is presented well on all devices, removing those extra black bars.
Conclusion
That’s how to upload iMovie to YouTube! With the assistance of the detailed steps here, you can immediately upload your iMovie projects on this famous streaming platform. In addition to that, the required settings discussed today will help you be well-prepared for upload to YouTube, minimizing the risk of compatibility and other issues. But, to completely avoid compatibility problems, try using the 4Easysoft Total Video Converter. The program can help you get the format, resolution, frame rate, and more perfectly fit for the YouTube platform. Download it today and see more of its magic.
100% Secure
100% Secure


