Stvorite DVD/Blu-ray disk/mapu ili ISO datoteke iz svih video formata.
How to Burn DVD with VLC? Everything You Need to Know

Objavio Paula Pailaga do Snimi DVD/Blu-ray 10. veljače 2025
Are you trying to create a DVD of your most loved videos or movies but don’t want to break the bank? Here’s some good news: you can burn DVDs with VLC—a popular media player known for its wide format support. Whether you want to burn DVDs for later viewing or preserve important files, VLC can help, but there’s a catch. In this guide, you will learn everything about how to burn DVD with VLC alongside the best alternative to it. Create your own DVDs at home!
Popis vodiča
Detailed Steps to Burn DVD with VLC Media Player Limitations of Burning DVD with VLC [Pros & Cons] Best Alternative to VLC for Burning DVDs from VideosDetailed Steps to Burn DVD with VLC Media Player
VLC Media Player is not just made for watching media files—it can also be utilized to burn DVDs. How cool is that? Whether you wish to burn a movie or homemade videos, VLC provides a straightforward and free solution to get the job done. Without much to say, come after the detailed guide below on how to burn DVDs with VLC.
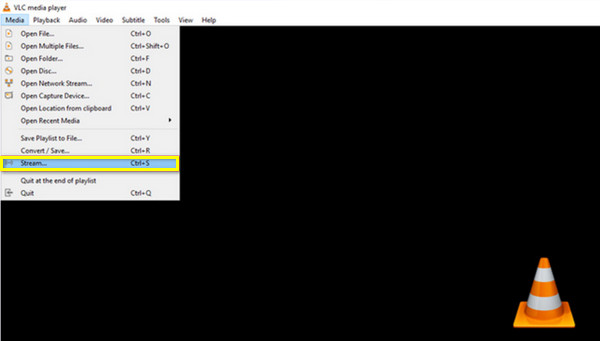
Korak 1Run VLC Media Player on your computer. Head to the "Media" menu and choose "Stream". Prior to this, you should have placed the blank DVD disc inside the drive.
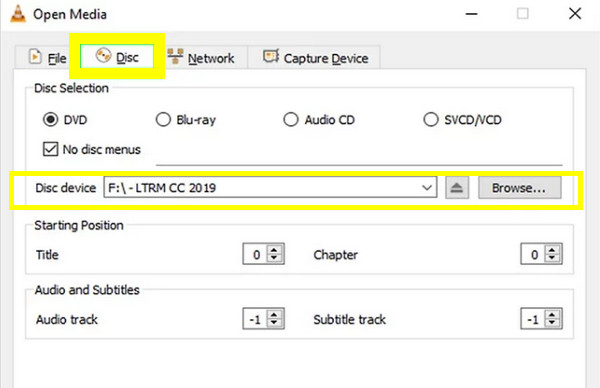
Korak 2From the new dialogue, go to "Disc" and choose the "DVD" radio button. Upload your intended video to burn by clicking the "Browse" button, then select the correct titles, chapters, and tracks below.
After that, proceed to the "Stream" to the "Next" button, and click the "Add" button to select the file path.
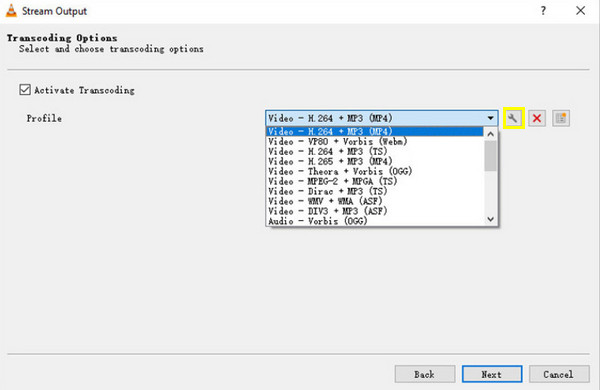
3. korakAnother interface will be shown on your screen; please click on the "Settings" button (Wrench icon). Here, you can alter the video and audio codecs. In the "Video Codec" menu, go for the "MPEG-2" option, then the "Save" button. For the "Audio codec" menu, select the "A52/AC-3" option.
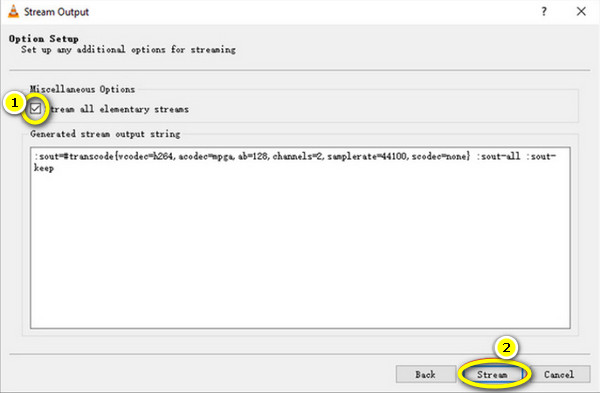
Korak 4Once you have completed the codes, click the "Next" button. Then, check the "Stream all elementary streams" box as the final requirement for this burning operation. Click the "Stream" button to begin burning the DVD.
Limitations of Burning DVD with VLC [Pros & Cons]
As you see, to burn DVD with VLC is a simple process. But while VLC works as a powerful, versatile tool for media playback, it offers some limits regarding burning DVDs. Here’s a breakdown of the pros and cons, along with details about extra plugins that assist VLC in DVD burning.
Burn DVD with VLC: Pros
• Free and Open-Source. No hidden costs are offered by VLC, unlike many DVD-burning software that require full purchase before enjoying all features.
• Straightforward Steps. Since VLC is already a familiar software, burning DVD with VLC comes in a simple, few steps. You simply have to add the videos, select the DVD format, and complete the burning operation.
• Various Formats Support. VLC is known for its support of a wide range of file formats, e.g., MP4, AVI, MOV, AVI, MP3, etc. This means you don’t need to convert your files into a certain format before burning them.
• Works on Cross-Platform. Can be operated on different systems, like Windows, Mac, and Linux.
• No Need for Extra Software. For basic burning tasks, VLC is an effective tool, even without extra software or tools to assist.
Burn DVD with VLC: Cons
• No Advanced Customization. Though you can burn DVD with VLC, it does not have advanced customization options for menus, chapters, or other buttons, compared to other dedicated software.
• The Burning Process is Slow. While the operation can be basic, the burning process is often slower, especially when the file size is larger; the process will surely take longer than expected.
• Less Support for Video Encoding. VLC only has less control over the quality and formats of the video. If you wish to compress HD files, the options offered here are far more basic than others.
As mentioned, VLC burning capabilities are limited, and you won’t need extra help to get basic tasks done. However, to extend this functionality, there are plugins or software that may be involved. Here’s how they work with the VLC DVD-burning process.
1. Additional Plugins. For DVD creation, plugins like DVDStyler can work with VLC to allow for DVD menu customizations.
2. Video Conversion. If you need to encode videos first before you burn DVDs with VLC, the program can handle it as you can convert videos to .mpg format. However, for something more advanced, you can use FFmpeg.
Here’s the command example you can use for encoding videos to DVD format:
C:Program FilesVideoLANVLC lc "D:MoviesYour File.mp4" :sout=#transcode{vcodec=mp2v,vb=4096,acodec=mp2a,ab=192,scale=1,channels=2}:std{access=file,mux=ps,dst="C:MoviesYour File Output.ps.mpg"} --aspect-ratio="4:3" --sout-transcode-width=720 --sout-transcode-height=480 --sout-transcode-fps=29.97 --sout-ffmpeg-keyint=16 --sout-ffmpeg-strict-rc
3. Use ISO Image Creation. For more control over the DVD-burning process, you can use VLC instead to create an ISO file, a disc image, and then burn it with software like ImgBurn.
Best Alternative to VLC for Burning DVDs from Videos
Now that you know how to burn DVDs with VLC and find them a bit complex and limited, you may consider better alternatives to them. This is where having the 4Easysoft DVD Creator becomes necessary. With this software, you won’t have any compatibility issues as it covers a wide variety of formats, like MP4, MKV, MOV, AVI, and more, to be converted to DVD. It has the ability to generate completely personalized DVD menus, allowing you to add touches by customizing the buttons, designs, and backdrops; doing all that guarantees high-quality video, making it perfect for anyone who wants to keep their camera videos and movies to an excellent DVD product.
Many video formats are covered to create DVDs, from video to audio and image.
Includes a large selection of themed templates, e.g., wedding, holiday, and more.
Allows you to edit video, apply effects, trim, crop, and do more before burning.
Can be configured to play on TVs or players and supports NTSC/PAL standards.
100% Sigurno
100% Sigurno
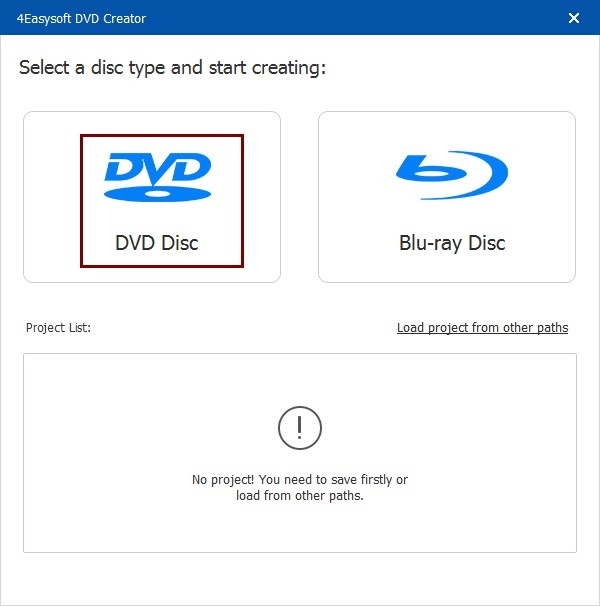
Korak 1Insert the blank disc into the DVD drive, then launch the 4Easysoft DVD Creator to begin. From the main interface, select the "DVD Disc" option.
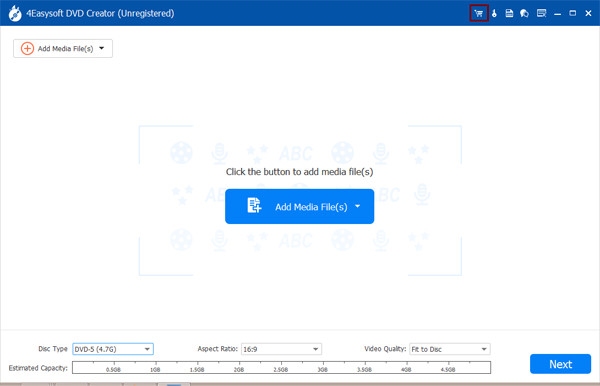
Upload all intended files to be burned by clicking the "Add Media Files" button, then click the "Next" button to proceed.
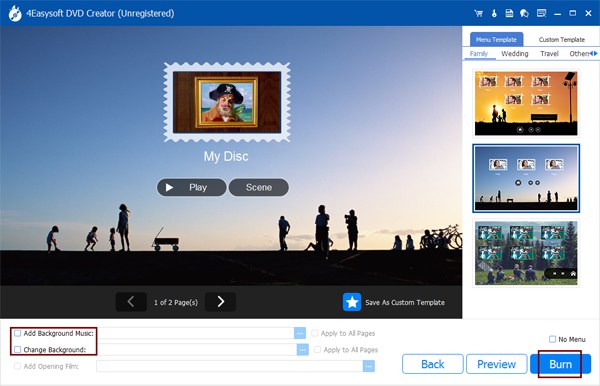
Korak 2Start editing menus for your disc in the next window. The program has provided you with many templates you can select from, or you can edit one yourself. You can add background music and an opening film, too.
After doing all the necessary edits, click the "Preview" button to check how your DVD will look like, then click the "Burn" button to proceed.
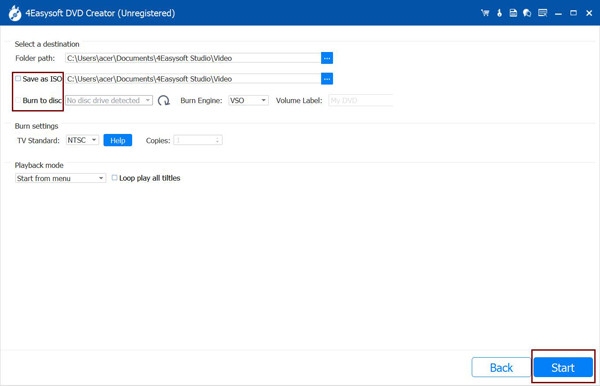
3. korakIn this window, change the output settings you like, like the storage path, burning settings, and playback mode. At last, click the "Start" button to begin the DVD creation.
Zaključak
That’s how you burn DVD with VLC! As you see, you can get the task done without extra costs, giving you a straightforward and free method to quickly burn a movie. However, you’ve seen here that VLC has limitations when it comes to advanced features like customizable menus. Thus, for more control over the DVD creation, the 4Easysoft DVD Creator is a fantastic upgrade! From custom menu creation to superior video encoding, the program ensures professional-looking DVDs. So, take the DVD burning to the next level now with 4Easysoft!
100% Sigurno
100% Sigurno