Prijenos i upravljanje svim podacima između iOS uređaja, uređaja i računala te iTunesa i uređaja.
Kako brzo prenijeti datoteke s iPhonea 16 na Mac u paketu

Objavio Paula Pailaga do iOS prijenos 07. 2023
Postoje slučajevi u kojima korisnici iPhonea žele prenijeti datoteke s iPhonea na Mac kako bi sačuvali datoteke ili uštedjeli prostor za pohranu. Sada, ako ste jedan od njih, neka vam ovaj post pomogne! Možda znate da AirDrop može prenositi datoteke jednu po jednu, ali kako to učiniti bržim? Ovaj post pokriva 4 izvediva načina kako brzo i učinkovito prenijeti datoteke s iPhonea na Mac. Dakle, bez daljnjeg odgađanja, istražite ih sada!
Popis vodiča
Najlakši način za skupni prijenos datoteka s iPhonea na Mac Kako prenijeti datoteke s iPhonea na Mac pomoću iTunes/iCloud Kako prenijeti datoteke s iPhonea na Mac putem AirDropa Često postavljana pitanja o prijenosu datoteka s iPhonea na Mac SonomaNajlakši način za skupni prijenos datoteka s iPhonea na Mac
Svatko voli prenositi niz datoteka s iPhonea na Mac bez napora, brzo i učinkovito. 4Easysoft iPhone prijenos može vam pomoći da postignete te sjajne bodove! Ovaj alat podržava mogućnost prijenosa gotovo svih vrsta podataka, poput onih kategoriziranih kao bitni, medijski i društveni podaci. Štoviše, također vam omogućuje slobodno upravljanje iOS podacima na vašem računalu. Možete uređivati, brisati, stvarati i pretvarati datoteke na temelju svojih preferencija! Ovo je samo kratak pregled jedinstvenih značajki ovog alata, a ima još mnogo toga za ponuditi. Istražite više o tome kako biste prenijeli sve datoteke sa svog iPhone 16 na Mac!
Omogućite siguran i brz prijenos vaših datoteka s vašeg iPhonea na vaš Mac.
Mogućnost prijenosa iPhone datoteka između iTunesa i iClouda na računalo.
Podržava sve verzije iOS-a i iPhone modele, uključujući iOS 17/18 i iPhone 16.
Podržava različite vrste datoteka, kao što su povijest poziva, kontakti, fotografije, filmovi, Kik itd.
100% Sigurno
100% Sigurno
Kako batch prenijeti datoteku s iPhonea na Mac koristeći 4Easysoft iPhone Transfer:
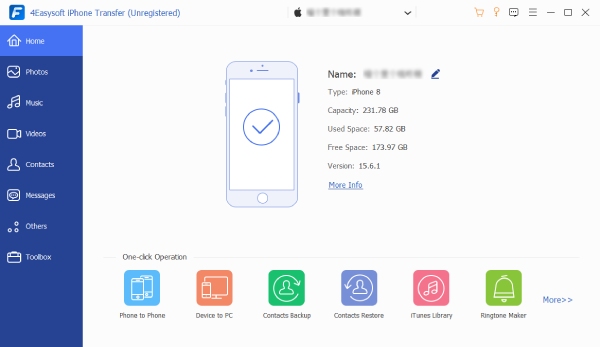
Korak 1Preuzmite i instalirajte 4Easysoft iPhone prijenos alat na vašem Mac računalu. Zatim povežite svoj iPhone s računalom putem USB kabela. Nakon što se veza uspostavi, na sučelju ćete vidjeti informacije o svom iPhoneu. Onda, možete lako prijenos fotografija s iPhonea na Mac.
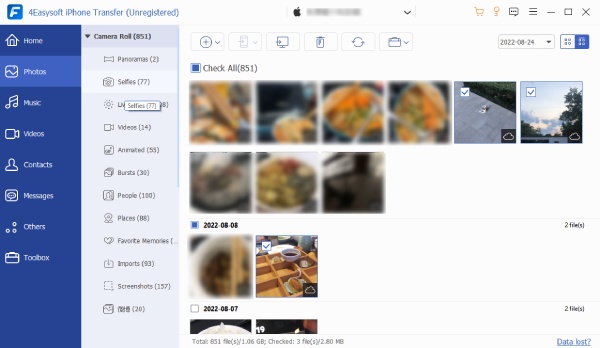
Korak 2Nakon toga, na lijevoj strani sučelja alata odaberite karticu datoteke koju želite prenijeti. Zatim će se sve datoteke dostupne na vašem iPhoneu pojaviti na sučelju alata. Pritisnite sve datoteke koje želite prenijeti.
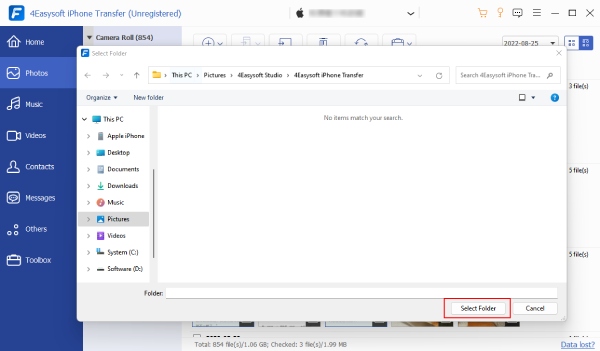
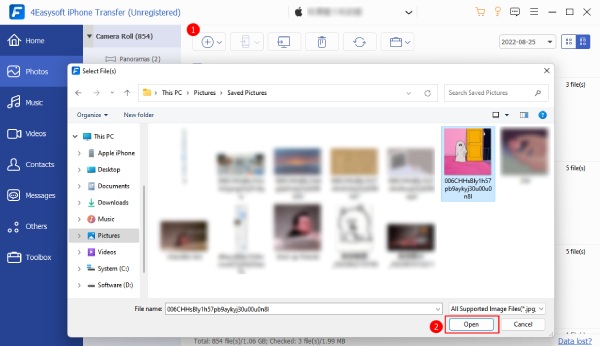
3. korakNakon što završite s odabirom svih datoteka koje želite prenijeti, kliknite gumb "Izvezi na računalo" i odaberite ili stvorite novu mapu datoteka za pohranjivanje svih odabranih datoteka za prijenos u skočnom prozoru. Nakon toga kliknite gumb "Odaberi mapu".
Korak 4Nakon što kliknete gumb "Odaberi mapu", sve datoteke koje želite prenijeti bit će premještene u mapu koju ste odabrali ili stvorili. Možete ih provjeriti izravno u mapi datoteka na računalu. To je to! Tako prenosite podatke s iPhonea na Mac pomoću ovog moćnog alata!
Kako prenijeti datoteke s iPhonea na Mac pomoću iTunes/iCloud
Osim korištenja alata treće strane koji može prenijeti datoteke s iPhonea na Mac, također možete koristiti zadane načine. Ovi načini su korištenjem iTunes-a ili iClouda! Ako ne znate kako ih koristiti, istražite opcije u nastavku.
Opcija 1. Kako prenijeti datoteke s iPhonea na Mac pomoću iCloud Drivea
iCloud Drive omogućuje korisnicima pohranjivanje različitih datoteka, kao što su Wordovi dokumenti, PPT-ovi, Excel datoteke itd., i njihovu sinkronizaciju s drugim iOS uređajima. To će biti moguće samo ako vaši iOS uređaji dijele isti Apple ID. Sada, kako prenijeti datoteke s iPhonea na Mac pomoću iCloud Drivea? Ovo su koraci koje morate slijediti:
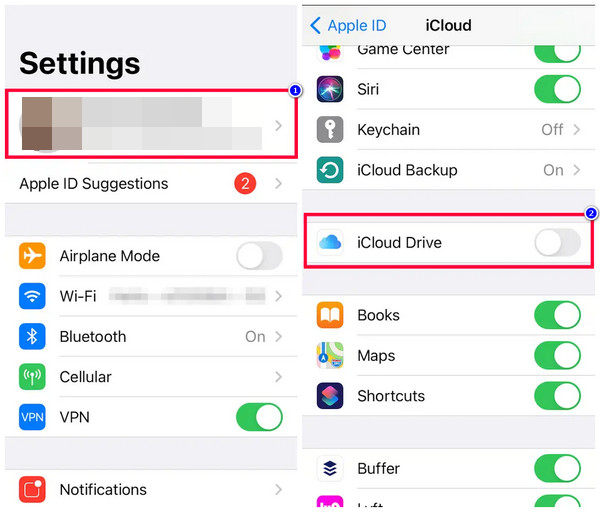
Korak 1Omogućite "iCloud Drive" na svom iPhoneu tako što ćete otvoriti aplikaciju "Postavke", dodirnuti svoje "Ime" u gornjem dijelu zaslona i odabrati opciju "iCloud".
Korak 2Zatim dodirnite gumb "iCloud Drive" i omogućite opciju "Sync this iPhone" pomicanjem gumba za prebacivanje. Uvjerite se da gumb prekidača svijetli zeleno.
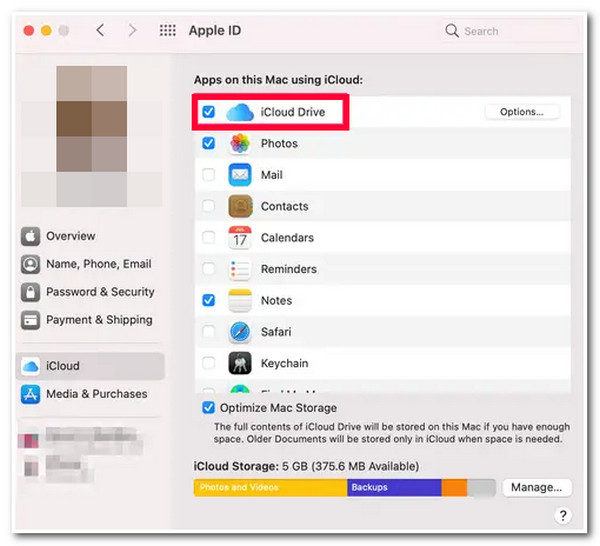
3. korakZatim, na vašem Macu također trebate omogućiti "iCloud Drive" pristupom "Apple Menu" i klikom na gumb "System Preferences".
Korak 4Nakon toga kliknite gumb "Apple ID", odaberite opciju "iCloud" i kliknite okvir "iCloud Drive's Checkbox" kako biste ga omogućili.
Korak 5Nakon što završite s omogućavanjem iCloud Drivea na vašem iPhoneu i Macu, pristupite datoteci koju želite podijeliti, dodirnite gumb "Dijeli" za prijenos datoteka s iPhonea 16 na Mac.
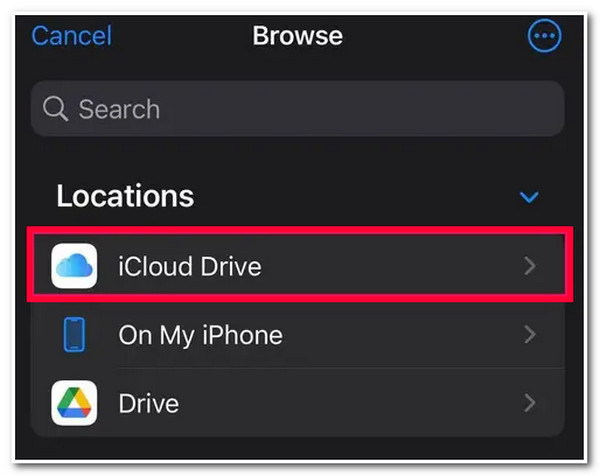
Korak 6Zatim prelistajte prema dolje, dodirnite gumb "Spremi u datoteke", zatim na novom izborniku pod "Lokacije" odaberite opciju "iCloud Drive" i dodirnite gumb "Spremi" kako biste potvrdili svoj odabir.
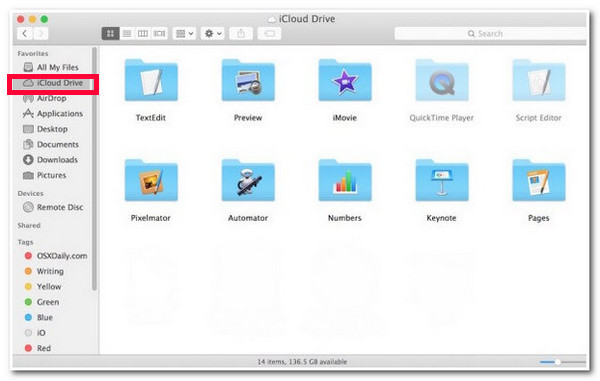
Korak 7Nakon toga idite na svoj Mac, pristupite "Finderu" i kliknite gumb "iCloud Drive" i datoteke koje ste spremili na iCloud Drive vašeg iPhonea bit će tamo.
Opcija 2. Kako prenijeti datoteke s iPhonea na Mac putem iTunes dijeljenja datoteka
Osim iCloud Drivea, također možete koristiti iTunes File Sharing za prijenos datoteka s vašeg iPhonea na vaš Mac. Međutim, morate provjeriti stvari prije nego što možete koristiti aplikaciju. Prvo na čemu trebate poraditi je da imate USB kabel kojim ćete povezati svoj Mac i iPhone. Štoviše, također morate osigurati da koristite najnoviju verziju iTunesa na svom Macu. Evo koraka koji vam pokazuju kako prenijeti podatke s iPhonea na Mac pomoću iTunes dijeljenja datoteka:
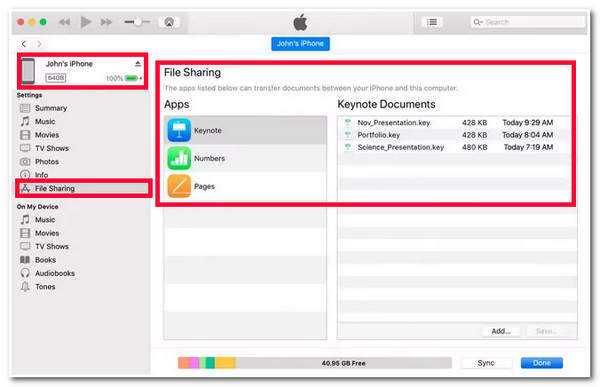
Korak 1Povežite svoj "iPhone i vaš Mac" pomoću "USB kabela". Nakon toga, na vašem Macu pokrenite iTunes, označite ikonu "Uređaj" u gornjem lijevom kutu sučelja i pričekajte da iTunes prikaže sve prenosive datoteke.
Korak 2Zatim kliknite opciju "Dijeljenje datoteka" na lijevoj traci, odaberite datoteku koju želite prenijeti i označite gumb "Spremi u". Nakon toga odaberite željenu lokaciju datoteke na koju želite pohraniti odabranu datoteku. Zatim označite gumb "Spremi" kako biste potvrdili svoj odabir i to je to!
Kako prenijeti datoteke s iPhonea na Mac putem AirDropa
Osim ova dva zadana načina, možete prenijeti datoteke s iPhonea na Mac putem AirDropa. AirDrop je Appleova aplikacija za bežični prijenos datoteka koja koristi Bluetooth i Wi-Fi vezu za prijenos datoteka s različitih uređaja. Tijekom procesa trebali biste držati svoj iPhone i Mac blizu jedan drugom, a datoteke možete prenositi samo jednu po jednu s dosta dugo vremena. Dakle, kako prenijeti datoteke s iPhonea na Mac pomoću AirDropa? Ovo su koraci koje morate slijediti:
Korak 1Na svom iPhoneu pristupite svom "Kontrolnom centru", dodirnite opciju "AirDrop" i postavite da ga otkrivaju "Samo kontakti" ili "Svi".
Korak 2Zatim idite na svoj Mac, idite na "Finder", kliknite gumb "Go" i kliknite "AirDrop" da biste ga uključili. Isto vrijedi i za iPhone AirDrop postavku; postavite AirDrop vašeg Maca tako da ga otkriju "Svi" ili "Samo kontakti".
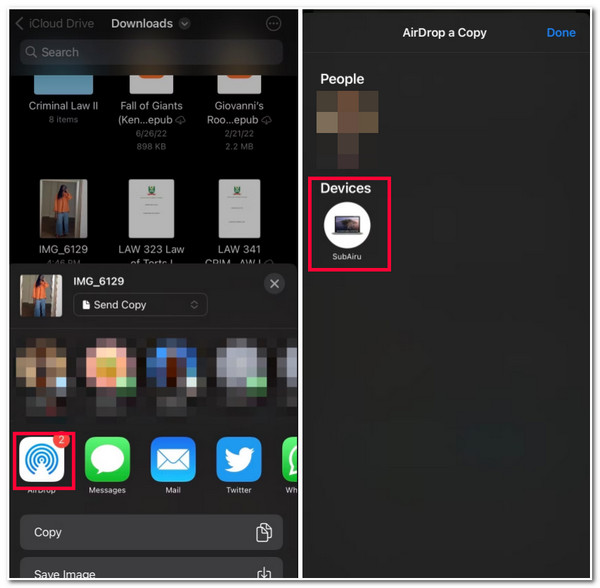
3. korakNakon toga na svom iPhoneu odaberite "Datoteke" koje želite prenijeti, dodirnite gumb "Dijeli" s ikonom strelice prema gore i odaberite ikonu svog Mac računala kako biste započeli proces prijenosa datoteka.
Često postavljana pitanja o prijenosu datoteka s iPhonea na Mac Sonoma
-
Kako brzo prenijeti filmove s iPhonea na Mac?
Za brzi prijenos filmova s iPhonea na Mac upotrijebite alat treće strane predstavljen u ovom postu ili USB kabel. Ova dva načina su najbolje opcije za brzi prijenos velikih filmova.
-
Kako prenijeti datoteke s iPhonea na Mac pomoću USB kabela?
Spojite svoj iPhone na Mac putem USB kabela. Nakon toga pristupite Finderu na svom Macu i kliknite svoj iPhone pod Locations. Zatim odaberite Datoteke u prozoru Finder vašeg iPhonea i kliknite ikonu strelice pored mape kako biste vidjeli sve datoteke pohranjene u njoj. Zatim povucite i ispustite datoteke na bočnu traku Mac računala koje želite prenijeti.
-
Zašto moj AirDrop ne prenosi datoteke?
Razlog zašto vaš AirDrop ne prenosi nijednu datoteku mogao bi biti taj što su vaši načini rada Hotspot i AirPlane aktivni. Morate ih isključiti kako bi AirDrop prenosio datoteke s raznih uređaja.
Zaključak
Sada su to 4 izvediva načina za učinkovit prijenos datoteka s iPhonea na Mac. Na te načine sada možete prenijeti različite datoteke sa svog iPhonea na svoj Mac! Ako smatrate da su ta 3 zadana načina naporna i oduzimaju puno vremena za prijenos datoteka, možete koristiti napredni 4Easysoft iPhone prijenos alat kao najbolja alternativa! Ovaj alat nudi brz, siguran i učinkovit prijenos datoteka između uređaja. U samo nekoliko klikova možete postići svoju svrhu prijenosa datoteka s iPhonea 16 na Mac! Ako vas ovaj alat zanima, posjetite njegovu službenu web stranicu da biste saznali više!
100% Sigurno
100% Sigurno