Polcról felhőbe: DVD tárolása felhőben [2025. évi útmutató]
Mivel a felhőalapú tárolás létfontosságú eszközzé vált a növekvő videógyűjtemény kezelésében, jó dolog, ha megfontoljuk a DVD-k felhőben való tárolását. De csak szabványos videofájlformátumok tölthetők fel, tehát hogyan tárolhat DVD-t felhőben? Szerencsére a mai digitális korban vannak olyan módszerek, amelyek segíthetnek, valamint a felhőalapú tárolási szolgáltatások közül választhat. Készüljön fel most, amikor felfedezi a DVD-k felhőben való tárolásának legjobb módját, biztosítva azok biztonságos és könnyű megosztását.
Útmutató lista
1. lépés: Másolja a DVD-t videóra a DVD felhőben való tárolásához 2. lépés: Tárolja a bemásolt DVD-t felhőben – melyiket válassza?1. lépés: Másolja a DVD-t videóra a DVD felhőben való tárolásához
Kezdje el a DVD-k felhőben való tárolását úgy, hogy először bemásolja a DVD-ket egy elfogadható videofájlformátumba. Minden bizonnyal arra vágyik, hogy megismerjen egy olyan eszközt, amely rengeteg szerkesztési funkcióval és gyors másolási képességgel rendelkezik. 4Easysoft DVD Ripper ez a név! Ez a szoftver lehetővé teszi a kimenetek lejátszását bármilyen eszközön, mivel több mint száz formátumot fed le, támogatva az okostelefonokat, médialejátszókat, számítógépeket és így tovább. Az integrált videószerkesztővel elforgathatja, levághatja és vághatja a DVD-videót, mielőtt sikeresen bemásolná. Ezenkívül ez a csodálatos eszköz bármilyen DVD-t kezel, függetlenül attól, hogy védett-e vagy sem, minden további segítség nélkül. Bővítse DVD-gyűjteményét és tárhelyét most ezzel a programmal!
Készítsen gyorsan digitális másolatokat DVD-lemezéről olyan formátumokban, mint az MP4.
Módosítsa a kulcsfontosságú beállításokat a kívánt videóeredmények eléréséhez.
Először tekintse meg a videó előnézetét, és ellenőrizze, hogy minden módosítás megtörtént-e.
Lehetővé teszi több tonna DVD-fájl egyidejű feldolgozását.
100% Biztonságos
100% Biztonságos
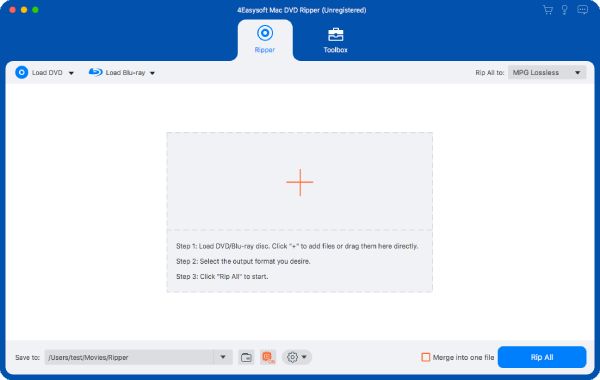
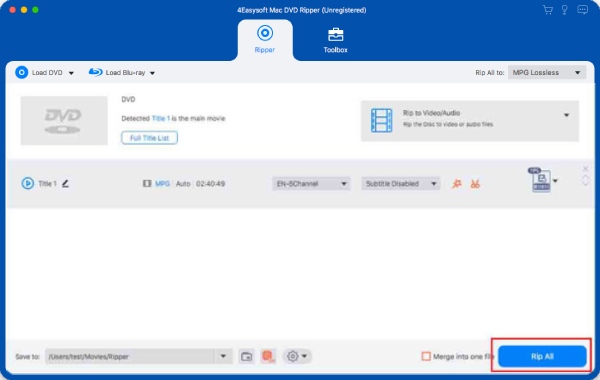
1. lépésA folytatás előtt helyezze be a lemezt a meghajtóba. Most, miután a 4Easysoft DVD Ripper elindult a képernyőn, kattintson a "DVD betöltése" gombra, és válassza a "Lemez betöltése" lehetőséget a DVD-forrás importálásához.
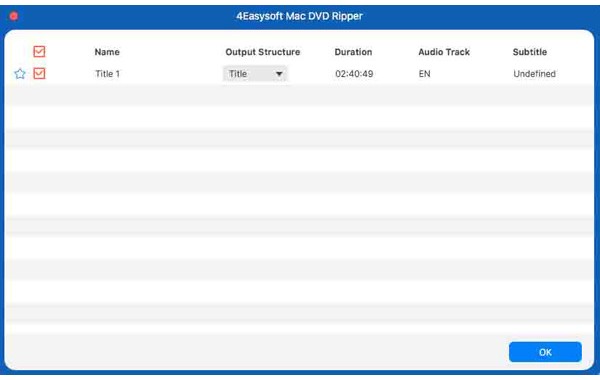
2. lépésA fő címek ezután megjelennek a képernyőn; kattintson a "Teljes címlista" gombra az összes cím megtekintéséhez, és a négyzetek bejelölésével válassza ki azokat, amelyekről digitális változatot szeretne. A kijelölések megerősítéséhez kattintson az "OK" gombra.
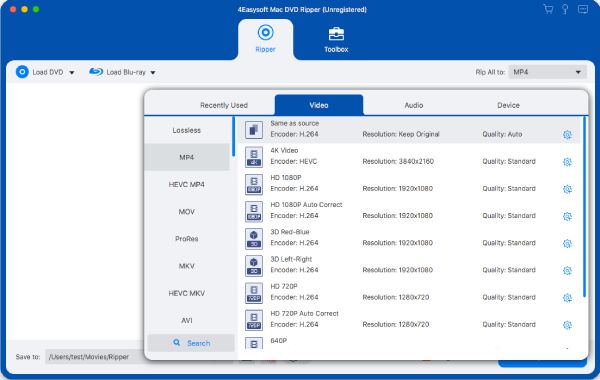
3. lépésA kívánt formátum (például MP4, AVI, MKV vagy más videoformátumok) kiválasztásához csúsztassa az ujját a „Rip All to” menübe, majd a „Video” menübe. A választott formátum mellett használja az "Egyéni profil" gombot a profilparaméterek módosításához, vagy megtarthatja azokat úgy, ahogy vannak.
4. lépésVégül másold be a DVD-t a választott digitális fájlba! Térjen vissza a program kezdőképernyőjére, ellenőrizze az összes kiválasztott számot és feliratot, majd válassza ki a fájl célhelyét lent. A folyamat befejezéséhez kattintson a "Rip All" gombra. Most folytassa a következő részvel a DVD felhőben való tárolásához!
2. lépés: Tárolja a bemásolt DVD-t felhőben – melyiket válassza?
Most, hogy DVD-jét videófájl formátumba másolta, itt az ideje, hogy a DVD-t a felhőben tárolja! Most a megfelelő tárolási szolgáltatást kell kiválasztani. Mindegyik opció egyedi jellemzőkkel, kapacitásokkal és különböző árszabással rendelkezik. Az alábbiakban a három legnépszerűbb felhőalapú tárolási eszköz összehasonlítása látható: a Google Drive, a Dropbox és az iCloud. A későbbiekben részletes lépéseket fog látni a bemásolt DVD felhőben való tárolására vonatkozóan.
| Felhőalapú tárolási szolgáltatás | Ingyenes tárolás | Fizetett tervek | Hozzáférés | Fájlméret-korlát |
| Google Drive | 15 GB | $1,99 havonta 100 GB-ért | Web, mobil és asztali számítógép | 5 TB |
| Dropbox | 2 GB | $11,99 havonta 2 TB-ért | Web, mobil és asztali számítógép | 50 GB |
| iCloud | 5 GB | $0,99 havonta 50 GB-ért | iOS, macOS és web | 50 GB |
1. Google Drive
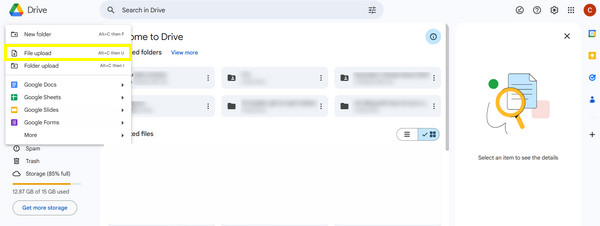
1. lépésJelentkezzen be Google-fiókjával a Google Drive-ba. Ezután kezdje el a DVD-k tárolását az icloudban a bal oldalon található "Új hozzáadása" gombra kattintva, és válassza a "Fájlfeltöltés" lehetőséget. Ezután határozza meg a kimásolt DVD-t a számítógép fájljaiból.
2. lépésA feltöltés után rendszerezheti úgy, hogy az "Új hozzáadása" gombbal létrehoz egy mappát, majd válassza a "Mappa" lehetőséget. Másolja át a feltöltött másolt fájlokat a mappába.
2. Dropbox
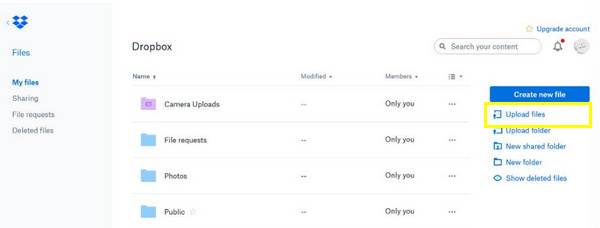
1. lépésNyissa meg a Dropboxot, majd jelentkezzen be fiókjával a megfelelő hitelesítő adatokkal. Kattintson a "Fájlok feltöltése" gombra, majd válassza a "Fájlok kiválasztása" lehetőséget a bemásolt DVD-fájl kiválasztásához és a felhőbe való feltöltéséhez.
2. lépésHozzon létre mappákat, majd az oldalsávon található "Új mappa" gombra kattintva további rendszerezést biztosít. Húzza át a bemásolt fájlokat az új mappába. Ilyen egyszerű a DVD-k felhőben való tárolása!
3. iCloud
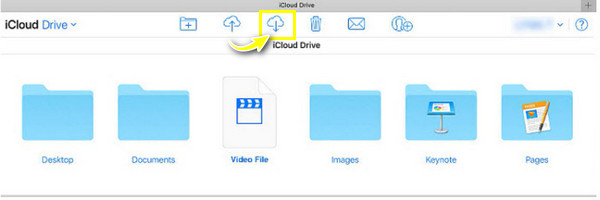
1. lépésKeresse meg az iCloud.com webhelyet a böngészőjében, majd jelentkezzen be Apple ID-jával. Lépjen az „iCloud Drive” ikonra, majd húzza át a másolt DVD-t az ablakba. A "Feltöltés" gombbal kiválaszthat egy fájlt, majd importálhat.
2. lépésKattintson a felül található "Mappa" gombra, ha ennek megfelelően szeretné rendezni a fájlokat; áthúzhatja őket a létrehozott mappába, vagy manuálisan hozzáadhatja őket a DVD-k sikeres tárolásához az iCloudban.
Következtetés
Itt láthatja, hogy a DVD-k felhőben való tárolása csak egy gyors folyamat! Miután levette filmjeit a DVD-kről, végre tárolhatja a DVD-t felhőben különböző felhasználási célokra. A felhőalapú tárolási szolgáltatások esetében pedig a három legjobb választás közül választhat, ezek a Google Drive, a Dropbox és az iCloud – igényeitől függően használhatja őket biztonsági mentéshez vagy egyszerű hozzáféréshez. Noha sok választási lehetőség áll rendelkezésére a tárolóeszközök közül, a 4Easysoft DVD Ripper ez az, amire csak a DVD-k másolásához van szüksége. A többféle formátum támogatása mellett szerkesztési és testreszabási lehetőségekkel, valamint gyors feldolgozási sebességgel rendelkezik, ami izgalmasabbá és hatékonyabbá teszi az élményt.
100% Biztonságos
100% Biztonságos


