선반에서 클라우드까지: 클라우드에 DVD를 저장하는 방법 [2025년 가이드]

클라우드 스토리지가 점점 늘어나는 비디오 컬렉션을 관리하는 데 필수적인 도구가 된 만큼, 클라우드에 DVD를 저장하는 것을 고려하는 것은 좋은 일입니다. 하지만 표준 비디오 파일 형식만 업로드할 수 있으므로, 어떻게 DVD를 클라우드에 저장할 수 있을까요? 다행히도 오늘날의 디지털 시대에는 도움이 되는 방법과 선택할 수 있는 클라우드 스토리지 서비스가 있습니다. 지금 바로 클라우드에 DVD를 저장하는 가장 좋은 방법을 알아보고, 안전하고 공유하기 쉬운지 확인하세요.
1단계: DVD를 비디오로 리핑하여 클라우드에 DVD 저장
허용 가능한 비디오 파일 형식으로 먼저 DVD를 리핑하여 클라우드에 DVD를 저장하는 여정을 시작하세요. 여러분은 다양한 편집 기능과 빠른 속도로 리핑할 수 있는 기능을 갖춘 도구에 대해 알아볼 기회를 원할 것입니다. 4Easysoft DVD 리퍼 이름입니다! 이 소프트웨어는 스마트폰, 미디어 플레이어, 컴퓨터 등을 지원하는 100개 이상의 포맷을 지원하므로 모든 기기에서 출력을 재생할 수 있습니다. 통합 비디오 편집기를 사용하면 DVD 비디오를 성공적으로 리핑하기 전에 회전, 자르기 및 트리밍할 수 있습니다. 또한 이 놀라운 도구는 보호 여부에 관계없이 모든 종류의 DVD를 처리하며 추가 도움이 필요하지 않습니다. 이 프로그램으로 지금 바로 DVD 컬렉션과 공간을 개선하세요!

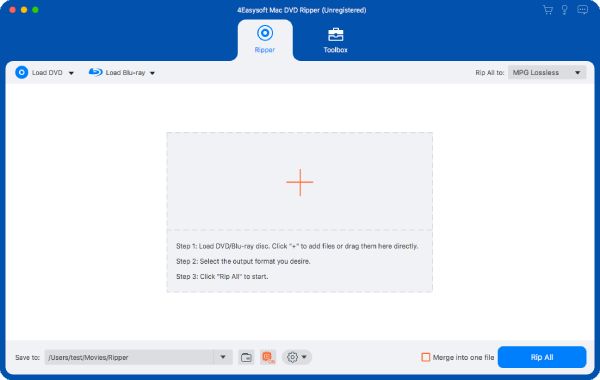
1 단계진행하기 전에 드라이브에 디스크를 삽입하십시오. 이제 4Easysoft DVD 리퍼 화면에 이 나타나면 "DVD 로드"를 클릭하고 "디스크 로드"를 선택하여 DVD 소스를 가져옵니다.
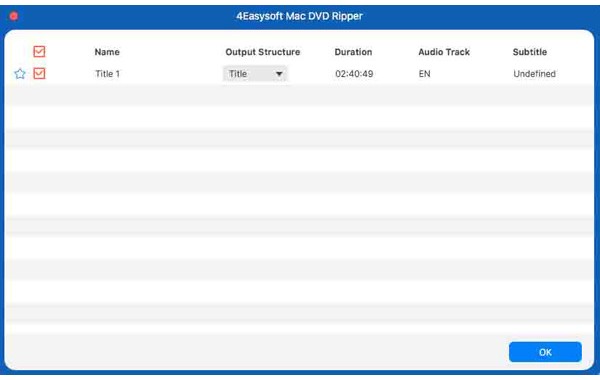
2 단계그러면 주요 제목이 화면에 나타납니다. "전체 제목 목록"을 클릭하여 모든 제목을 보고, 상자를 체크하여 디지털 버전을 원하는 제목을 선택합니다. 선택 사항을 확인하려면 "확인"을 클릭합니다.
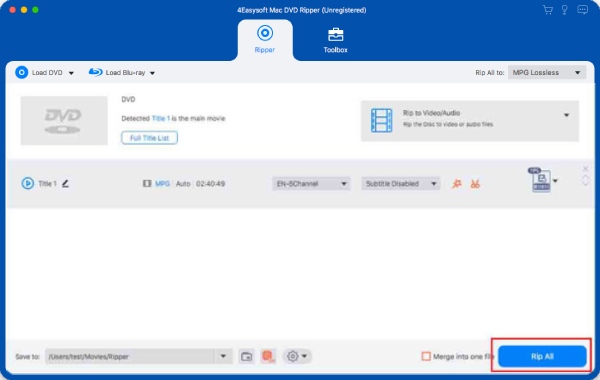
3단계MP4, AVI, MKV 또는 기타 비디오 형식과 같이 원하는 형식을 선택하려면 "모두 리핑" 메뉴로 슬라이드한 다음 "비디오"로 슬라이드합니다. 선택한 형식 옆에 있는 "사용자 정의 프로필" 버튼을 사용하여 프로필 매개변수를 변경하거나 그대로 유지할 수 있습니다.

4단계마지막으로 DVD를 선택한 디지털 파일로 리핑하세요! 프로그램의 홈 화면으로 돌아가서 선택한 모든 트랙과 자막을 확인한 다음 아래에서 파일 대상을 선택하세요. "모두 리핑"을 클릭하여 프로세스를 마무리하세요. 이제 다음 단계로 넘어가 DVD를 클라우드에 저장하세요!
2단계: 리핑한 DVD를 클라우드에 저장 - 어떤 것을 선택해야 할까?
이제 DVD를 비디오 파일 형식으로 리핑했으니, DVD를 클라우드에 저장할 시간입니다! 이제 해야 할 일은 올바른 스토리지 서비스를 선택하는 것입니다. 각 옵션에는 고유한 기능, 용량 및 다양한 가격 플랜이 있습니다. 아래는 가장 인기 있는 세 가지 클라우드 스토리지 도구인 Google Drive, Dropbox, iCloud를 비교한 것입니다. 나중에 리핑된 DVD를 클라우드에 저장하는 방법에 대한 자세한 단계를 볼 수 있습니다.
| 클라우드 스토리지 서비스 | 무료 보관 | 유료 플랜 | 입장 | 파일 크기 제한 |
| 구글 드라이브 | 15GB (15기가바이트) | $1.99 월 100GB | 웹, 모바일 및 데스크탑 | 5테라바이트 |
| 드롭 박스 | 2GB(2기가바이트) | $11.99 월 2TB | 웹, 모바일 및 데스크탑 | 50GB |
| 아이클라우드 | 5GB(5기가바이트) | $0.99 월 50GB | iOS, macOS 및 웹 | 50GB |
1. 구글 드라이브
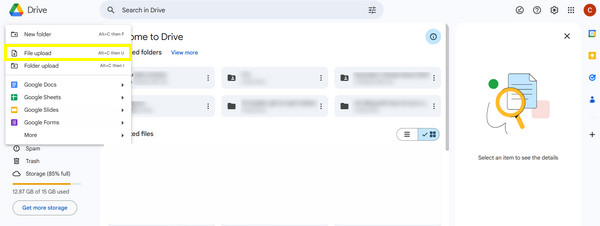
1 단계Google 계정으로 Google Drive에 로그인합니다. 그런 다음 왼쪽에 있는 "새로 추가" 버튼을 클릭하고 "파일 업로드"를 선택하여 icloud에 DVD를 저장하기 시작합니다. 그런 다음 컴퓨터 파일에서 리핑된 DVD를 확인합니다.
2 단계업로드가 완료되면 "새로 추가" 버튼에서 폴더를 만든 다음 "폴더"를 선택하여 정리할 수 있습니다. 업로드된 리핑된 파일을 폴더로 전송합니다.
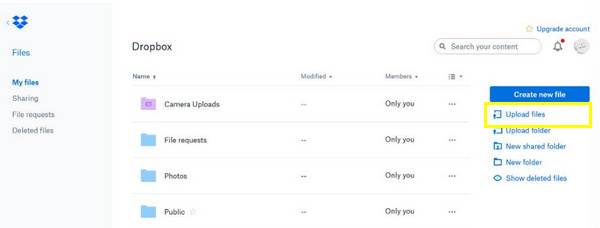
2. 드롭박스
1 단계Dropbox로 이동한 다음 적절한 자격 증명을 사용하여 계정으로 로그인합니다. "파일 업로드" 버튼을 클릭한 다음 "파일 선택"을 선택하여 리핑된 DVD 파일을 선택하고 클라우드에 업로드합니다.
2 단계사이드바에서 "새 폴더" 버튼을 클릭하여 폴더를 만든 다음 더 체계적으로 정리하세요. 리핑한 파일을 새 폴더로 끌어다 놓으세요. 이렇게 쉽게 DVD를 클라우드에 저장할 수 있습니다!
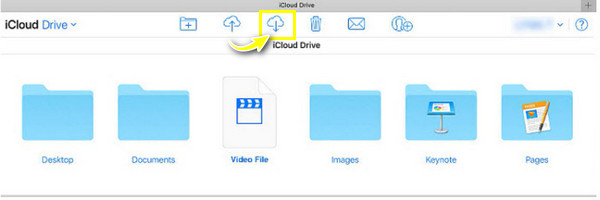
3. 아이클라우드
1 단계웹 브라우저에서 iCloud.com을 검색한 다음 Apple ID로 로그인합니다. "iCloud Drive" 아이콘으로 이동한 다음 리핑한 DVD를 창으로 끌어다 놓습니다. "업로드" 버튼을 사용하여 파일을 선택한 다음 가져올 수도 있습니다.
2 단계파일을 정리하려면 위쪽의 "폴더" 버튼을 클릭하세요. 생성된 폴더로 파일을 끌어다 놓거나 수동으로 추가하여 iCloud에 DVD를 성공적으로 저장할 수 있습니다.
결론
여기서 DVD를 클라우드에 저장하는 것은 빠른 과정이라는 것을 알 수 있습니다! DVD에서 영화를 꺼내면 마침내 DVD를 클라우드에 저장하여 다양한 용도로 사용할 수 있습니다. 클라우드 스토리지 서비스의 경우 Google Drive, Dropbox, iCloud라는 세 가지 최상의 선택이 있습니다. 필요에 따라 백업이나 간편한 액세스에 사용할 수 있습니다. 스토리지 도구에 대한 선택이 많지만 4Easysoft DVD 리퍼 DVD 리핑에만 필요한 것입니다. 다양한 포맷 지원 외에도 편집 및 사용자 지정 옵션과 빠른 처리 속도가 있어 경험을 더욱 흥미롭고 효율적으로 만들어줍니다.