Record video, audio, gameplay, and webcam to record precious moments easily.
Capture Every Monitor: The 6 Multi-Screen Recording Programs

Posted by Ethan Brooke to Record Video, Review Mar 14, 2025
The need to juggle multiple screens comes if you’re a streamer, content creator, or working from home. This has become the norm, so you can see all the happening across those screens, but how can you record all those screens? The right multi-screen recording program is the key! Whether you’re recording a tutorial, presentations, or live-streaming gameplay, there’s one option for you in this top 6 multi-screen recorder review! Get started now.
Guide List
Top 1. 4Easysoft Screen Recorder Top 2. OBS Studio Top 3. Bandicam Top 4. Camtasia Top 5. ScreenFlow Top 6. Snagit| Multi-Screen Recorder | Special Feature |
| 4Easysoft Screen Recorder | It is an easy-to-operate recorder with support for recording multiple screens with audio and webcam integration. |
| OBS Studio | Open-source program and highly customizable for live streaming and multi-screen recording. |
| Bandicam | A lightweight recorder specially made for gaming and video capture. |
| Camtasia | Has powerful editing tools with screen recording, ideal for professional tutorials. |
| ScreenFlow | Equipped with advanced editing features with multi-screen capture for Mac users. |
| Snagit | Capture multiple screens at once with options for scrolling capture, basic editing, and annotations. |
Top 1. 4Easysoft Screen Recorder
First on the list today, 4Easysoft Screen Recorder is a friendly multi-screen recorder made for recording high-quality video and audio. It lets you record multiple screens at once, together with system sound and mic audio, making it a perfect choice for gaming, tutorials, classes, presentations, and more. Additionally, it has support for various export formats, such as MP4, MOV, AVI, MKV, etc., so you can export your recording to the format you like. Another thing about it is its ability to add real-time annotation during the process, which is crucial for tutorials and presentations as you can highlight important details. Then, right after, you can view the recorded video and edit it within this multi-screen recording program.
Able to record high-quality multiple screens without watermarks or time limits.
Edit recorded videos by trimming, adding text, shapes, and more annotations.
Adjust video and audio settings to acquire the recording quality you want.
Hotkeys can be used to start, pause, stop, and do more during recording.
100% Secure
100% Secure
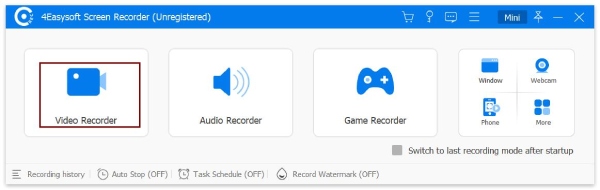
Step 1Before launching the 4Easysoft Screen Recorder, ensure your computer is linked to multiple monitors and all displays are recognized. Now, to begin, click the "Video Recorder" from the main screen of 4Easysoft.
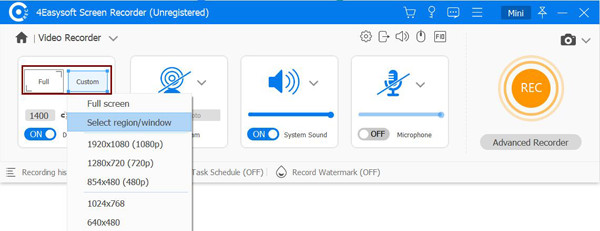
Step 2When choosing the recording area, please go for the "Full" option to capture the entire screen, which records multiple monitors as well.
If you wish to record computer sound, make sure to enable the "System Sound" button and the "Microphone" switch for mic audio. Adjust each of their audio volumes as needed.
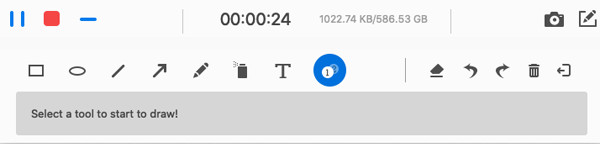
Step 3After setting up everything, click the "REC" button to begin or use the "Ctrl + Alt + R" keys. During the session, use the toolbox to add shapes, callouts, etc., and even take screenshots as you wish.
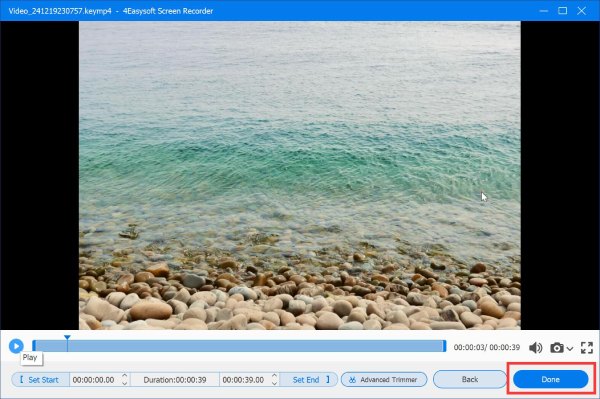
Step 4Later, click the "Stop" button to conclude or use the same hotkeys again. In this part of the preview window, you can watch the recorded multiple screens first and check if there’s a part that needs to be trimmed. Click the "Save" button to save this on your computer.
Top 2. OBS Studio
Transitioning to a more comprehensive option, OBS Studio is a famous open-source multi-screen recording program that stands out due to its advanced customization options. It captures different sources, covering screens, webcams, and microphones, making it perfect for live streaming and multiple monitor setups. Also, OBS lets you switch between scenes during recording without losing quality. It provides various filters, effects, text overlays, and tools for video and audio mixing, too. While free, it offers no watermarks, but its learning curve may be steeper. Anyway, here’s how to record a multi-screen video with OBS:
Step 1Launch OBS Studio, and go for the "Settings" button at the down right, then select "Video" to alter the resolution: Canvas Resolution and Output Resolution. Change them as per the number of screens you are recording, then click the "Apply" button.
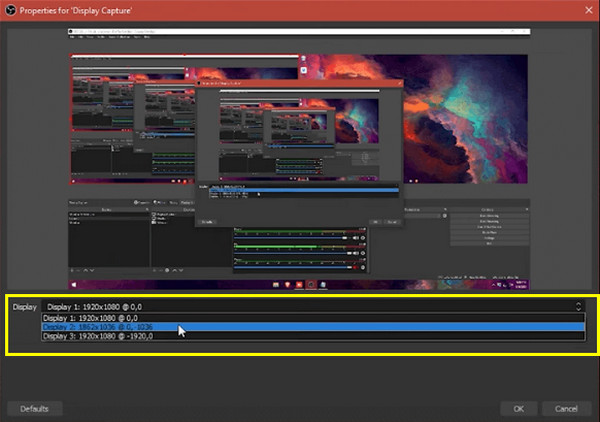
Step 2From the main screen, drag the original monitor screen to the blank area. Then, add another by clicking the "Add" button below and choosing "Display Capture".
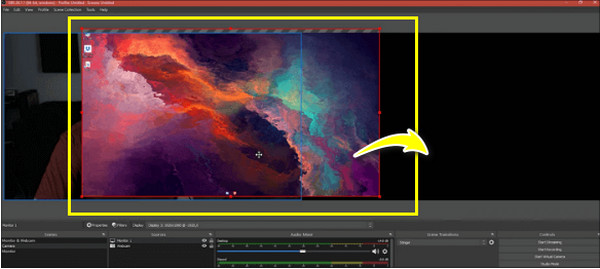
Next, determine the right parameters for the second monitor. In this way, you can capture multiple screen with OBS.
Step 3Now, once both screens are ready, click the "Start Recording" at the bottom right side of the program, and the multi-screen recording is about to happen.
Top 3. Bandicam
Bandicam is a fantastic multi-screen recording program that excels in high performance, especially for gamers out there. One of its crucial features is being able to capture high-quality, high-fps video while still minimizing system resource usage. With its Game Recording mode, you can get an ultra-smooth recording even for fast-paced gaming sessions across several screens. In addition to that, it can record desktop activity and webcam footage, providing flexibility in its recording capabilities.
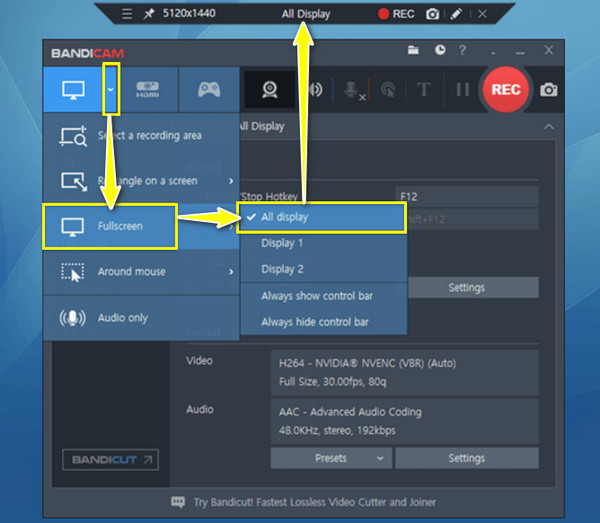
Step 1After launching the Bandicam program on your main desktop, click on the "Screen Recording" dropdown menu, go down to the "Fullscreen" option, and choose "Add Display" from its side menu to automatically capture all linked displays.
Step 2Following that, click on the "REC" button to begin recording. This multi-screen recording program will now capture all content across your multiple monitor screens.
Top 4. Camtasia
For those who wish for both high-quality recording and advanced editing, Camtasia works as an excellent choice. Though it is mainly popular for its robust editing tools, this multi-screen recorder is also ideal for creating professional presentations and tutorials. Later on, Camtasia will let you trim, cut, and apply special effects, transitions, and annotate. You can enjoy multi-track editing, too, allowing for the smooth integration of diverse media types. While it is a paid tool, it is still a worthwhile experience for content creators. Here’s how to record a multi-screen video using it:
Step 1Open Camtasia now on your desktop screen, and choose the recording mode you want, for example, "Fullscreen". Next, select the audio source you want to add.
Step 2To record both your monitor screens, drag the "green dotted line" all the way to the end of the second monitor screen. Then, adjust the resolution according to your system’s performance.
Click the "REC" button once both monitor screens are both ready.

Top 5. ScreenFlow
Moving to another excellent option for Mac users, ScreenFlow provides an elegant way to record several screens with a bunch of editing capabilities. This multi-screen recorder shines in recording and post-production, giving you a smooth workflow for a professional video project. Moreover, it is equipped with stock media, like images and music, which can be utilized to enhance your videos. Thus, with its recording and editing tools, ScreenFlow is perfect for those who want polished, high-quality videos without extra applications.
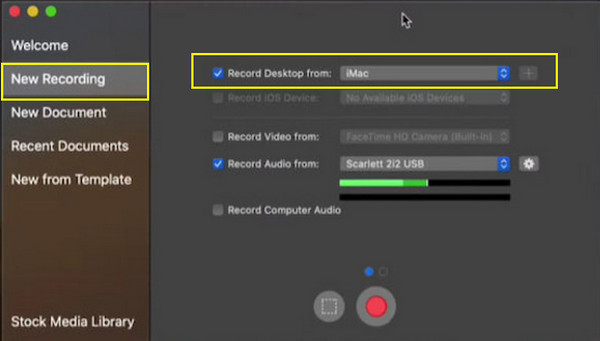
Step 1Once you open ScreenFlow on your desktop, click the "New Recording" button. Take note that this works for Mac; ensure that other monitors are set up in the "Display Preferences".
Step 2From the new window, check the boxes for each monitor you wish to record. If not seen, add it manually by clicking the "Add" button next to the "Record Desktop from" field.
As for audio, you can select to record system audio and microphone audio. Whenever you’re ready, click the "Record" button to begin recording both screens.
Top 6. Snagit
Lastly, you have here the Snagit. This multi-screen recording program has a versatile solution for everyone—both casual users and professionals. It holds features like the ability to capture static images as well as record videos of your onscreen activities. This tool is specifically helpful for creating instructional content as it comes with tools for annotating and editing. Regardless of whether you want quick demos or professional-level videos, Snagit shines with a balance of friendliness and advanced functionality.
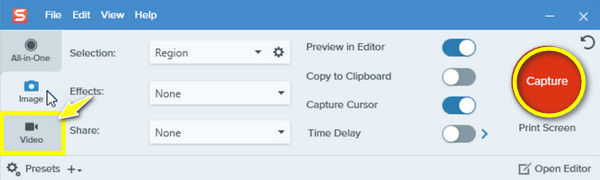
Step 1Upon starting Snagit on your computer, please double-check that all monitors are connected and active so they can be recorded. Begin by clicking the "Video" tab on its main interface.
Step 2Since you’ll record multiple screens, select the "All Displays" option if available; otherwise, drag the capture area on both screens. Set the audio settings, like system sound, mic audio, or both.
It’s time to click the "Capture" button to begin capturing all monitor scenes within the chosen area.
Conclusion
In terms of recording multiple screens, as you've seen here, several powerful tools are there to assist you, like Bandicam, ShareX, and more. Whether you’re a content creator, educator, or gamer, having the right multi-screen recording program can hugely enhance your workflow. But among all options, the 4Easysoft Screen Recorder provides a more efficient and reliable way to capture your multi-screen setups. With its straightforward interface, high-quality results, customization, and editing tools, it can one hundred percent meet your recording needs.
100% Secure
100% Secure