Ta opp video, lyd, spilling og webkamera for å enkelt ta opp dyrebare øyeblikk.
Hvordan tildele mer RAM til Minecraft for jevn spilling?
Det er en hodepine å møte etterslep og lukkende rammer når man spiller Minecraft, spesielt når man bygger større verdener; her er hvorfor det hjelper å lære å tildele mer RAM til Minecraft. Å gjøre det vil minimere etterslepet og forbedre bildefrekvensene for jevnere spilling. Det kan være utfordrende i begynnelsen, men det er ingen grunn til å bekymre seg for det. Følgende deler vil gi deg de beste metodene for hvordan du kan gi Minecraft mer RAM; et bonustips venter på deg på slutten.
Guideliste
Bruk Standard Launcher for å tildele mer RAM til Minecraft Hvordan tildele mer RAM til Minecraft via CurseForge LauncherC Tildel mer RAM til Minecraft med ATLauncher Bonustips for å spille inn Minecraft med mindre belegg/høy FPSBruk Standard Launcher for å tildele mer RAM til Minecraft
Hvis du har vært en fan av Minecraft siden den gang, har du kanskje hørt om Default Launcher av Mojang. Denne Minecraft Launcher administrerer spillinstallasjonene, gir deg tilgang til forskjellige versjoner og lar deg tilpasse forskjellige innstillinger. I tillegg til disse er den i stand til å hjelpe deg med å forbedre spillytelsen ved å gi mer minne til Minecraft.
Før noe annet, her er hvordan du dedikerer mer RAM til Minecraft ved å bruke standardstarteren:
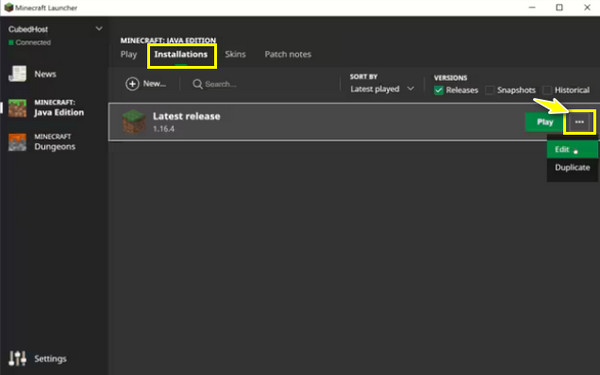
Trinn 1Start Minecraft Launcher, og skyv deretter til "Installasjoner"-fanen. Her velger du ikonet med tre prikker, og deretter velger du Rediger fra rullegardinlisten.
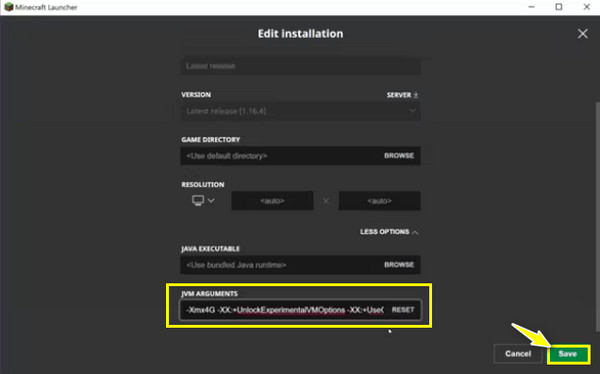
Steg 2I dette nye vinduet klikker du på rullegardinmenyen "Flere alternativer". Skyv ned til "JVM Arguments", hvor du kan endre antall gigabyte for Minecraft. Dette eksemplet endret det fra 2G til 4G; klikk "Lagre" når du er ferdig.
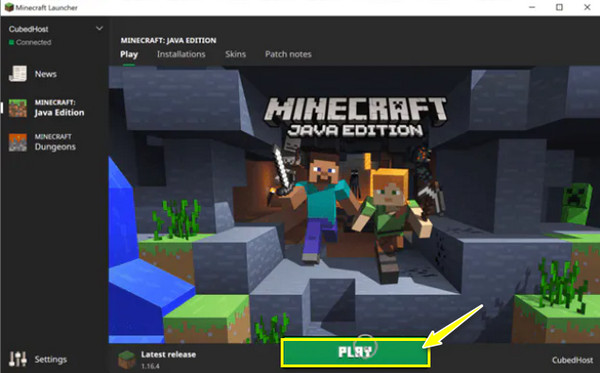
Trinn 3Gå tilbake til Launcher-hovedskjermen, klikk på "Spill"-knappen og nyt Minecraft-opplevelsen din med mer RAM!
Hvordan tildele mer RAM til Minecraft via CurseForge Launcher
CurseForge Launcher, derimot, har vært en etterspurt plattform for å kjøre tonnevis av mods og mod-pakker av Minecraft, og effektivisere nedlastingsprosessen deres. Den dekker også tilpasning og drift av forskjellige versjoner av Minecraft, og posisjonerer den som det nest beste valget for å forbedre spillingen din.
Så uten mye å si, sjekk ut trinnene nedenfor for å lære hvordan du tildeler mer RAM til Minecraft ved å bruke denne lanseringen for forbedret spilling.
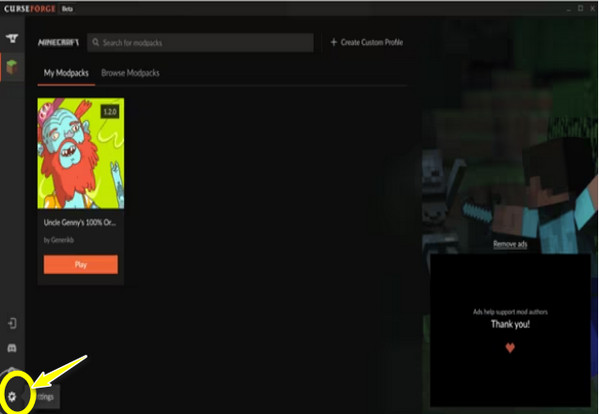
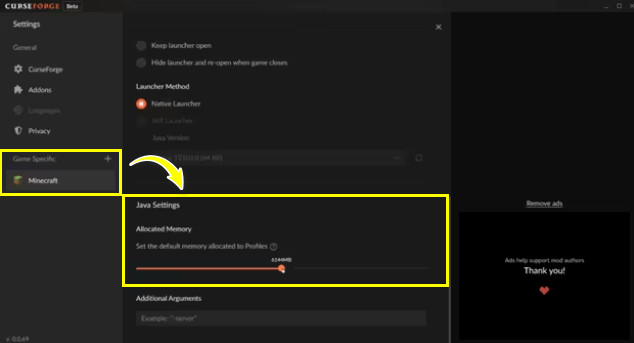
Trinn 1Åpne CurseForge Launcher, og gå deretter til "Innstillinger"-knappen helt til venstre på skjermen. Fra "Spillspesifikk"-delen klikker du på "Minecraft" for å åpne spillinnstillingene.
Steg 2Etter det, finn "Java-innstillinger", og trekk deretter glidebryteren for "Tildelt minne" for å justere RAM-en du vil at Minecraft skal ha. Senere klikker du på "Avslutt"-knappen øverst og starter spillet.
Tildel mer RAM til Minecraft med ATLauncher
Også for å forenkle installasjonen av mod-pakker, har den siste ATLauncher innebygd støtte for flere mods, noe som gir deg bredere valg for tilpasning. Starteren er det beste valget hvis du ikke bare vil tildele mer RAM til Minecraft, men også utforske modifisert spilling uten ulempen med manuell installasjon.
Når du er klar, her er hvordan du bruker ATLauncher for å lære hvordan du tildeler mer minne til Minecraft.
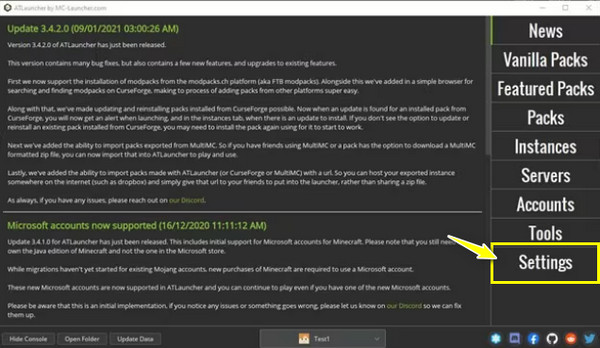
Trinn 1Start ATLauncher nå på skrivebordsskjermen. Vennligst naviger til "Innstillinger"-delen fra høyre side. Deretter velger du "Java/Minecraft"-fanen for å åpne spillinnstillingene.
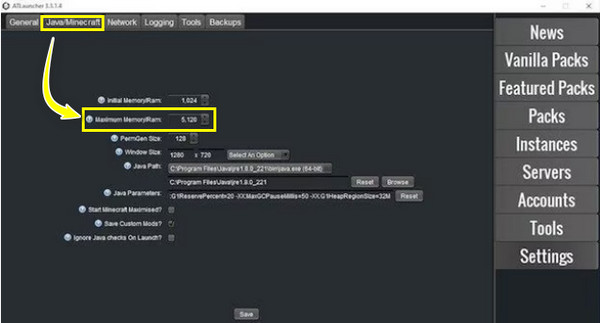
Steg 2Fra dette vinduet, juster "Maksimalt minne/RAM" i tråd med dine behov; du kan enten stille inn nummeret selv eller bruke "Opp/Ned"-knappene. Klikk på "Lagre"-knappen for å tildele den angitte RAM-en til Minecraft nå.
Bonustips for å spille inn Minecraft med mindre belegg/høy FPS
Nå som du må tildele mer RAM til Minecraft, forbedres spillingen din! Anta at du ønsker å dele din unike Minecraft-verden med andre. For å garantere mindre ressursbelegg og høye bildefrekvenser for et jevnere opptak, bruk 4Easysoft skjermopptaker! Programmet lar deg justere opptaksoppløsningen fra 1080p til 720p, og minimerer belastningen, samtidig som den bevarer en god visuell kvalitet. Andre video- og lydinnstillinger kan også angis i henhold til dine preferanser for å fange spilling og hva som fungerer best for systemet ditt. I tillegg til den utpekte spillopptakeren har dette verktøyet video-, lyd- og webkameraopptaker, noe som gjør det til en allsidig løsning for nettkurs, forretningsmøter, presentasjoner, fortellinger og mer.

Enkelt å ta opp Minecraft via spillopptakeren med høy fps og oppløsning.
Bruk CPU- og GPU-akselerasjon for å ta opp spilling uten etterslep.
Aktiver webkameraopptak og lyd for å ta opp sammen med spilling.
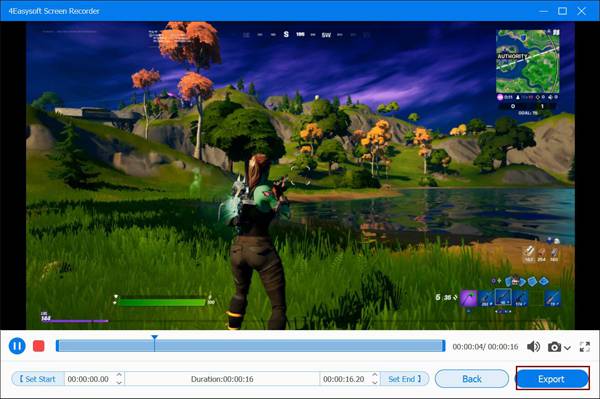
Forhåndsvis opptaket for å sjekke om det er en unødvendig del å trimme.
100% Sikker
100% Sikker
Trinn 1Inne i 4Easysoft skjermopptaker, velg "Spillopptaker"-knappen, blant andre opptaksalternativer, for å begynne. Sørg for at Minecraft-spillet allerede kjører på skjermen din.

Steg 2Klikk på "Velg spillet"-knappen, og velg "Minecraft"-vinduet fra den åpne listen. Deretter bestemmer du om du vil legge til et webkameraoverlegg eller fortelle under opptaksøkten. Slå i så fall på de nødvendige knappene.

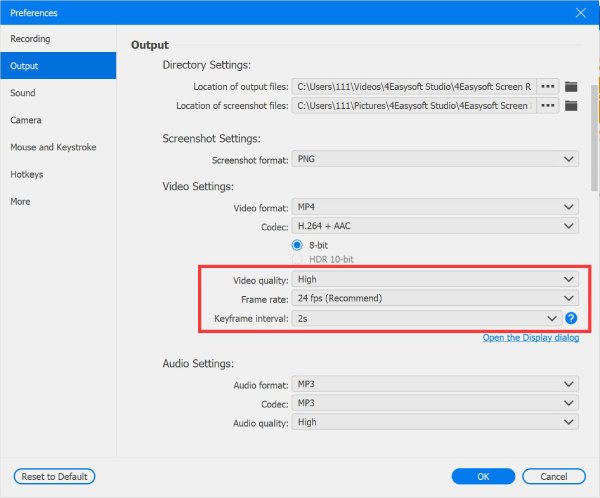
For å beholde høykvalitetsopptaket, åpne "Preferences"-knappen, og der, angi ønsket bildefrekvens og kvalitet, og klikk deretter på "OK"-knappen for å fortsette.
Trinn 3Når alt er avgjort, klikker du på "REC"-knappen for å begynne å spille inn Minecraft. Senere, når det er gjort, trim unødvendige deler i forhåndsvisningsvinduet. Klikk på "Eksporter"-knappen for å lagre Minecraft-innspillingen med høy kvalitet etter å ha allokert RAM til Minecraft.
Konklusjon
Dette er de mest brukte lanseringene for Minecraft over hele verden som, i tillegg til å gi enkel installasjon, kan hjelpe deg med å få en forbedret opplevelse ved å lære hvordan du tildeler mer RAM til Minecraft. Nå kan du definitivt nyte dine større verdener og mods og tekstur uten forsinkelser eller stamming. Hvis du noen gang bestemmer deg for å fange denne jevnere Minecraft-opplevelsen, bruk 4Easysoft skjermopptaker. Det er en alt-i-ett-løsning som resulterer i høykvalitets video og lyd med mindre ressursbruk. Den fungerer også med trimmer, merknadsverktøy og flere tilpasningsalternativer. Prøv det i dag og del spillingen din med verden!
100% Sikker
100% Sikker


