Record video, audio, gameplay, and webcam to record precious moments easily.
[Simple Guide] How to Use Schedule Recording on OBS Studio
It is frustrating when you don’t want to miss an important meeting or a TV show online on your computer, but there’s something you need to work on that will make you unable to access a computer. If you are looking for a way to address that, this post features detailed steps to use the OBS Schedule Recording function that will help you record an important meeting or TV show even without your presence! So, without further ado, start exploring it now!
Guide List
Detailed Steps to Use OBS Schedule Recording Function The Best OBS Alternative to Record Task Schedule FAQs about How to Use OBS Schedule RecordingDetailed Steps to Use OBS Schedule Recording Function
Before you start exploring this post’s detailed guide on how to use Schedule Recording on OBS, you first must understand that OBS doesn’t have a built-in feature that allows you to set a schedule for when to take a screen recording. It only supports a Stop feature that lets you set a time limit for how long you wish it to record. But there’s a workaround solution you can use to make this happen, and that is by using Windows Tasks.
Now that you have acquired some information, it is time to explore how to use the "OBS schedule recording" function via this post walkaround. So, without further ado, start diving below!
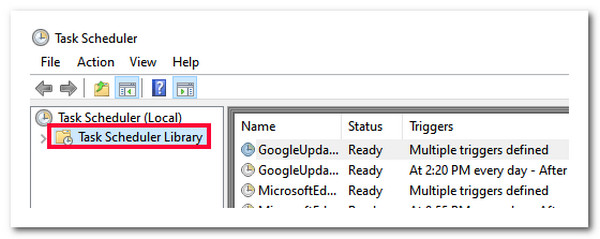
Step 1On your computer, tick the "Windows" icon, type the "Task Scheduler" in the search box, and double-click the "Task Schedule Library" button in the left pane. After that, tick the "Action" button and select the "Create Basic Task" to access the wizard for you.

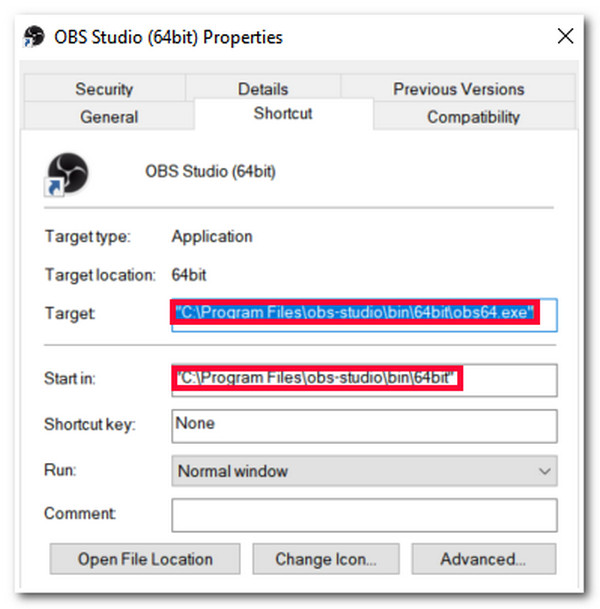
Step 2Once a prompt opens up that asks you what action it should perform when this task is triggered, click the "Windows" icon, type the "OBS Studio" on the search box, and instead of launching it, right-click the OBS icon and select the "Open file location" option.
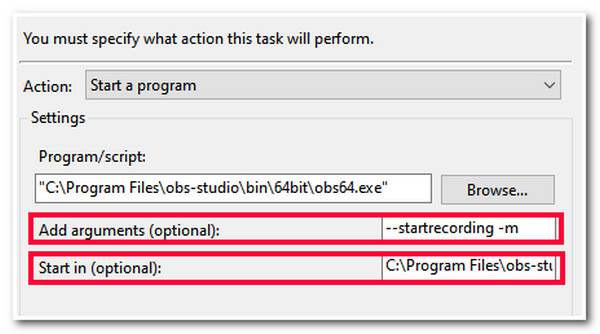
Step 3After that, right-click the "OBS" icon and select the "Properties" option. Then, copy the "directory" under the "Target" section and paste it into the Task Scheduler’s "Program/Script" box. Next, copy and paste the "Start-in" path to the Task Scheduler’s "Start-in" box.

You must remove the quotation marks on those directories, or it will not work.
Step 4Next, type this argument "-startrecording -m" on the Task Scheduler, and click the "OK" button. And that’s it! Those are detailed steps on using OBS schedule recording with the help of Windows Tasks/Task Scheduler.
Tips
To test whether this workaround solution will work, right-click the schedule and select the "Run" option. Then, this will immediately open the OBS and start recording.

The Best OBS Alternative to Record Task Schedule
That’s it! Those are the detailed guides on the OBS schedule recording! Now, if you find the above walkaround quite complicated, you definitely consider looking for an alternative. Well, what this post can recommend to you is the professional 4Easysoft Screen Recorder tool! This Windows and Mac-compatible tool supports a built-in Task Schedule feature that lets you easily and quickly add a schedule for when to start and stop a screen recording! It enables you to set the Start and Stop times and dates based on the on-screen activity you wish to record. Moreover, compared to OBS, this tool offers an easy-to-use, efficient, and complete set of options to record a scheduled on-screen activity! These are just a glimpse of this tool’s powerful Task Schedule feature. If you want to discover more, explore the list below!

Enable you to set a scheduled on-screen recording for Video, Audio, Game, etc.
Multi-segment record option that lets you split your recordings into multiple segments.
Offer you an option to stop recording when the on-screen activity is finished manually.
Let you command the tool what to do when the recording is finished: Do nothing, exit the program, and more.
100% Secure
100% Secure
How to Use 4Easysoft Screen Recorder tool as an Alternative to OBS Schedule Recording Function:
Step 1Download and install the 4Easysoft Screen Recorder on your computer. Then, launch the tool, select "Video Recorder, Audio Recorder, Game Recorder, etc." according to the upcoming on-screen activity you wish to record, and click the "Task Schedule" button.

Step 2After that, tick the "Add" button with the "Plus" icon to add a new schedule. Then, enter the task name on the pop-up dialogue box and tick the "OK" button to save it.
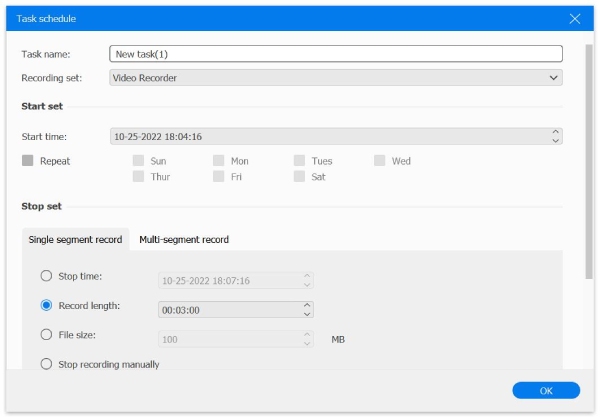
Step 3Next, on the Task Schedule window, you can set the "Start time and date" under the "Start set" section. After that, under the "Stop set" section, you can set the "Stop time, Record length, File size, etc."

Step 4Once you finish the above setups, tick the "OK" button at the bottom right side of the tool to save the task. Then, the tool will preview the task you created earlier with the status "ON". And that’s it! That’s how you use this tool as an alternative to OBS Schedule Recording.
FAQs about How to Use OBS Schedule Recording
-
1. Can OBS Studio schedule record streaming?
Yes, OBS Studio can schedule a record streaming. To do that, follow the steps featured in this post’s part 1 and set the task based on the streaming schedule. You can also utilize the third-party tool mentioned in this post for a much easier task schedule recording.
-
2. Is there a plugin I can use to schedule recording on OBS Studio?
Yes, the Advanced Scene Switcher plugin is a plugin you can use to schedule a recording. This plugin lets you create "macros" like alarms. You can set that up based on your desired recording time. However, this plugin is much more complicated than the task scheduler.
-
3. How long will OBS Studio, with the system’s task scheduler, record an on-screen activity?
OBS Studio doesn’t impose any time limit for recording an on-screen activity or subject, even when using the system’s task scheduler. The OBS Studio recording process will only stop if you command it or once it reaches the set end or stop time.
Conclusion
That’s it! That’s the detailed guide on how to use the OBS Schedule Recording function. After reading this post, you can now capture an upcoming on-screen event or activity that you don’t want to miss. If you find the OBS Schedule Recording too complicated to execute, you can use the professional 4Easysoft Screen Recorder tool as an alternative! With this tool’s built-in Task Schedule feature, you can easily schedule when to start and stop recording based on the on-screen activity you wish to capture. Visit this tool’s official website today to discover more!
100% Secure
100% Secure


