Create DVD/Blu-ray disc/folder or ISO files from all video formats.
PowerPoint to DVD - How to Burn Presentation Videos on Windows/Mac?
 Posted by Paula Pailaga to Burn DVD/Blu-ray Jan 10, 2023
Most of the time, playing your slideshow in a PowerPoint file on your computer may fail to display. Transferring your PowerPoint to DVD video makes it easy to play your presentations and discuss well in front of clients, classmates, co-workers, and more. After you edit your presentation with transitions, effects, animations, text, etc., you can save your PowerPoint as a DVD disc. Make sure to review your slideshow before converting, and now you’re ready to burn PowerPoint to DVD video.
Guide List
Part 1: How to Burn PowerPoint Videos to DVD for Storing Part 2: The Default Way to Burn PowerPoint to DVD on Windows Part 3: FAQs about How to Burn PowerPoint to DVD DiscPart 1: How to Burn PowerPoint Videos to DVD for Storing
Before burning your PowerPoint to DVD video, you must make a presentation through Microsoft PowerPoint first. It includes many elements, including animations, transitions, texts, timings, and more. You can start creating presentations with PowerPoint on Windows, Mac, or your mobile devices.
First, open Microsoft PPT and select New in the left pane. To start your presentation, click the Blank Presentation; you can see tips for using the program when you choose Take a Tour and then click Create. In the Home tab, select New Slide in the Slides section to add a new slide, then choose the layout you want your slide to appear by clicking Layout. You can click each tab in the main interface and then add something to your presentation, such as text, images, shapes, animations, transitions, and more. If you’re satisfied with your PowerPoint presentation, save it as a video; you can decide whether to use recorded timings or not.
After saving your slideshow, it’s time to burn your PowerPoint to DVD video. Create your own DVD in high quality with 4Easysoft DVD Creator. This software is available on Windows/Mac and supports all disc types, such as DVD-5, DVD-9, DVD-R, DVD+R, DVD-DL, and more. With this DVD creator, you can also burn homemade videos to permanently save your precious time watching your favorite movies. Preserve your videos taken by your phone, then convert them to DVD format to save beautiful memories.

Support high-quality conversion; it can save 25GB or 50 GB, so the video resolution can reach 1080P.
Provide essential editing functions, such as merging, splitting, cropping, adding music, and making menus.
Allow you to burn PowerPoint videos to DVD in two different standards, NTSC or PAL, to play on the corresponding TV or DVD players.
Support burning many video and audio formats to DVD, including MP4, 3GP, MKV, MP3, AAC, WMA, etc.
100% Secure
100% Secure
Step 1Download and install the PowerPoint to DVD video converter, 4Easysoft DVD Creator, then launch it on your computer. After launching it, insert a blank DVD into your computer’s drive.

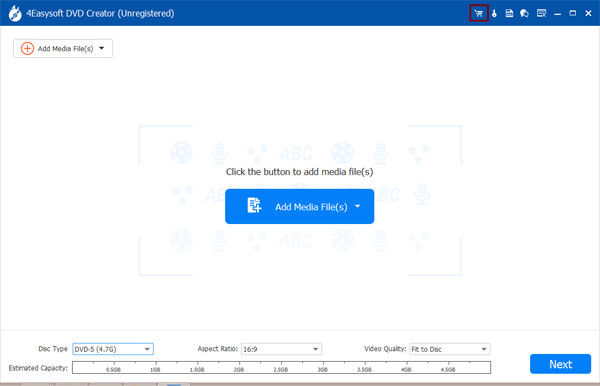
Step 2On your computer, choose DVD Disc in the popping-up window. Click Add Media Files to choose the presentation videos that will be put into the program. You can add many video files within 4.7 GB, then click Next.
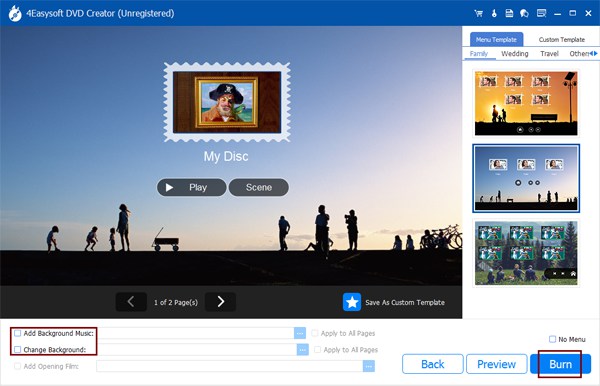
Step 3This program offers you many templates, and you can also create your templates with your desired background and title. Plus, you can also add background music as you want.
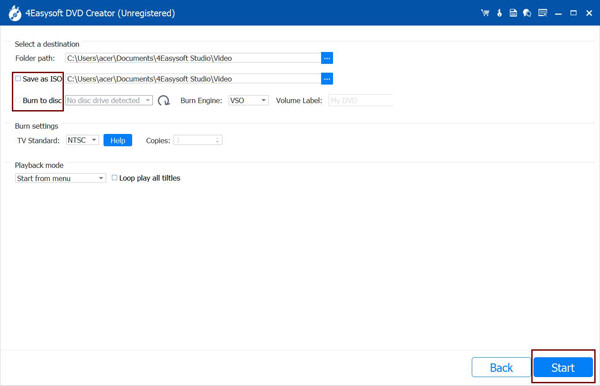
Step 4After customizing, click Burn at the bottom-right corner of the program to start changing the output settings, such as changing the destination file, burning settings, and. choosing playback mode. When you’re done, click Start to create your PowerPoint to DVD video.
Part 2: The Default Way to Burn PowerPoint to DVD on Windows
If you don’t want to use software to burn PowerPoint to DVD video, you could use the default way to transfer your presentation to a blank DVD. With just three easy steps, you can have your PowerPoint on DVD. Below, you’ll see how to directly and quickly move and start burning PowerPoint to DVD video.
Step 1Insert a blank DVD into your computer’s DVD drive, and your computer will automatically detect it. Make sure your PowerPoint presentations are ready. If your computer doesn’t automatically open the blank DVD location, you’ll have to navigate to My Computer/This PC and ensure your DVD shows DVD-RW or DVD-R.
Step 2Copy your PowerPoint presentation, paste it or directly drag the file into the DVD drive, then drop it. Then right-click the DVD drive, and choose Burn to disc. Set Disc Title on the Burn to disc pop-up windows, then choose With a CD/DVD Player; click Next.
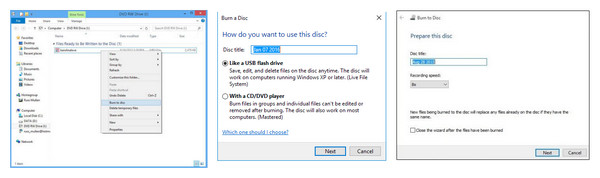
Step 3Wait for the process to finish, then when your PPT file is transferred to the DVD folder. Click Burn from the menu to start the burning process of your PowerPoint to DVD video.
Part 3: FAQs about How to Burn PowerPoint to DVD Disc
-
How can I quickly save my slideshow as a video format to convert to DVD?
You can burn your PowerPoint presentations to DVD with the help of Windows Media Maker. However, this program has been removed, so it isn’t supported on Windows 10. You could try searching for another program to help you burn Powerpoint to DVD video, or consider trying the mentioned program and the default way above to burn your PowerPoint slides.
-
Can I use Windows Media Maker to burn PowerPoint to DVD video?
You can burn your PowerPoint presentations to DVD with the help of Windows Media Maker. However, this program has been removed, so it isn’t supported on Windows 10. You could try searching for another program to help you burn Powerpoint to DVD video, or consider trying the mentioned program and the default way above to burn your PowerPoint slides.
-
Is Windows Media Maker available in earlier versions of Windows?
Windows DVD/Media Maker was removed in Windows 8. So, for Windows Vista and Windows 7 users, this program is still available. Like the methods mentioned above, you can quickly burn PowerPoint to DVD video with this software.
Conclusion
Creating a video from your presentation would be easy to access since you just need to insert the DVD into your computer’s drive. That is why the abovementioned methods would help you burn your PowerPoint to DVD video. However, doing this might take a lot of your precious time, especially if you aren't familiar with the program. Fortunately, one program can help you quickly burn your PowerPoint to DVD video - 4Easysoft DVD Creator. With this software, you will be able to burn PowerPoint presentations with ease.
100% Secure
100% Secure