Record video, audio, gameplay, and webcam to record precious moments easily.
[Tutorial] How to Record Fortnite Epic Gameplay? 4 Workable Ways
Fortnite is one of the most thrilling cross-platform battle games today. With its millions of gamers, no doubt this game was able to enter the world of streaming on video-sharing platforms like YouTube. You are probably one of those gamers who want to record Fortnite and share your epic battle scenes for entertainment or feature a skill. In that case, this post features 4 ways, with their steps, to record Fortnite gameplay with high quality on various platforms. Explore them now!
Guide List
Part 1. How to Record Fortnite Gameplay on PC/Switch/PS4 Part 2. The Ultimate Way to Record Fortnite with High Quality Part 3. FAQs about How to Record Fortnite GamesPart 1. How to Record Fortnite Gameplay on PC/Switch/PS4
Fortnite supports many platforms, and each of them is equipped with a recorder feature that you can use to capture your gameplay highlights. As mentioned, this post features 4 ways to record Fortnite on different platforms: PC, Switch, and PS4, and later on, you’ll see the ultimate tool to record your gameplay. So, without any further delay, start diving in!
1. Record Fortnite on PC - Xbox Game Bar
If you are playing Fortnite on your PC via Epic Games, you can use its built-in screen recorder feature, Xbox Game Bar to record Fortnite easily. This feature stands out because you don’t need to do other installations for extra software, and the interface is indeed easy to understand. You can also initiate the screen recording process by executing key combinations on your keyboard. Sometimes, its virtual interface is not showing up, and performance is not as good as other screen recorder features.
Step 1Launch Fortnite and press the Windows key + G to open the Xbox. Then, click the Audio icon to capture your voice to add commentary while playing. You also need to adjust the System Sound using its Volume Slider to modify the loudness of the game and lower the sounds of other applications to ensure that no other sounds will capture.
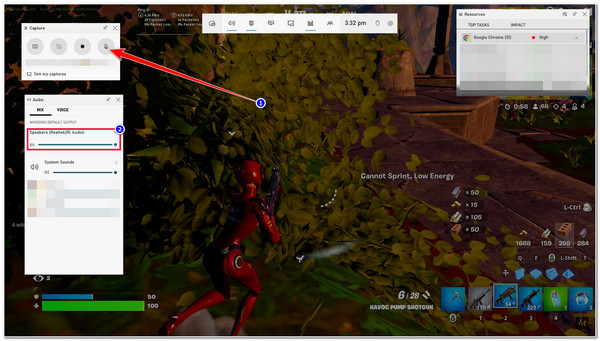
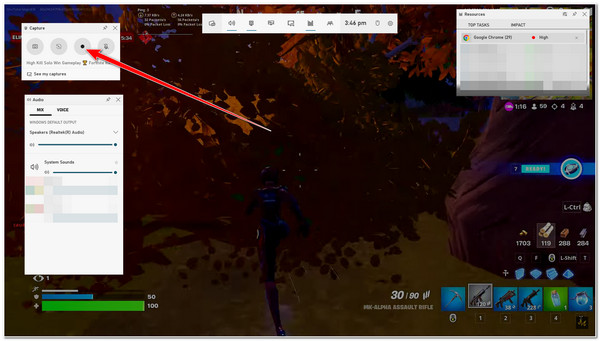
Step 2After that, tick the Record button with the Circle icon to start recording Fortnite, or press Windows + Alt + R simultaneously on your keyboard. Once done, click the same button or perform the same key combinations to stop recording. Your recordings will then be saved in your File Explorer under the Captures folder.
2. Record Fortnite on Switch
Otherwise, if you use Switch without a capture card and utilize Game Controller to play Fortnite games, you can use its record button to capture it! What might bother you is that, unlike Xbox Game Bar on PC, the Switch only records 30 seconds of your gameplay, which is too short to showcase the game’s best highlights. But 30 seconds is not bad for YouTube Reels. This means you can still use it as a YouTube Reel upload. If this is okay with you, here are the steps you need to go after to record Fortnite:
Step 1Open the Fortnite game on your Switch. After that, spot the part you want to record. Once you’ve reached the part you want to record, long press the Capture button with the Square icon at the left part of your Joy-Con.
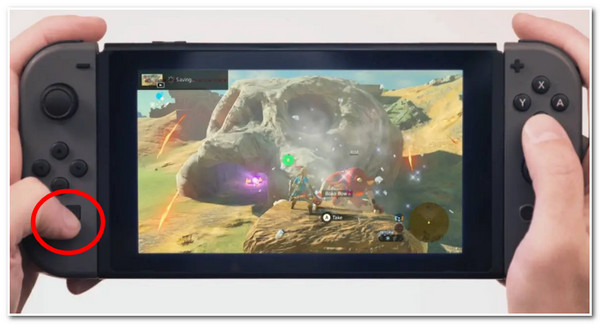
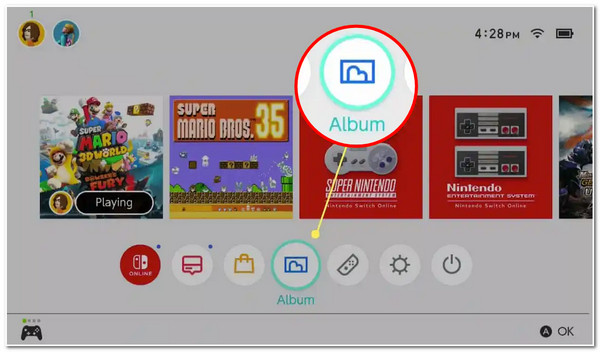
Step 2After clicking the button, the recording will automatically start. Once it reaches maximum duration, the recorded Fortnite gameplay will automatically store on your Album.
3. Record Fortnite on PlayStation 4 (PS4)
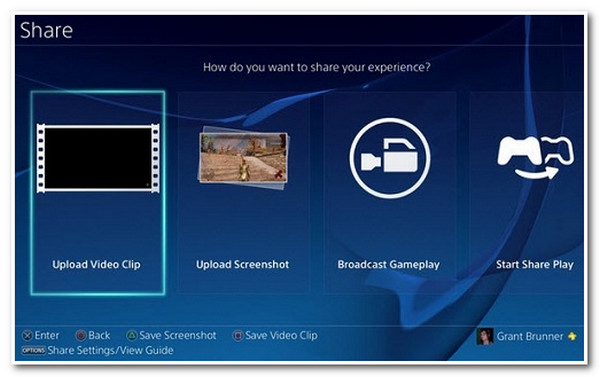
In case you are using PS4 to play Fortnite games, then you can also use it as well to record your gameplay. This way is impressive because, unlike the first two ways, PS4 lets you instantly share your gameplay to video-sharing platforms like YouTube, Facebook, Twitch, etc., after the recording process. However, please note that PS4 can only record 60 minutes of your gameplay. If it exceeds the mentioned time, it will not record the rest. But a one-hour recording is enough to feature all the highlights of your Fortnite game! To record kill Fortnite gameplay with your PS4, here are the steps you must follow:
Step 1Launch the Fortnite game on your PlayStation 4. After that, press the Share button twice on your PS4 Controller to start the recording process.
Step 2Once you are done recording, press the Share button twice again to stop recording.
Part 2. The Ultimate Way to Record Fortnite with High Quality
There you have it! Those are the first three ways to record kill Fortnite: PC, PS4, and Switch. Now, the last way you can record the highlights of your Fortnite gameplay is by using the 4Easysoft Screen Recorder tool! What’s the edge of this tool from those first three ways? Well, this tool’s Game Recorder feature can record your Fortnite gameplay on any device, whether using a PC, Switch, or PS4 (with a capture card), with high quality and without lag issues! Recording your Fortnite with high quality is made possible by this tool’s integrated CPU and GPU acceleration technology.

Equipped with Customizable Hotkeys that enable you to start, stop, and pause recordings easily.
Infused with a Webcam feature that lets you capture your face and your voice while recording.
Offer video formats to export your Fortnite recordings, such as MP4, WMV, MOV, etc.
Support Output Customization Settings that let you modify your Fortnite recording’s quality, frame rate, codec, etc.
100% Secure
100% Secure
How to Use 4Easysoft Screen Recorder to Record Fortnite with High Quality
Step 1Download and install the 4Easysoft Screen Recorder tool on your Windows or Mac computer. Next, launch the tool, and click the Game Recorder option. You should ensure that your Fortnite is already running and open.
Step 2Then, the tool will automatically recognize your Fortnite. Otherwise, you can also select it by clicking the Select the Game button and choosing Fortnite. If you want to do commentary while playing, turn on the Webcam and Microphone by ticking their switch buttons.

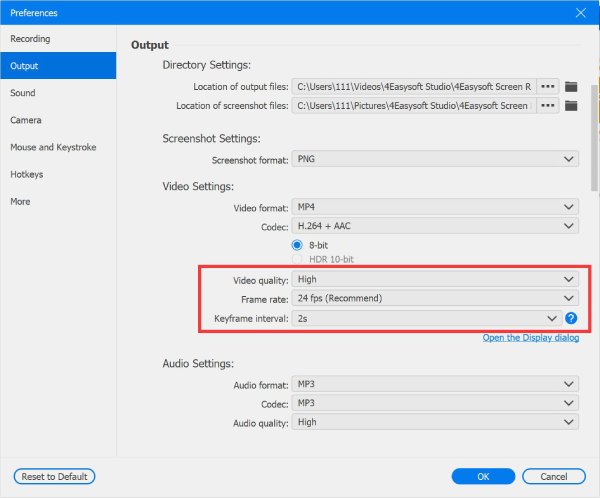
Step 3Next, to ensure a high-quality Fortnite gameplay recording, click the Record Settings with the Gear icon and select the Output tab. Then, set the Frame Rate to 60 fps and Video Quality to Lossless quality. Once you are done, tick the OK button.
Step 4After all those setups, start recording by clicking the REC button. You can immediately launch your Fortnite game window before the 3-second countdown ends.

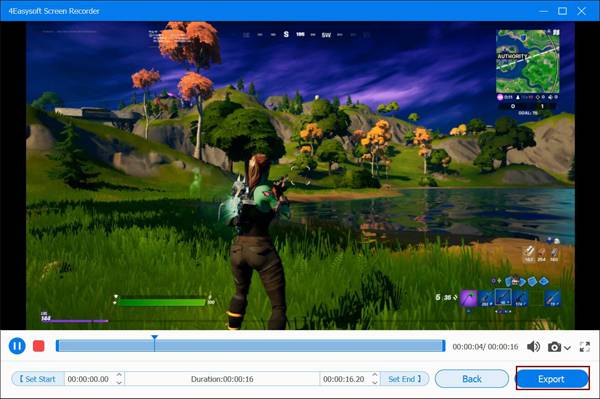
Step 5Once you are done recording your Fortnite gameplay, tick the Stop icon. After that, the tool will then bring you to its Preview section. Here, you can trim the recorded clip to eliminate unwanted parts. If you are satisfied with its outcome, click the Export button to save it.
Part 3. FAQs about How to Record Fortnite Games
-
Can I record Fortnite gameplay on EPIC Games?
Unfortunately, you can’t. Although EPIC automatically records gameplay through its EPIC’s replay mode and stores them on its server, you can’t be able to download or send them. So, in this case, you need screen recorders to help you with it.
-
How to record the last Fortnite game?
To record the last Fortnite games, you can choose and follow the ways provided above that applies on your end. If you are using PS4, you need to press the Share button on your Controller once to record the past gameplay. Otherwise, if you are using a PC or Switch, you need to access first the Fortnite Replays, and there you can record or directly save them.
-
Where can I see Fortnite game replays on Switch?
To access the replays of your Fortnite gameplays, head to the Main Menu and press Replays on the list of options. After that, select the Fortnite game you wish to see and press the Start button to watch it.
Conclusion
There you go! Those are the 4 ways you can do to screen record Fortnite PC, Switch, PS4, and with an advanced screen recorder tool! With those featured ways, you can now record your epic Fortnite gameplay and share them on various video-sharing platforms like YouTube. If you struggle to record them on a specific device, let the 4Easysoft Screen Recorder tool be your best ally! This tool is infused with a Game Recorder tool capable of recording your Fortnite gameplay on various devices. It can record them without lag issues, providing the best Fortnite gameplay-watching experience. Feel free to visit this tool’s official website to discover its other best features!
100% Secure
100% Secure


