Record video, audio, gameplay, and webcam to record precious moments easily.
Record TeamViewer: 3 Proven Methods with Detailed Steps
When it comes to remote support, TeamViewer is undoubtedly a robust tool for getting the work done seamlessly. And sometimes, you want to capture those sessions to keep records, save essential meetings, etc. How do you record TeamViewer, then? In this post, you will learn the three ways to easily capture everything on TeamViewer, helping you determine the best approach for your recording needs. Dive in now and get started to record TeamViewer!
Guide List
How to Record TeamViewer Sessions Manually How to Record TeamViewer Session Automatically The Best Way to Record TeamViewer Sessions in High-QualityHow to Record TeamViewer Sessions Manually
Fortunately, TeamViewer has a built-in screen recording tool that lets you record all communications during a session, covering sound, videos, webcam, and more. Also, it can be simply edited, which is beneficial for creating how-to videos. In this part, you will see how to record TeamViewer manually on both Windows and Mac.
How to Record TeamViewer on Windows:
Step 1Please link your TeamViewer to another device and direct to the toolbar, then move to the "Files & Extras" option and select "Start session recording".

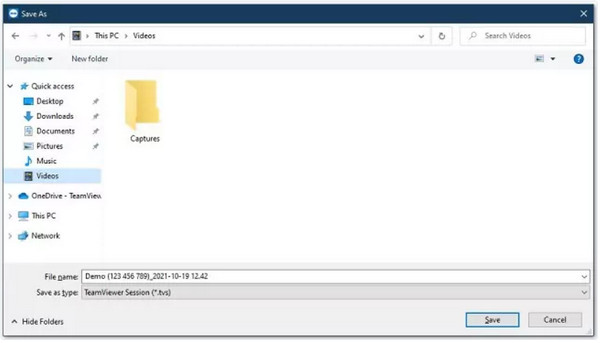
Step 2Once the TeamViewer session ends, a notification will pop up where you can save the recording to your desired path.
How to Record TeamViewer on Mac:
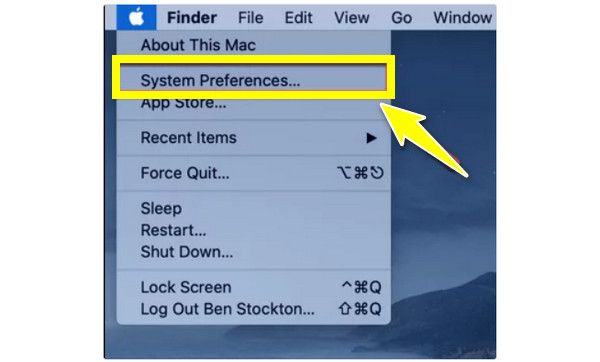
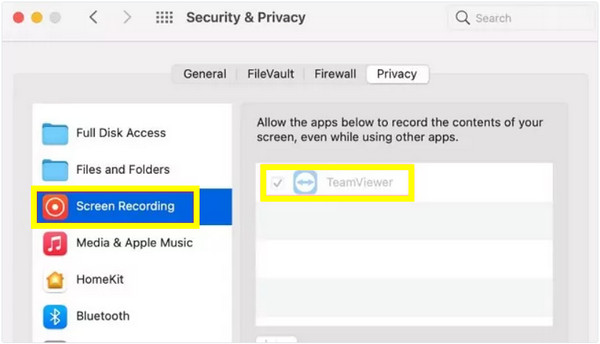
Step 1Please hover over the "Apple menu" on your screen and select "System Preferences". Next, head to the "Security & Privacy" option, go through the menu, and find "Screen Recording".
Step 2Following that, applications will be shown; please look for TeamViewer and check the box next to it to enable screen recording. If the TeamViewer is still active, re-open it.
Step 3Now, connect TeamViewer with another system, click the "Extras" dropdown, head to the "Record" option, and then click "Start" to begin recording on Mac with audio. Later on, save the recording once done.

How to Record TeamViewer Session Automatically
Meanwhile, you can take complete advantage of the built-in recording of TeamViewer, too. This is by setting up an automatic recording of the sessions. Once you have established a connection to the remote computer, you can now record TeamViewer automatically. Check out the detailed steps below:
How to Record TeamViewer on Windows:
Step 1Once you're in the TeamViewer app, go to the "Settings" button in the top right corner of your screen, then select the "Advanced" option.
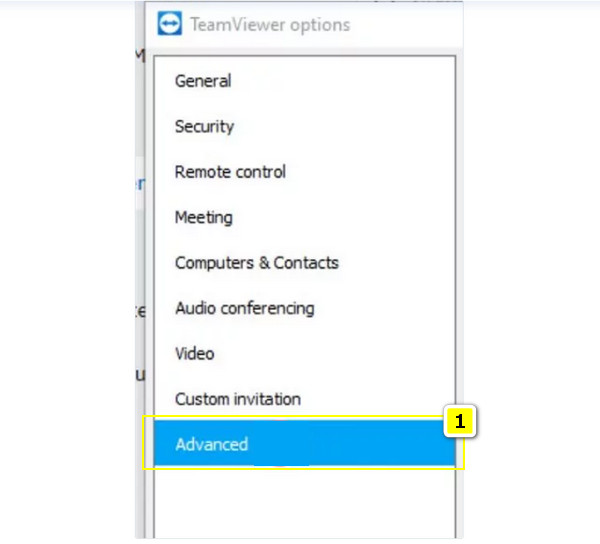
Step 2Next, find the "TeamViewer" options and determine the path where to save your automatic recordings. Once finished, click the "OK" button.

How to Record TeamViewer on Mac:
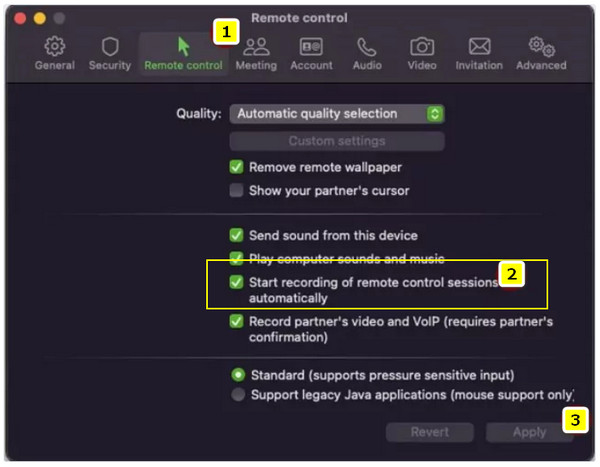
Step 1Find the TeamViewer from the upper bar, click on it, scroll down, choose "Preferences," and select the "Remote Control" option.
Step 2Here, you will see "Start recording of remote-control sessions automatically" on your screen; please check this box. After that, click the "Apply" button to save changes.
The Best Way to Record TeamViewer Sessions in High-Quality
While TeamViewer does provide you with a built-in recording feature to record TeamViewer sessions, the thing about it is that it lacks more control over what you record and some customization options. Thus, using an alternative tool like 4Easysoft Screen Recorder can fill these limitations and enhance your recording experience. This program lets you choose to capture specific areas of your computer screen or adjust settings such as frame rate, resolution, format, and more for higher-quality recordings. Also, unlike the TeamViewer recorder that is built-in for basic session captures, 4Easysoft is built-in for a broader range of tasks, so whether it is for tutorials, gameplay, TeamViewer meetings, voiceover, or more, you can get them all done effortlessly!

Able to record videos up to 4K UHD for incredibly clear results.
During and after recording, you can add annotations like text, callouts, etc.
Record the webcam, microphone, and system sounds alongside your screen.
Multiple export format support, like MP4, MKV, AVI, etc. for broader compatibility.
100% Secure
100% Secure
Step 1On your screen, open up the 4Easysoft Screen Recorder. Please select the "Video Recorder" button from the main interface to begin the TeamViewer recording operation.

You can choose either to record the entire screen or just the selected region by choosing "Full" or "Custom". In any case, you can still pull the frame to change the recording position.
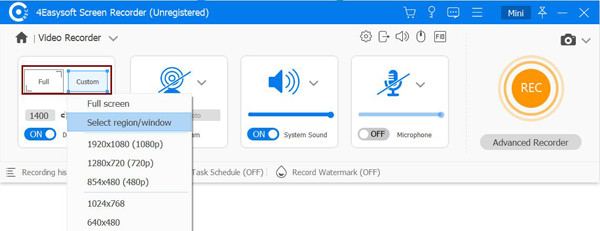
Step 2Turn on the "System Sound" switch button to capture computer sound and everything, and the "Microphone" switch button for voiceovers. Pull the corresponding sliders to change the audio volume.

Step 3After everything is set up, click the "REC" button to start recording TeamViewer or use the "Ctrl + Alt + R" keys for more easy control. You may now annotate while recording, add text, lines, shapes, and callouts, and even take a screenshot via the pop-up toolbar.

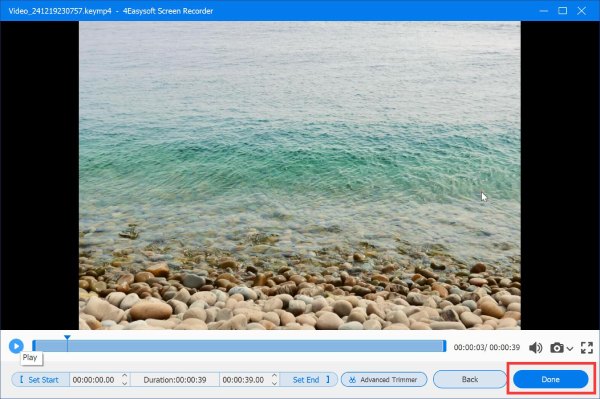
Step 4Soon after you finish everything, click the "Stop" button. Here, in the preview window, watch the recording and see if there are any changes to be made. Click the "Save" button if you’re happy with the way it looks.
Conclusion
Wrapping it all up, now you know how to record TeamViewer sessions! A recording will help you document remote meetings or some technical issues. You’ve learned how to manually and automatically record via its built-in recording feature here. However, it won't be enough for those who want advanced options. Thus, with alternatives like 4Easysoft Screen Recorder, you can have enhanced customization, better output options, and superb control over your video recordings. Ensure you never miss an important moment with this program.
100% Secure
100% Secure


