Rip DVD to Hard Drive: 3 Proficient Tools For You [Tutorial]
Collecting tons of DVDs comes with a lot of drawbacks. These drawbacks include discs being vulnerable to physical damage and being inconvenient to bring somewhere. Well, why do you need to endure all these where you can rip and store DVDs on a hard drive? Yes! You read it right. By ripping DVD, you can have a much more convenient playback. How will you do that? Explore this post, for it features 3 efficient tools to rip DVDs to a hard drive! Explore them now!
Guide List
Why You Need to Rip DVD to Hard Drive without Directly Copying The Best Way to Rip DVD to Hard Drive with High Quality How to Rip DVD to Hard Drive through Handbrake How to Use VLC Media Player to Rip DVD to Hard Drive FAQs about How to Rip DVDs to Hard DriveWhy You Need to Rip DVD to Hard Drive without Directly Copying
Before you dive into this post’s 3 efficient ways to rip DVD movies to hard drives, you first need to understand why you need to rip DVDs to hard drives without directly copying them. Well, not all DVDs allow you to copy their contents directly. These DVDs, especially those commercial ones, are mostly integrated or equipped with one or more copy-protection schemes. These copy-protections are the ones that hinder you from directly copying DVD’s contents.
Now, what if you still tried to copy this protected DVD’s contents? Well, you can bring damage to the DVD. Apart from this, you could also experience these scenarios: reading an empty DVD, what you have copied is corrupted, or unable to play copied content.
So, that’s it! That’s a brief reason why you need to rip the DVD to a hard drive instead of copying it directly. Now, to start bringing yourself to the main event of this post, begin diving below!
The Best Way to Rip DVD to Hard Drive with High Quality
The first professional tool you can use to rip a DVD collection to a hard drive is the 4Easysoft DVD Ripper. This Windows and Mac-compatible tool can quickly and efficiently rip DVDs. Its built-in GPU Accelerated technology drives the tool to rip and convert DVD contents with 60X faster speed without compromising the original quality. Moreover, it supports 600+ media and device preset formats to convert the DVD’s content. Also, along with these formats, this tool also has a built-in output tweaking option, which you can use to enhance the quality of ripped DVD content.
Able to rip DVDs to 600+ digital formats for easy saving on hard drive or computer.
Output tweaking options to modify DVD content’s format, quality, frame rate, etc.
Rip any homemade and commercial DVDs without being hindered by protection.
Built-in video editor to customize DVD movies, including subtitles, filters, effects, etc.
100% Secure
100% Secure
How to Rip DVD to Hard Drive with High Quality Using 4Easysoft DVD Ripper:
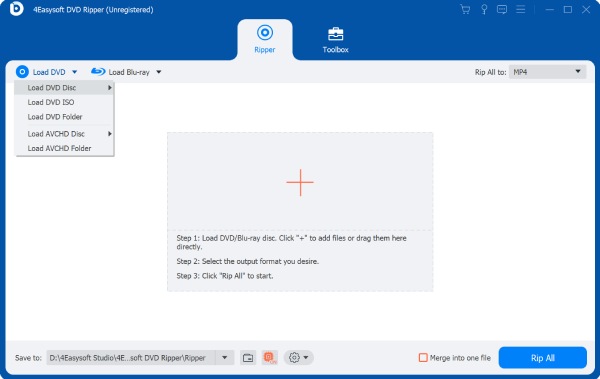
Step 1Download and install the 4Easysoft DVD Ripper tool on your Windows and Mac. Then, launch the tool, insert the DVD into your computer’s DVD drive, head to the tool again, and click the "Load DVD" dropdown button. After that, select the "Load DVD Disc" option.
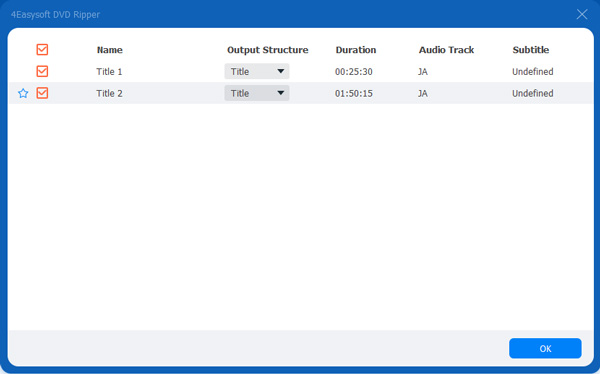
Step 2Next, click the "Full Title List" button to access all the DVD’s title lists. After that, select all the titles you wish to rip by ticking their corresponding "checkboxes". Once you are done, click the "OK" button.
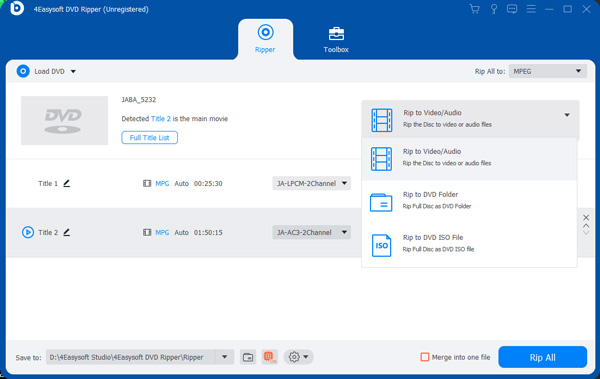
Step 3Then, click the "Rip All to" dropdown button and select the "Rip to Video/Audio" option. After that, on the pop-up window, select the "Video" tab and choose a format to export the DVD content. This post recommends you choose MPG Lossless to keep the original quality.
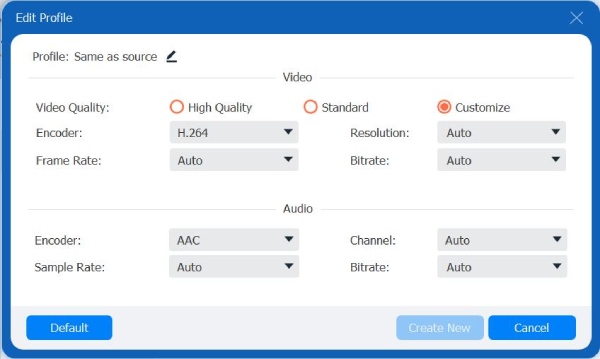
Step 4To further enhance the DVD content’s quality, click the "Settings" button. On the "Edit Profile" window, you can tweak the DVD content’s quality, resolution, frame eate, etc. Once you are done, click the "Create New" button.
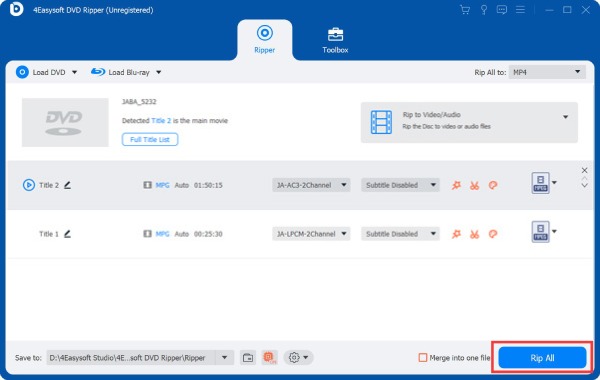
Step 5Once satisfied with your customization, click the "Rip All" button at the lower right corner. After that, access the ripped content on your computer’s folder and copy and paste it onto the hard drive. And that’s it! That’s how you use this tool to rip a DVD to a hard drive.
How to Rip DVD to Hard Drive through Handbrake
Another tool that can also rip DVD collection to a hard drive is Handbrake. This Windows and Mac-compatible tool is an open-source video transcoder that can convert DVD content to a media format. However, compared to the tool above, Handbrake only offers 3 media formats (MKV, MP4, and WebM) to convert your DVD content. Moreover, this tool doesn’t have a built-in DVD copy feature and exports low-quality content. But, despite having these drawbacks, Handbrake is still a great option to rip DVD movies to the hard drive. Now, to use Handbrake, here are the steps you should follow:
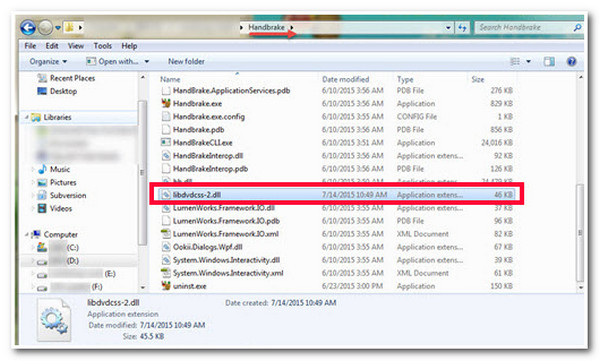
Step 1Download and install the "Handbrake" tool. After that, visit the VLC’s website and download the "libdvdcss.dll" file. This file will make Handbrake support copy-protected DVDs. Once you have downloaded the file, move it to the installation folder of Handbrake.
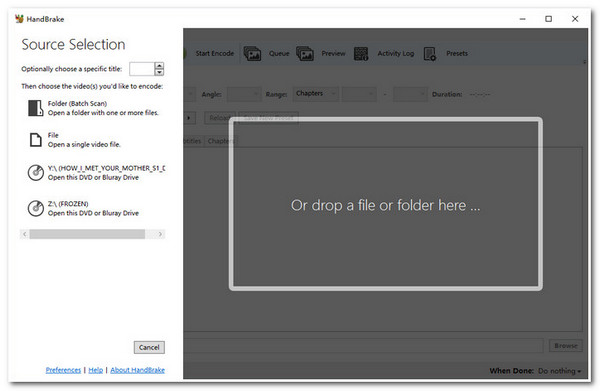
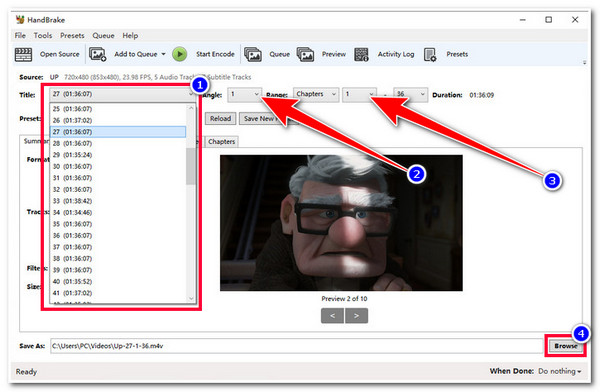
Step 2Then, insert the DVD on your computer’s driver and launch the "Handbrake" tool. After that, load the "DVD" under the "Source Selection" section and wait for the tool to finish scanning all the DVD titles.
Step 3Next, select the "title" you wish to rip and modify the "Angle and Chapters" options. Then, choose your desired output video format under the "Summary" tab under the "Format" menu. After that, click the "Browse" button, select the hard drive, and click the "Start Encode" button.
How to Use VLC Media Player to Rip DVD to Hard Drive
Besides Handbrake, you can also use VLC Media Player to rip the DVD collection to a hard drive. VLC is an open-source media player tool capable of playing various media files with different formats. But, apart from this, VLC can also rip and convert DVDs into a digital format. Now, the catch is that this tool takes a lot of time to rip DVD content. Moreover, like Handbrake, VLC can’t also directly handle protected DVDs; it needs an additional library before it can accommodate a protected DVD. Now, how to use VLC to rip a DVD to a hard drive? Follow these steps:
Step 1Run the "VLC" on your computer and insert the "DVD" on your computer drive. After that, select the "Media" tab and click the "Convert/Save" button. Then, click the "Disc" tab and select the DVD you inserted earlier on "Disc device".
Step 2After that, choose your desired "Title, Chapter, Audio Track, and Subtitle track" that you wish to rip and click the "Convert/Save" button. Then, if you want to export the DVD content into a specific format, click the "Profile" dropdown button and select a format.
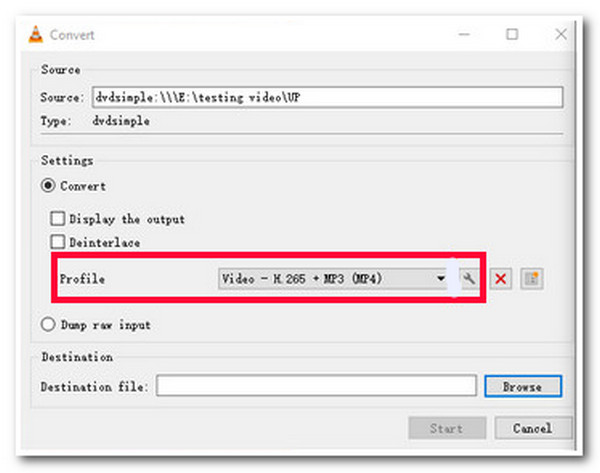
Step 3Once you finish the overall setup, click the "Browse" button and select the hard drive where you want to save the ripped file. Then, click the "Start" button to initiate the ripping and transferring process of the DVD content.

FAQs about How to Rip DVDs to Hard Drive
-
Can I use Handbrake to rip DVD to a hard drive without using libdvdcss?
Yes, you can use Handbrake to rip DVDs without using libdvdcss. However, if you are going to rip copy-protected DVDs, then you need to use the libdvdcss file to remove the protection and rip its content.
-
Does Handbrake add a watermark to the ripped DVD?
No, Handbrake doesn’t embed a watermark on your output. It also doesn’t impose any restrictions on the file you will import. You only need to consider that it can’t help you rip copy-protected DVDs unless you download and install libdvdcss.
-
How long does VLC rip a DVD content take?
VLC will stream the video to a file on your computer’s hard drive to rip it. In that case, the time VLC will take is according to the DVD movie’s runtime.
Conclusion
There you have it! Those are the 3 efficient tools to rip DVDs to a hard drive! With these 3 tools, you can easily rip DVD contents and transfer them to a hard drive. If you are looking for a tool that can quickly rip DVD content and export it with high quality, then the 4Easysoft DVD Ripper is what you are searching for. With this tool’s powerful ripping technology and output tweaking features, you can undoubtedly acquire the best-ripped DVD content and transfer it to a hard drive! To discover more about this tool, visit this tool’s official website today.
100% Secure
100% Secure


