Transfer and manage all data between iOS devices, device and computer, and iTunes and devices.
[Step-by-Step]5 Efficient Ways to Share Contacts on iPhone
Whatever the reason why you need to share your or another person’s contact information from your iPhone, Apple provides several tools to help you share them, and some services offer contact-sharing capabilities. Since you are here, you probably don’t know or are unfamiliar with these tools/services. Well, thankfully, you are here! This post collects 5 efficient ways to share contacts on an iPhone using different tools/platforms! So, start exploring each of them now!
Guide List
How to Share Contacts on iPhone One by One with AirDrop Share Batch of Contacts from iPhone to iPhone/Mac Use iCloud to Share Contacts on iPhone 16 How to Share iPhone Contacts with iTunes Backup How to Share A Desired iPhone Contact through Email FAQs about How to Share Contacts on iPhone 16How to Share Contacts on iPhone One by One with AirDrop
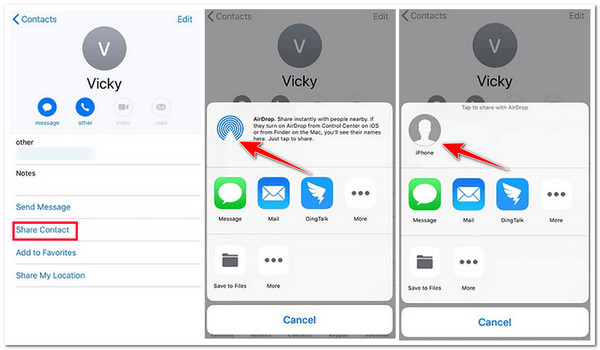
The first method you can use to share contacts on an iPhone is to utilize Apple’s very own file-sharing tool, AirDrop. This tool is already built-in for Apple devices such as iPhones and iPads, so you no longer need to install an extra program to complete the contact-sharing process. Moreover, with this tool, you can wirelessly share various files, including contacts, with other iOS devices. Now, after using AirDrop, you might consider it one of the most convenient methods. However, you can only send one contact at a time, which might be a hassle if you need to share multiple contacts. But if that’s ok with you, here are the steps on how to share a contact card on an iPhone automatically via AirDrop!
Step 1Turn on AirDrop on both devices. After that, on your iPhone, run the "Contacts" app and access the contact information you wish to share. Then, tap on the contact and select the "Share Contact" option.
Step 2Next, tap the "AirDrop" icon and choose the receiver’s iPhone AirDrop. Then, head to the target iPhone and tap the "Accept" button to receive the contact. Once the transfer process is complete, you can check the shared contact on the target iPhone’s contact app.
Step 3If you want to transfer multiple contacts, repeat the above steps until you have shared all of the contacts. And that’s it! Those steps show you how to share contacts on an iPhone via AirDrop.
Share Batch of Contacts from iPhone to iPhone/Mac
There you have it! That’s the first method to share contacts on an iPhone. Otherwise, if you want to share multiple contacts from iPhone to iPhone/Mac in batch, you can use the professional 4Easysoft iPhone Transfer tool! This Windows and Mac-compatible tool lets you seamlessly transfer various files, including those categorized as important (such as contacts), media files, and social data. Moreover, this tool has a contact assistant that provides options to manage your iPhone’s contacts. These options include editing, updating, removing unavailable contacts, creating groups, and more!
Lets you add new contacts to your iPhone with customized information.
Integrated with an advanced preview that lets you easily see and pick contacts to share.
Provide you the option to backup and restore your iPhone contacts to your computer.
Offer you an option to transfer iPhone contacts to other iPhones, computers, and iTunes.
100% Secure
100% Secure
How to Share Contacts on iPhone to iPhone/Mac Using 4Easysoft iPhone Transfer Tool:
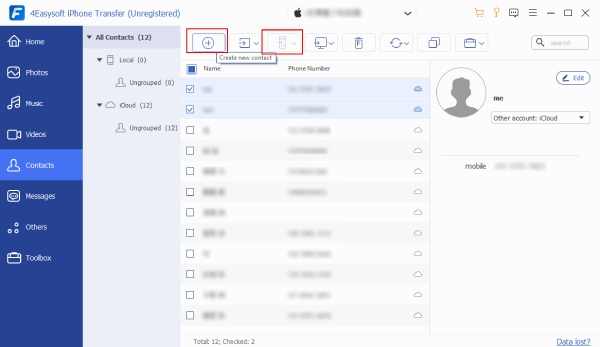
Step 1 Download and install the 4Easysoft iPhone Transfer tool on your Mac or Windows computer. Then, run the tool and connect your iPhone to the computer using your phone’s charger cable. After that, select the "Contacts" option on the left pane.
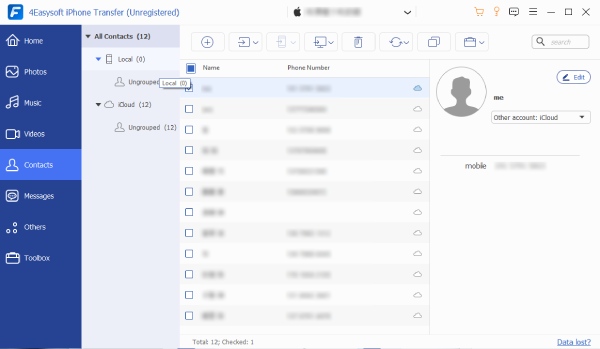
Step 2Next, please select all the contacts you wish to share by ticking their checkboxes. You can also click on them to see them in detail. After that, if you want to share these selected contacts on your computer, tick the "Export to PC" icon and select a specific format.
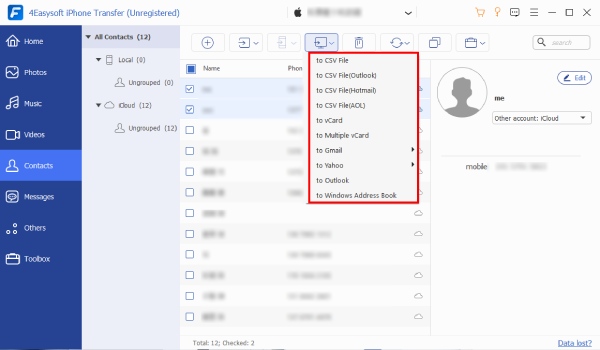
Step 3Otherwise, if you want to share the selected contacts with another iPhone, link that other phone to the computer utilizing a different USB cord and click the "Export to Device" icon, and that’s it! That’s how you share contacts on iPhone to iPhone/Mac.
Use iCloud to Share Contacts on iPhone 16
There you go! That’s the best tool you can use to share contacts on iPhone in batch! You can also use iCloud to share various contacts on your iPhone 16 to other iOS devices. Now, there are 2 ways you can send/share contacts on iPhone to other iOS devices using iCloud. The first one is to share all contacts between your iOS devices using the same Apple ID, and the other one is to share tons of contacts with other iOS devices with different Apple IDs. Now, this post featured both of these ways’ steps. You can follow the one that you think fulfills your needs.
1. Share Contacts on iPhone to Your Other iOS Devices (using the same Apple ID):
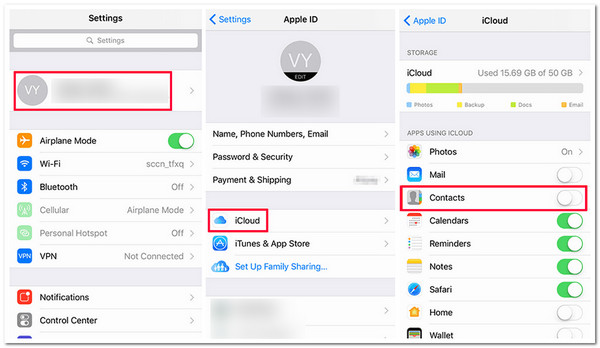
To share your iPhone’s contacts, head to your device’s Settings app, tap your "Name" at the tap, and select the "iCloud" option. After that, toggle on the "Contacts" by tapping its switch button. Now, you can wait until the uploading (to iCloud) and downloading (on other iOS devices) process is done. Once done, you can access the contacts on your other iOS devices.
2. Share Contacts on iPhone to Other iOS Devices (different Apple IDs):
Step 1On your mobile device, head to the Settings application, tap your "Name" at the top, choose the "iCloud" option, and turn on the "Contacts" option. Afterward, access the "iCloud.com" webpage on a computer’s browser. Then, log in with your Apple ID and passcode.
Step 2Next, choose the "Contacts" option and select all the contacts you wish to share. After that, tick the "Gear" icon at the lower left corner of the webpage and select the "Export vCard" option to download the contacts on your computer.
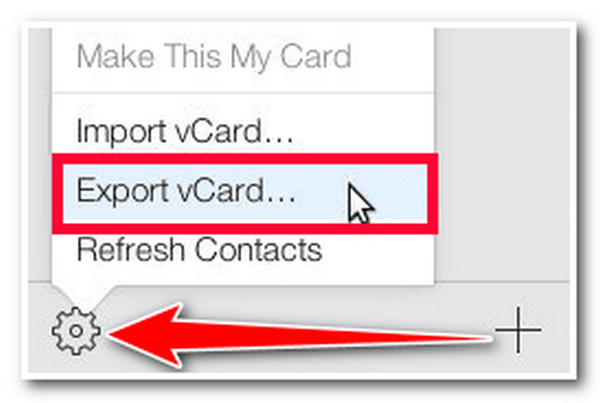
Step 3After that, log out of your account and log in with the contact receiver’s Apple ID and password. Then, click the "Contacts" button, tick the "Gear" icon, and select the "Import vCard" option to import the contacts that you have exported to vCard format earlier.
Step 4Finally, turn on the "Contacts" option under "iCloud" on the receiver’s Settings. Then, please wait until the contacts appear on his Contact app. And that’s it! That’s how you share contacts on iPhone via iCloud!
How to Share iPhone Contacts with iTunes Backup
There you have it! Those are the two ways how to share contacts on the iPhone via iCloud! Aside from iCloud, you can also utilize iTunes to share iPhone contacts by restoring a backup to another device. However, when you restore an iTunes backup, the program will overwrite the current data of the target device. In that case, this would be one of the best methods you can do if the target device is brand new or at least doesn’t have any valuable data yet. So, how do you share contacts on an iPhone via restoring an iTunes backup? Here are the steps you should follow:
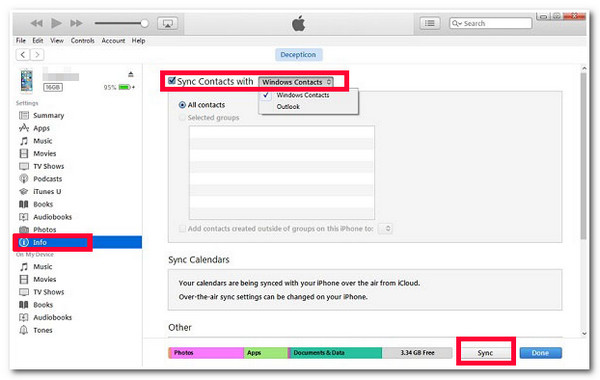
Step 1On your computer, run the current version of iTunes. After that, link your iPhone to the computer using a USB cord and wait for iTunes to recognize your device. Once iTunes recognizes your device, click your "Device" icon and select the "Info" tab on the left pane.
Step 2Next, tick the "Sync Contacts with" checkbox. From there, choose between the "All contacts" or "Selected groups" options and click the "Apply" button. Then, wait for iTunes to initiate a process. Once done, unplug your iPhone and do the same steps on the target phone.
Step 3Then, once you are done performing the 2 steps above, choose the "Contacts" option under the "Replace information on this iPhone" section, and tick the "Apply" button. And that’s how you share contacts on iPhone via restoring iTunes backup!
How to Share A Desired iPhone Contact through Email
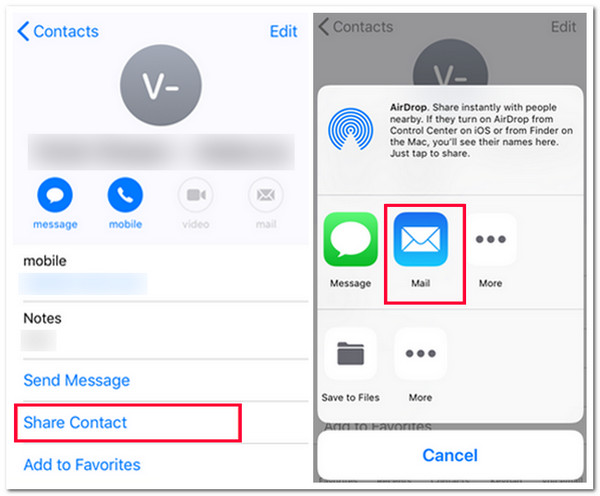
That’s it! Those are the steps to share contacts on an iPhone via restoring an iTunes backup. The last method you can use to share iPhone contacts is emailing them. So, instead of choosing AirDrop after tapping the Share option on your Contacts app, you will tap the Mail button instead. However, the same goes for AirDrop; this method only lets you send contacts individually. But if you only want to share one contact with someone, then here are the steps on how to share contacts on an iPhone via Email:
Step 1Run the Contacts application on your iPhone, tap the "contact" you wish to share, and select the "Share Contact" option. After that, tap the "Mail" icon, which will automatically open up the native email app. You will also see the contact as an attachment.
Step 2Then, on the email screen, enter the "email address" of the person you want to send the contact and send it. And that’s it! That’s how you share contacts on an iPhone by sending them via Email.
FAQs about How to Share Contacts on iPhone 16
-
1. How do you share contacts on an iPhone using iOS 17/18 NameDrop?
To share contacts on iPhone via NameDrop, you first need to enable NameDrop on both devices and ensure that you have turned on the Bringing Devices Together. Then, bring both devices near each other, wait for the prompt, and tap Share. And that’s it!
-
2. How do you turn off Share Contact on an iPhone with iOS 17/18 version?
To turn off the Share Contact option, run the Settings app, tap the General button, head to the AirDrop option, and toggle off the Bringing Devices Together switch. And that’s it! It will automatically turn off Share Contact on an iPhone with iOS 17/18 version.
-
3. Can I share my entire contact list with another iPhone?
Yes, you can! This post features two ways to share multiple contacts or a contact list. The first one is to use the mentioned professional third-party tool, and the other one is iCloud. Through these two methods, you can share a whole list of contacts.
Conclusion
There you go! Those are the 5 efficient ways to share contacts on an iPhone using different tools/platforms! With these methods, you can now share your or another person’s contact to someone. Now, if you want to share multiple contacts on your iPhone to other iOS devices, you can use the professional 4Easysoft iPhone Transfer tool! With this tool’s powerful file-sharing feature, you can share multiple contacts seamlessly and simultaneously to another iPhone or Mac. To discover more about this tool, visit its official website today.
100% Secure
100% Secure


