Record video, audio, gameplay, and webcam to record precious moments easily.
Snipping Tool Shortcut: List of its Shortcut Keys and the Functions
Are you looking for a way to capture any on-screen activities on your Windows much faster and easier, rather than clicking multiple buttons to capture it? Then, you probably don’t yet discover the Snipping Tool shortcuts, which make your screen-capturing process easy and quick. Fortunately, you landed on this page! This post collects a variety of default Snipping Tool shortcut keys. It also features the best alternative tool with customized shortcuts! Explore it now!
Guide List
Part 1: Get to Know All Snipping Tool Shortcuts to Capture[Easy & Fast] Part 2: The Best Alternative to Snipping Tool with Customized Shortcuts Part 3: FAQs about the Snipping Tool Shortcuts on WindowsPart 1: Get to Know All Snipping Tool Shortcuts to Capture [Easy & Fast]
Before exploring all the default Snipping Tool keyboard shortcut, let us first briefly discuss this Windows screenshot utility. Snipping Tool is a built-in Windows 10 screenshot utility that enables users to initiate screenshots easily and quickly. This screenshot utility lets users capture their computer screen, either Free-form, Rectangular, Window, or Full-screen Snips. Moreover, this tool also supports essential drawing tools with different colors and a copy & paste feature, which you can use to transfer screenshots on various documents or emails easily.
Those are just a few features of this Windows 10 built-in screenshot utility. What makes it much easier to use is that it supports shortcut keys, which you can use to initiate some of its built-in features. So, what are those shortcut for Snipping Tool? Get to know them in the table below, with other key shortcuts for accessing other options and information.
| Snipping Tool Keyboard Shortcuts | Functionality |
| Ctrl + N | Initiate new screen capture. |
| Alt + M | Access capture options from Mode (Free-form, Rectangular, Window, and Full-screen Snips). |
| Alt + D | Display all the Delay options offered by Snipping Tool (Options from 1 to 5 seconds). |
| Ctrl + S | Saves the screenshot on your local storage. |
| Ctrl + C | Copy the screenshot you’ve taken. |
| Ctrl + E | Access the Paint 3D program to edit the screenshot. |
| Ctrl + P | It opens up print options to print the screenshot. |
| Alt + F | Access the File options. |
| Alt + F + T + E | Send the screenshot as an Outlook email. |
| Alt + F + T + A | Send a screenshot as an attachment in an Outlook email. |
| Alt + T + P | Access Pen color options. |
| Press Alt + T + P + R/B/L/P or C to select specific pen colors. | |
| Alt + T + P + R | Select Red Pen. |
| Alt + T + P + B | Select Blue Pen. |
| Alt + T + P + L | If you want to use Black Pen. |
| Alt + T + P + C | Access the Customize option. |
| Alt + T + H | Select the Highlighter tool. |
| Alt + T + O | Access the tweakable Snipping tool options. |
| F1 | Open the Help option to access Microsoft Support Page for Snipping Tool. |
| Alt + H + A | Display the Snipping Tool’s information page. |
| Esc | Initiate cancels during the screen capturing. |
Now those are the keyboard shortcuts available on the Snipping Tool screenshot utility. Despite those mentioned capabilities and key combinations, most people ignored using this Windows built-in screenshot utility. That is because of the unavailability of image-enhancing features and uncustomizable shortcut keys. Due to these reasons, this paved the way for the best substitute tool! Discover its outstanding features below!
Part 2: The Best Alternative to Snipping Tool with Customized Shortcuts
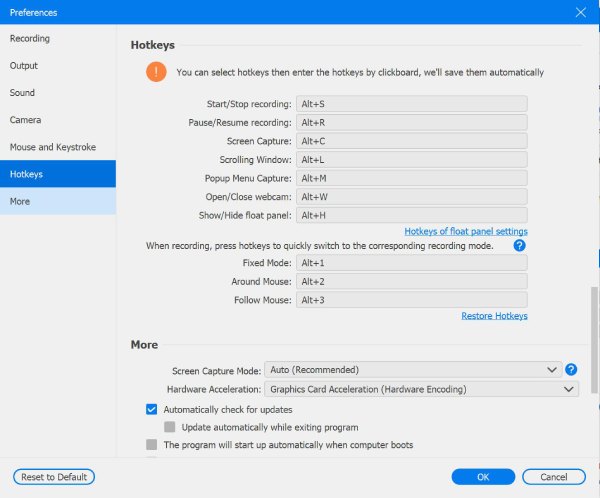
After reading those Snipping Tool shortcut, if you are looking for the best alternative out there that enables you to not only redefine your screen captures but also allows you to customize shortcut keys according to your preferences, then the 4Easysoft Screen Recorder tool is what you are searching for. This tool supports customizable shortcut keys, enabling you to modify key combinations to initiate start, pause, and stop screen recordings, take screenshots, and capture webcams. Moreover, its built-in Snapshot feature captures your screen at any selected region and lets you edit it using its built-in Drawing Tools. These are just a glimpse of the capabilities this tool supports; it still has a lot to offer! To further discover other features, check them below.

Support tweaking options that offer various lossless or high-quality image formats to export your screenshots.
Infused with a Real-Time Drawing feature to add texts, shapes, lines, arrows, callouts, etc., on your screenshot.
Equipped with an Area Selection feature that enables you to capture the entire screen of your computer, a specific window, or a screen region.
Offer Video, Audio, Webcam, Phone recorders, etc., which you can use with high quality and without lag problems.
100% Secure
100% Secure
How to use 4Easysoft Screen Recorder Tool’s Shortcuts as an Alternative to Snipping Tool Shortcut:
Step 1Download and install the 4Easysoft Screen Recorder tool on your Windows computer. After that, launch the tool. For much easier taking screenshots, you can customize the hotkeys by heading to the Menu button with the Burger icon. After that, click the Preferences button and select Hotkeys from the options. Then, under Screen Capture, you can modify its default key combination based on your preferences, and after that, click OK.

Step 2After setting up your preferred key combinations, tick the Snapshot option from the tool’s main interface to take screenshots through the best alternative to snipping tool shortcuts. You can also press Ctrl + Shift + C on your keyboard to initiate a screenshot much more accessible.

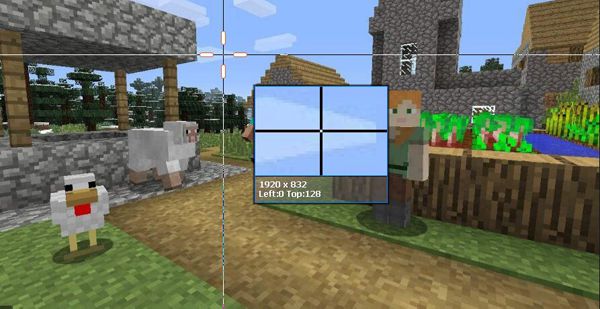
Step 3Next, left-click your cursor to select the screen area where you want to take a screenshot. You can also freely move the borderlines to adjust the scope of the area.

Step 4Then, use the toolbox to edit your screenshot; you can add shapes, arrows, texts, callouts, etc. You can also copy it by clicking the Copy icon and pasting it with a specific document program or on email attachments. If you are satisfied with your editings, tick the Save icon to export your screenshot. This tool automatically stores your screenshots under the Picture folder.

Part 3: FAQs about the Snipping Tool Shortcuts on Windows
-
Why does Snipping Tool Shortcut not working?
One of the main reasons the Snipping tool shortcut is not working is due to inactive Clipboard History. You check whether your Clipboard History is enabled by pressing the Win + I on your keyboard, heading to the System, scrolling down, and selecting Clipboard. After that, turn On the Clipboard history by ticking its Switch button. Then, check whether the Snipping Tool is working.
-
Can I save my screenshot as GIF or with other formats using Snipping Tool?
Yes, you can. The snipping tool supports three formats to export your file. You can save it as GIF, PNG, or JPEG file. To access them, you just need to capture a screenshot on the Snipping tool, save it by clicking the Save button, or simply press the Ctrl + S keys on your keyboard. After that, on the folder window, tick the Save as type dropdown menu option and select GIF. Then, after that, click the Save button.
-
Does Snipping Tool offers a cropping feature?
Unfortunately, Snipping Tool doesn’t offer a cropping feature. So, whenever you capture your screen using Snipping Tool, you must ensure that it captures the entire and exact area you want to capture.
Conclusion
If you need to take an easy and fast screenshot of any on-screen activities on your Windows, your computer’s built-in screenshot utility named Snipping Tool could help you do the job. This is made possible by its default Windows Snipping Tool shortcut key combinations, which you can use to execute various functions quickly. Otherwise, if you are searching for the best alternative tool for Snipping Tool, then the 4Easysoft Screen Recorder tool is the best pick! This tool is not made to take screenshots but also offers you customizable hotkeys, outstanding features, and excellent output quality. Feel free to visit the tool’s official website to download and install it on your computer. Download it now!
100% Secure
100% Secure


