Avsluta i 3 steg: Hur man konverterar DVD-skivor till HD-kvalitet
Att konvertera uppskattade DVD-samlingar till HD-kvalitet är en dröm för många filmälskare. Innehåll i HD-kvalitet låter trots allt tittare se mer detaljer. Även om DVD-skivor länge har varit en pålitlig källa för filmer och TV-serier, uppfyller deras standardkvalitet ofta inte behoven hos moderna biobesökare. Lyckligtvis hjälper det här inlägget dig att uppnå enkel HD-konvertering med kraftfulla verktyg och metoder. Gör dig redo att förvandla din DVD-samling till en visuell fest!
Guidelista
Vad är skillnaderna mellan DVD- och HD-kvalitet? Det mest kraftfulla verktyget för att konvertera DVD-skivor till HD-kvalitet [Windows] Hur man konverterar DVD-skivor till HD-kvalitet med handbroms [Mac] Hur man konverterar DVD-skivor till HD-kvalitet med hjälp av Disk UtilityVad är skillnaderna mellan DVD- och HD-kvalitet?
Skillnaderna mellan DVD- och HD-kvalitet är inte bara tekniska; de påverkar avsevärt hur filmer upplevs. För alla som vill njuta av sina favoritfilmer i bästa kvalitet bör du känna till de betydande skillnaderna mellan de två innan du konverterar DVD till videoformat i HD-kvalitet.
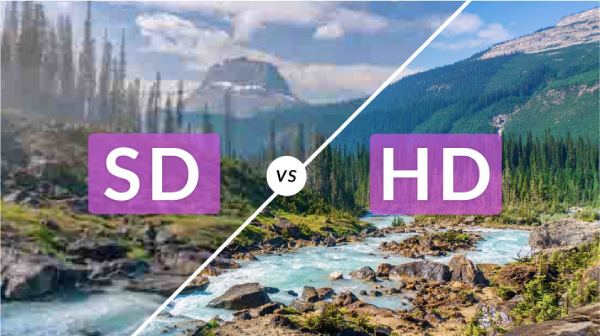
När man jämför kvaliteten på DVD och HD kan flera viktiga skillnader påverka tittarupplevelsen avsevärt. DVD-skivor erbjuder vanligtvis en upplösning på 720x480 pixlar för standardupplösning (SD) innehåll, som kan verka pixlat eller sakna detaljer, särskilt på större skärmar. Däremot erbjuder video i HD-kvalitet 1280x720 pixlar (720p) eller högre upplösningar som 1920x1080 pixlar (1080p), vilket resulterar i skarpare, mer levande bilder med större klarhet och detaljer.
Det mest kraftfulla verktyget för att konvertera DVD-skivor till HD-kvalitet
Därför, för de filmälskare som vill uppgradera sina DVD-samlingar till HD-kvalitet, är hur man direkt och snabbt uppgraderar de relevanta parametrarna det viktigaste. En sådan konvertering är oerhört nödvändig för att den moderna tittarupplevelsen ska kunna se fler detaljer i filmen. Särskilt efter att konverteringen är klar, om du jämför en DVD med en Blu-ray-skiva, kommer du att upptäcka att de kan ha relativt liknande bildprestanda. Men för dessa förvirrande parametrar kommer många att känna sig irriterade: hur kan man se till att videon kan ha HD-kvalitet när man extraherar video från DVD?

För detta problem är det bästa valet 4Easysoft DVD Ripper, som inte bara kan extrahera videon från din DVD fullständigt och säkert som en säkerhetskopia, utan också kan förbättra videokvaliteten till HD-nivå. Tack vare dess förinställda parametrar för HD 1080P behöver du bara direkt välja den kvalitet du vill ha i konverteringsprocessen för att direkt fylla i motsvarande parameterdetaljer. Här är stegen för hur du använder 4Easysoft DVD Ripper för att konvertera DVD-skivor till HD-kvalitet:

Konvertera dina DVD-samlingar till HD-kvalitet med förinställda parametrar.
Kopiera och säkerhetskopiera hela innehållet på din DVD helt.
Ta bort videor från DVD-skivor med GPU accelererad med 30X snabb hastighet.
Stöd för redigering av videor som tagits bort från DVD med fantastiska effekter.
100% Säker
100% Säker
Steg 1Starta 4Easysoft DVD Ripper och sätt in din DVD för att extrahera videon. Klicka på knappen "Ladda DVD".
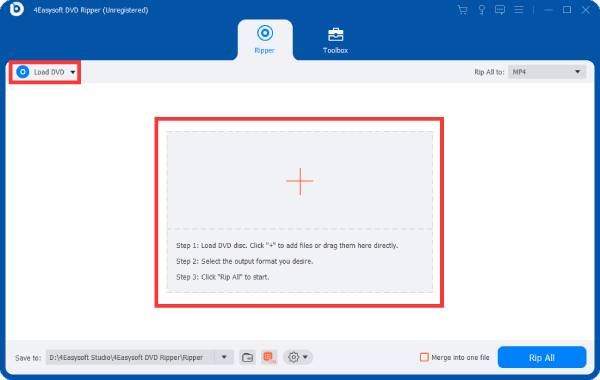
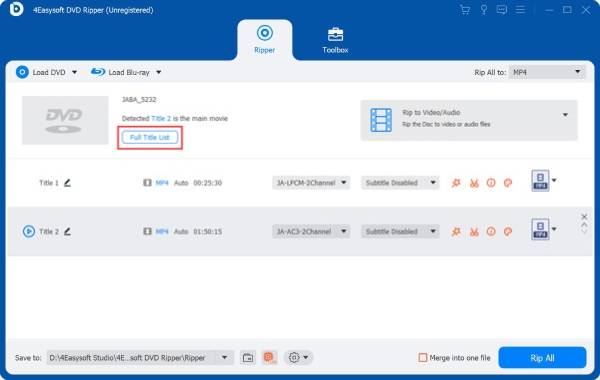
Steg 2När huvudtiteln på din DVD har laddats, klicka på "Full Tile List" för att välja allt innehåll på din DVD.
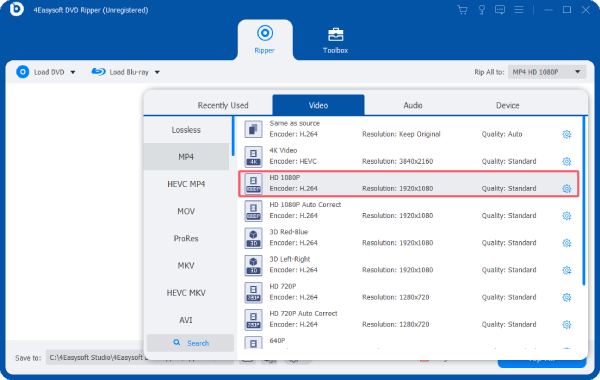
Steg 3Klicka på "Rip All to" och "HD 1080P"-knappen för att ladda de förinställda parametrarna. Klicka slutligen på knappen "Rippa alla".
[Windows] Hur man konverterar DVD-skivor till HD-kvalitet med handbroms
För Windows-användare, Handbrake, en berömd DVD-ripper med öppen källkod, väljs också av många människor för att förbättra sina DVD-skivor till videor i HD-kvalitet. Även om konverteringen ibland är begränsad, gör Handbrakes enkla och intuitiva gränssnitt och tydliga funktionssätt många fortfarande villiga att använda den. Så här använder du Handbrake för att konvertera dina DVD-skivor till HD-kvalitet:
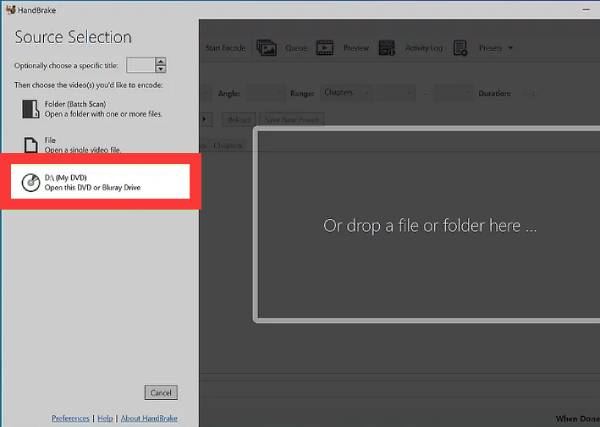
Steg 1Starta Handbrake och sätt in din DVD. Klicka på knappen "Källval" för att ladda din DVD.
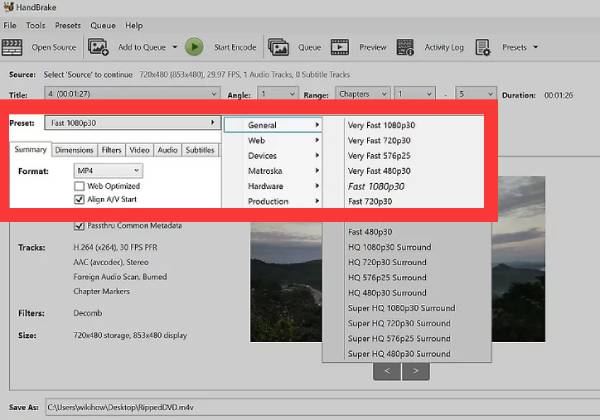
Steg 2Klicka på "Preset"-knappen för att justera parametrarna till HD-kvalitet för dina DVD-samlingar.
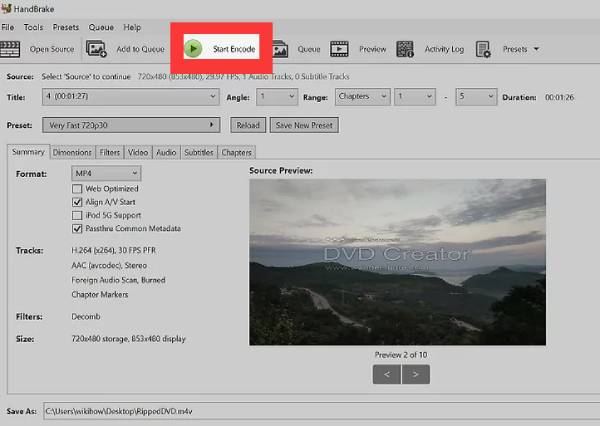
Steg 3När du är klar med förinställningen klickar du på knappen "Start Encode" för att konvertera DVD-skivor till HD-kvalitet.
[Mac] Hur man konverterar DVD-skivor till HD-kvalitet med hjälp av Disk Utility
Så, hur kan Mac-användare konvertera DVD till HD-kvalitet med den inbyggda metoden i systemet? Du kan enkelt göra det här jobbet genom att använda det inbyggda verktyget Disk Utility på Mac utan att ladda ner någon ytterligare programvara. Men du måste också vara medveten om att det kan misslyckas med att konvertera DVD-skivor till HD-kvalitet, eftersom dess konverteringskapacitet är relativt begränsad. Här är stegen för hur du konverterar DVD till HD-kvalitet med det inbyggda diskverktyget på Mac:
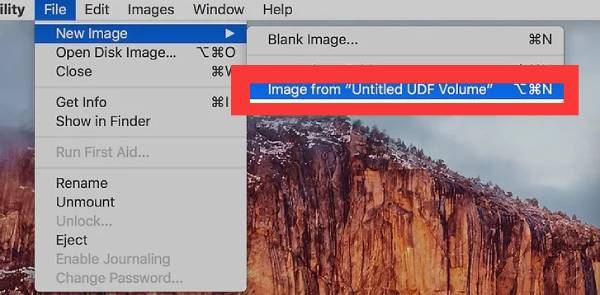
Steg 1Sätt in din DVD och sök "Disk Utility" på din Mac. Under fliken "Arkiv", klicka på knappen "Ny bild" och sedan på knappen "Bild från...".
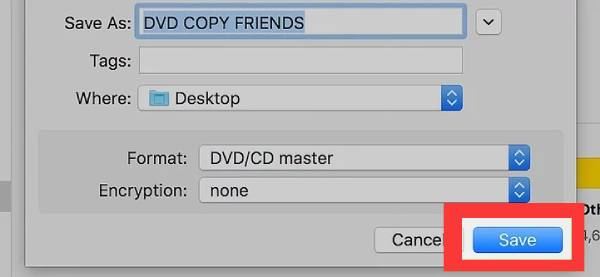
Steg 2Namnge din DVD och klicka på knappen "DVD/CD Master" från fliken "Format".
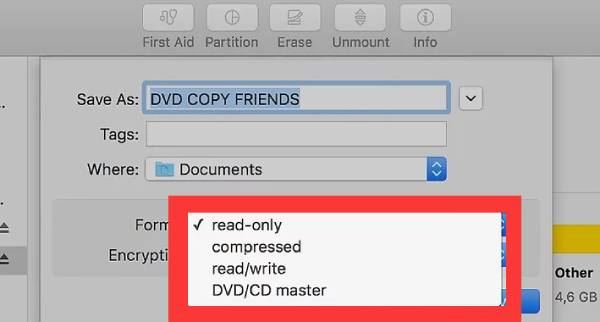
Steg 3Klicka slutligen på knappen "Var" för att välja HD-kvalitet för din DVD. Klicka sedan på knappen "Spara" för att spara videon.
Slutsats
Kort sagt, om du konverterar DVD till videoformat i HD-kvalitet kan du få fler videodetaljer och effektivt förbättra din tittarupplevelse. Oavsett om du njuter av din favorit-DVD-samling ensam eller njuter av filmkväll med vänner, är det en värd investering att uppgradera din DVD-samling till HD-kvalitet. Om du vill slutföra den här uppgiften effektivt, ladda ner och använd 4Easysoft DVD Ripper nu för att slutföra det!
100% Säker
100% Säker


