Transfer and manage all data between iOS devices, device and computer, and iTunes and devices.
How to Transfer Photos from iCloud to Hard Drive [All iOS Versions]
Although iCloud offers versions of storage, there are times when those versions’ capacity is not enough to store all the photos you produce on your device. That makes you think of transferring them to other storage to free up space. Well, what you think is a great idea, and this post features 3 efficient ways to transfer photos from iCloud to an external hard drive! So, without further ado, start freeing up space on your iCloud by exploring the ways below!
Guide List
Directly Download iCloud Photos to Transfer to the External Hard Drive How to Transfer All Photos from iCloud to External Hard Drive Use Photos App to Transfer iCloud Photos to External Hard Drive FAQs about How to Transfer Photos from iCloud to an External Hard DriveDirectly Download iCloud Photos to Transfer to the External Hard Drive
The first thing you can do to transfer iCloud photos from iCloud to an external hard drive is to directly download those photos on iCloud to save them on your Windows/Mac external hard drive. iCloud official website provides you the ability to access and download stored photos. Once you have downloaded them, you can move them to your computer’s external hard drive. But, just to set your expectations, all downloaded photos will be stored on a ZIP file. You must perform an unzipped process before you can fully access them.
Also, you can’t possibly download multiple iCloud photos simultaneously, for iCloud doesn’t allow it. If the number of photos you wish to transfer is beyond what iCloud supports, then you need to repeat the process once again to transfer those other photos. So, how do you transfer photos from iCloud to a hard drive via a direct download? Here are the steps you must follow:
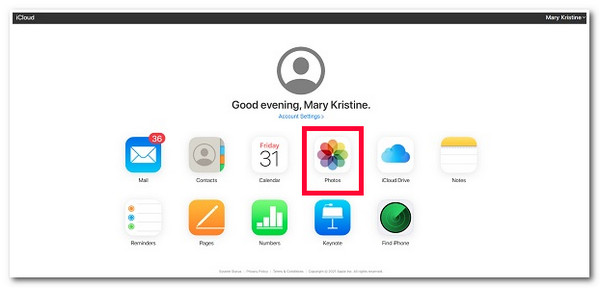
Step 1Visit the official iCloud website on your computer browser, log in to your iCloud account, and select the "Photos" option. After that, choose all the photos you wish to transfer.
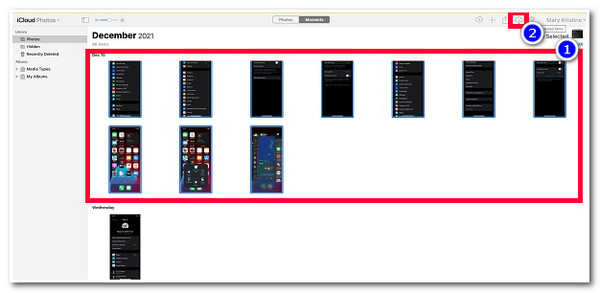
Step 2Next, click the "Download" button at the upper right corner of the iCloud’s interface. Then, once the downloading process is done, head to your computer’s "Download Folder".
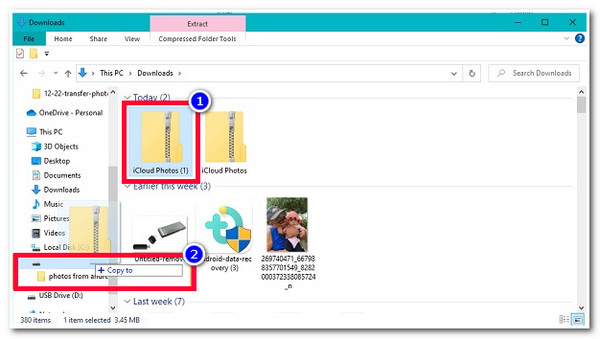
Step 3Then, copy the downloaded zip file (containing all the photos you selected earlier) and paste it onto the connected external hard drive on the computer.
How to Transfer All Photos from iCloud to External Hard Drive
Apart from that direct way of transferring photos from iCloud to an external hard drive, you can also use a powerful third-party file-transferring tool like 4Easysoft iPhone Transfer! Unlike the option above, this tool lets you quickly and efficiently transfer all iCloud photos to your external hard drive simultaneously. Moreover, it is also infused with a comprehensive file preview where all the transferable files, including photos from iCloud, are displayed categorically. With this feature, you can quickly select all the iCloud photos and transfer them to your external hard drive immediately. Now, these are just a glimpse of this tool’s powerful transferring features. If you want to discover more of its features, explore the list below!
Photo manager to create an album, preview, and delete duplicated photos in batch, check photo information, etc.
HEIC converter to convert photos in HEIC format to JPG/PNG to save space and increase compatibility.
Offer three transferring modes: data transfer between iOS Devices, Computers, and iTunes.
Remove transferred data option to delete iCloud photos that are already transferred.
100% Secure
100% Secure
How to Transfer Photos from iCloud to External Hard Drive Using 4Easysoft iPhone Transfer Tool:
Step 1Free download the 4Easysoft iPhone Transfer tool on your computer. Then, launch the tool and head to your iPhone. On your iPhone, access the "Settings" app, tap your name at the top of the screen, then enable "iCloud Photos" on "Photos" so the tool can access it.

Step 2Next, link your iPhone to the computer using a USB cord and wait for the tool to initiate a successful connection. Once it succeeds, you will see all the data about your device. Then, click the "Photos" tab, select "iCloud photos", and choose all the photos you wish to transfer.

Step 3After that, click the "Export to PC" button at the top of the tool’s interface. Then, on the pop-up folder, choose the connected "External hard drive" where you wish to transfer the iCloud Photos, and click the "Select Folder" button.
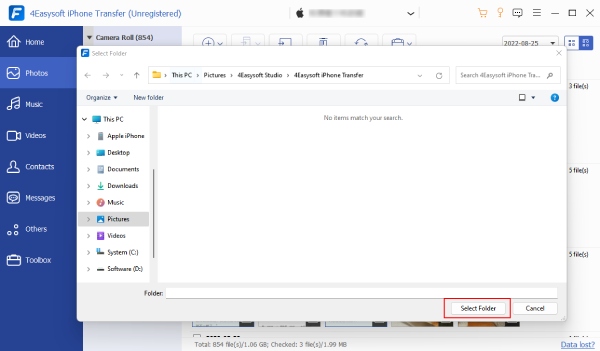
Step 4Then, access the External Hard Drive and check all the transferred iCloud photos. And that’s it! That’s how you transfer photos from iCloud to an external hard drive using the 4Easysoft iPhone Transfer.
Use Photos App to Transfer iCloud Photos to External Hard Drive
Another way to transfer photos from iCloud to an external hard drive is using the Mac Photos app. Photos app on Mac supports an option to transfer all your iCloud photos to your computer’s external hard drive. However, this will only work if you have enabled iCloud backup sync on your Mac computer before. But this will not be an issue if you have enabled that before. So, how to transfer photos from iCloud to an external hard drive using the Mac Photos app? Here are the steps you should follow:
Step 1Link the external hard drive to the Mac and create a new folder. After that, run the "Photos" app and select all the iCloud photos you wish to transfer.
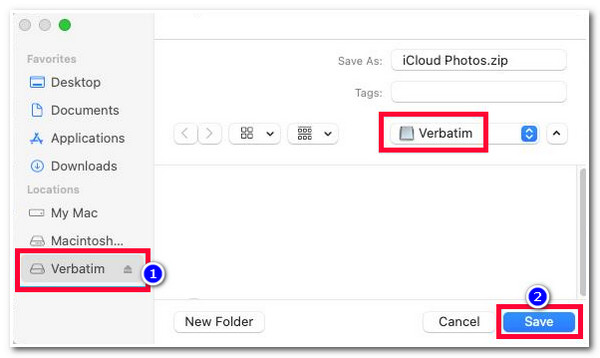
Step 2Then, click the "Export" button under the "File" menu and choose the external hard drive as the location to store the iCloud photos.
Step 3After that, click the "Save" button in the Photos app's lower right corner to initiate the iCloud photos' downloading and saving process.
FAQs about How to Transfer Photos from iCloud to an External Hard Drive
-
How many photos does iCloud allow me to download?
iCloud only allows you to download a maximum of 1,000 photos simultaneously. If that number is insufficient for you to transfer all the iCloud photos to your external hard drive, then you need to do the transfer process again to transfer the others.
-
How long does it take to download photos from iCloud?
If you have a lot of photos on your iCloud to be downloaded, it might take several hours to finish. But this will still depend on the number of photos you will transfer and your internet speed.
-
How much does it cost me to upgrade an iCloud storage?
If you are using iCloud free storage, which is 5GB, then there are other plans you can avail to upgrade it. These plans include 50 GB, which costs you $0.99, 200 GB costs $2.99, 2TB costs you $9.99, 6TB costs $29.99, and 12TB costs $59.99.
Conclusion
That’s it! Those are 3 efficient ways to transfer photos from iCloud to an external hard drive! With these 3 ways, you can now free up space on your iCloud. If you want to quickly transfer all your iCloud photos simultaneously and without the need to sync a backup, then the 4Easysoft iPhone Transfer tool is what you are searching for. This tool is infused with a powerful photo transfer technology that quickly and efficiently moves all your iCloud photos to an external hard drive! To discover more about this tool, visit its official website today.


