Transfer and manage all data between iOS devices, device and computer, and iTunes and devices.
4 Ultimate Guides to Transfer Bulk Playlist between iPhones Quickly
After buying a new-released iPhone 16/15, you may spend much time on transferring data, especially about your bulk of music. Do you know you can directly transfer your best-loved playlist between iPhones. Well, this method is very convenient for you, and you find this article with 4 efficient ways to help you! Get more about how to transfer playlist in bulk from one iPhone to another! Explore them right now!
Guide List
The Best Way to Transfer Playlist from iPhone to iPhone in Bulk How to Transfer Playlist from iPhone to iPhone with iTunes How to Transfer Playlist from iPhone to iPhone through iCloud Easily Share Music Playlist from iPhone to iPhone via AirDrop FAQs about Transferring Playlist from iPhoneThe Best Way to Transfer Playlist from iPhone to iPhone in Bulk
One of the best go-to solutions to transfer playlist is to use the 4Easysoft iPhone Transfer tool. This tool supports selective or bulk playlist transfer from an iPhone to another device, such as an iPhone, iPod, iPad, or computer. Additionally, this tool can provide you with a fast and safe playlist-transferring process even though you’ll transfer a bulk of a playlist. Aside from that, it also enables you to manage your playlist on your iPhone by creating a new playlist, converting an audio file, editing an album cover and music details, and deleting a batch of playlists. With these great points, this tool is the best solution for transferring playlists from iPhone to iPhone or other devices.
Equipped with a Music Editor feature that enables you to manage your specific music group or a playlist.
Equipped with the ability to create or transform specific music tracks as a ringtone.
Infused with a Preview feature that is well-composed to preview all your playlists on your iPhone accordingly.
Support syncing and backing up playlists from your iPhone to iTunes.
100% Secure
100% Secure
How to Transfer Playlist from iPhone to iPhone in Bulk using 4Easysoft iPhone Transfer:
Step 1Download and install the 4Easysoft iPhone Transfer tool on your Windows or Mac computer. Then, link your iPhone to your computer via a USB cable. After that, on your computer, select the Music tab in the left corner. Then, all the Music and Playlists will show up on your screen categorically.

Step 2Next, since you will transfer the playlist stored on your iPhone to another iPhone, connect the other iPhone to your computer using a USB cord as well. Then, select all the playlists you want to transfer to it.
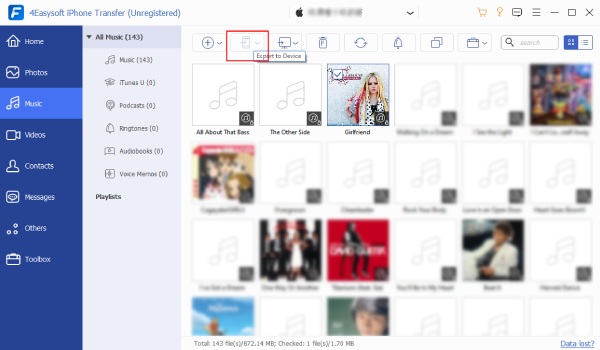
Step 3After that, click the Export to Device button and choose the desired storage folder in which you wish to store them. Once you are done, confirm it. Then, wait for the tool to transfer all the selected playlists, which will only take a few moments.
How to Transfer Playlist from iPhone to iPhone with iTunes
Now that you have discovered the best way to transfer playlist from your iPhone to another, you can also utilize iTunes to transfer them quickly. Well, iTunes is always at the top of the solutions if there’s a need to transfer various files from iPhone to iPhone. However, you should remember that iTunes is a one-way sync process, meaning, you can only sync playlist stored on your iTunes to your iPhone. This also implies that syncing playlist on iPhone to iPhone with iTunes is not possible.
Other than that, iTunes automatically overwrites existing playlists on the target iPhone, which will make the solution ideal if that target iPhone is new and doesn’t have any stored playlists yet. Other than that, this solution will also be ideal, if your old iPhone is connected to iTunes. In case it is, you can use it’s iTunes and sync its playlist to your new iPhone. If you want to discover how to sync or transfer playlist from your old iPhone’s iTunes to another, here are the steps you must follow:
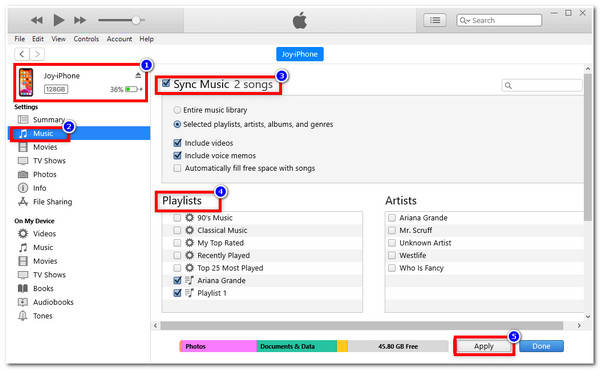
Step 1Using a USB cable, connect your target iPhone to your computer. After that, launch iTunes.
Step 2Select the target iPhone icon at the upper left corner of the iTunes interface. Then, select Music beneath the Summary option.
Step 3Next, click the Sync Music checkbox, head to the Playlists option, and select all the playlists you want to transfer. Once you are done choosing, tick the Apply button.
How to Transfer Playlist from iPhone to iPhone through iCloud
Other than that, you can also use iPhone’s default backup solution, iCloud to transfer playlist from iPhone to iPhone. However, the same goes with iTunes, iCloud is also a one-way sync process, and if you plan to transfer a lot of music, you might exceed its maximum storage space, which is 5GB. This likely happens if you are using free iCloud storage services. But, just like iTunes, this cloud storage service could still help you to transfer playlists from your iPhone to another. To do this, you need to perform the steps to transfer playlist using iCloud.
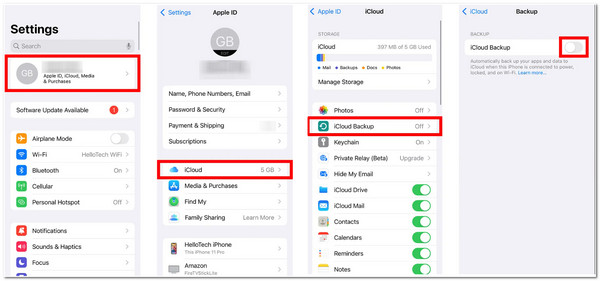
Step 1Connect your iPhone to your Wi-Fi network and access the Settings app. After that, on the Settings interface, tap your Name at the top of the screen.
Step 2Under the Apple ID menu, tap the iCloud option, select iCloud Backup, and then turn it On.
Step 3After that, log in to the same iCloud ID on the target iPhone. Then, you can now download all the music playlists you have previously backed up on the other iPhone.
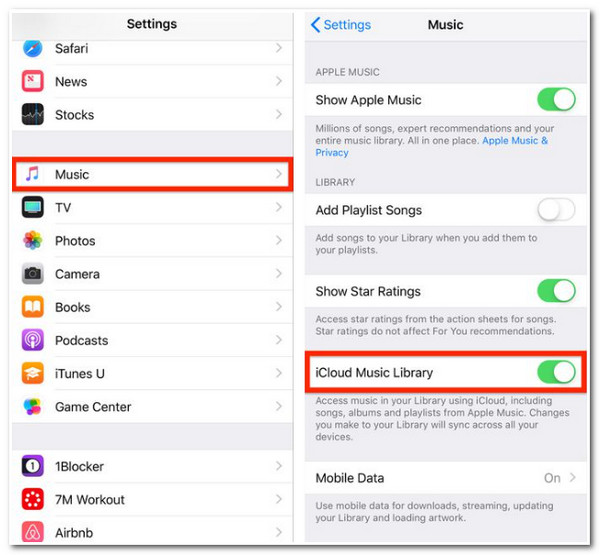
Otherwise, if you are using Apple Music or iTunes Match, you can also easily store your created playlist from those mentioned services on iCloud Music Library. You can access them using the target iPhone, which could also fall into the idea of transferring a playlist from an iPhone to another. However, this option will only be made available for you if you avail for a subscription. To turn it on, here are the steps you need to go after.
Step 1Head to your iPhone’s Settings app and tap the Music option.
Step 2Then, turn On the iCloud Music Library by tapping its Switch button.
Easily Share Music Playlist from iPhone to iPhone via AirDrop
Another way you can do to transfer playlist is by using AirDrop. This iPhone file-sharing feature lets you quickly transfer your created playlist to another iPhone. However, this specific solution is ideal if you only want to transfer a few songs on one playlist. Additionally, the receiver will obtain a link instead of the playlist you have transferred. But, still, AirDrop is also an effective solution for transferring playlists from iPhone to iPhone. If you are curious about how AirDrop transfer playlist, here are the steps to show you how.
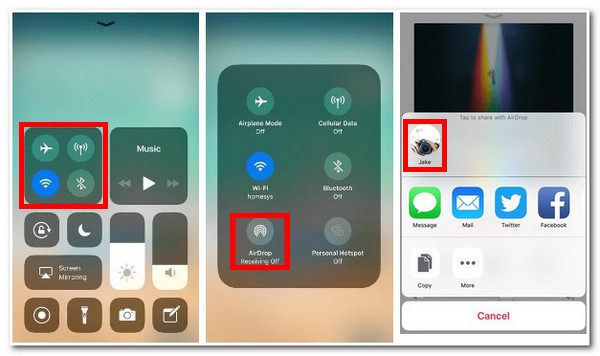
Step 1Place the two iPhones near each other, turn On their Wi-Fi and Bluetooth, and enable their AirDrop on their corresponding Control Centers.
Step 2On your iPhone, locate the playlist you wish to transfer. Then, tap the More button, select the Share option, and wait for the other iPhone’s AirDrop icon to appear on your screen and tap it.
Step 3After that, let the AirDrop finish the transferring process.
FAQs about Transferring Playlist from iPhone
-
1. Can I transfer playlist from Spotify to Tidal?
Yes, you can! But this will only be possible if you will use a service called Tune My Music. Through this web-based service, you can transfer playlists you’ve created on Spotify to Tidal. You can easily transfer them with just a few clicks and ticks of buttons and account sign-ins.
-
2. How can I transfer playlist from my iPhone to another using iTunes 11?
To transfer a playlist from your iPhone to another using iTunes 11, you must first link your iOS to your computer using a USB cord. After that, launch iTunes on your computer, select your Device icon, and click the Add to button. Then, on the right side of your screen, tick the Playlists and drag the playlist (the one that you want to transfer) to the right side from the left. Once finished, click the Done button and select the Sync option.
-
3. How to transfer Spotify playlist to Apple Music?
All you need to do is to sign into your account from both services. After that, on your Spotify, click the Setup Source and choose the playlist you want to transfer. Then, select the Setup Destination and choose Apple Music. Next, tick the I’m Finished button, and the transfer process will automatically be initiated.
Conclusion
There you have it! Those are the 4 ways to transfer playlist from your iPhone to another. Please, consider those limitations mentioned under iCloud, iTunes, and AirDrop. Even though they can transfer various playlists from your iPhone to other iOS mobile devices, having those limitations might cause inconvenience or hassle. So, it would be better if you use the 4Easysoft iPhone Transfer tool for you to have a much more convenient playlist-transferring process without considering any limitations! Feel free to visit this fantastic tool’s official website to get to know more about it!
100% Secure
100% Secure


