Backup all iOS data on Windows/Mac and restore them to other devices easily.
Update Apple ID Setting Stuck on iPhone 16?
You have probably updated your iOS device after receiving the "Update Apple ID Settings" notification. During the process of updating your iOS device, you suddenly get stuck on the same screen or after tapping the continue button! This issue brings frustration. Thus, to help you, this post features various reasons you encounter this and 7 efficient ways to fix the Update Apple ID Settings stuck issue. So, start exploring them now!
Guide List
The Reasons Why Your Update Apple ID Settings Stuck 6 Efficient Ways to Fix Update Apple ID Settings Stuck on iPhone FAQs about Update Apple ID Settings Stuck on iPhone 16The Reasons Why Your Update Apple ID Settings Stuck
There are a lot of reasons that trigger the Update Apple ID Settings stuck on continue to occur on your iPhone or iPad. Some of the common reasons are mentioned below.
- Your iOS device system currently suffers from specific bugs and freezes.
- An unstable internet connection triggers the updating process of your Apple ID settings to get stuck on the same screen.
- You are using different Apple ID credentials during the update process.
- Apple Servers are currently down or unavailable.
- Your device’s iOS version is outdated.
6 Efficient Ways to Fix Update Apple ID Settings Stuck on iPhone
Now that you have explored the possible reasons that might trigger the Update Apple ID Settings stuck issue to occur, it is time to fix it with this post list of 6 efficient ways! So, without further delay, take your first step in exploring them and see which can solve the issue.
1. Force Restart Your iOS Device
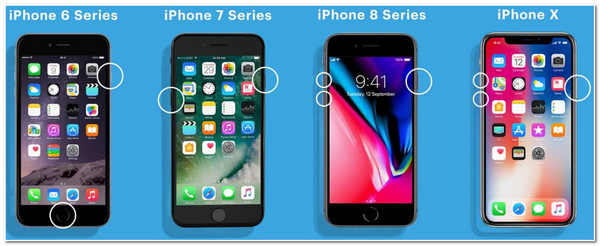
The first method that you can do to fix the iOS update Apple ID Settings stuck issue is to force restart your device. Force restart magically solves almost all iOS system issues, including bugs and freezes (If the issue occurs due to unknown bugs). Through this method, all the current tasks, including updating your Apple ID, will be forcibly clear and will immediately initiate a refresh process. Now, restating an iOS device differs from the model you are currently using. You can follow the steps below that are applicable on your end:
- If you use iPhone 8 and later, simultaneously push down the "Volume Up" and "Down" buttons. Then, push down the "Side" button and hold it until the "Apple logo" displays on the screen.
- Otherwise, if you are utilizing iPhone 7 and 7 Plus, press the "Sleep/Wake/Power" and "Volume Down" buttons together. After that, your iPhone will be restarted the moment when the "Apple logo" displays on the screen.
- Or, in case you are using iPhone 6 and earlier, push down the "Power" and "Home" buttons and wait until the "Apple logo" displays on the screen.
2. Check the Stability of the Internet Connection
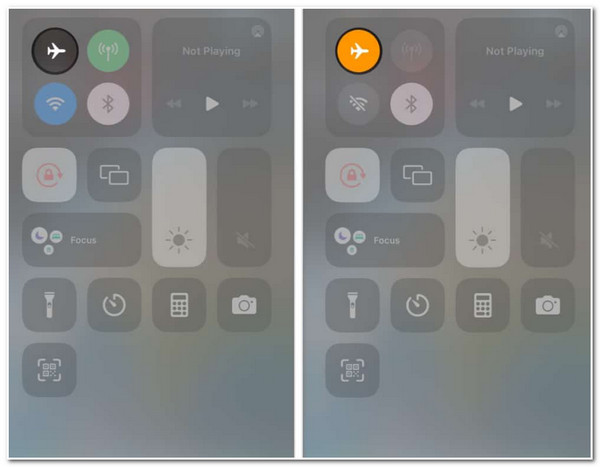
If your iPhone is still stuck at Update Apple ID Settings after restarting your device, another way you can fix the issue is to check your internet connection’s stability. Having a stable and strong internet is crucial when updating your Apple ID settings. If your internet connection is unstable, you’ll encounter a stuck issue. To check whether the connection is stable, you can access Ookla’s website to check your internet speed. You can also turn and off Airplane Mode to refresh your network connection, switch to cellular data, or refresh your router to fix your internet connection.
3. Check Apple Server Status
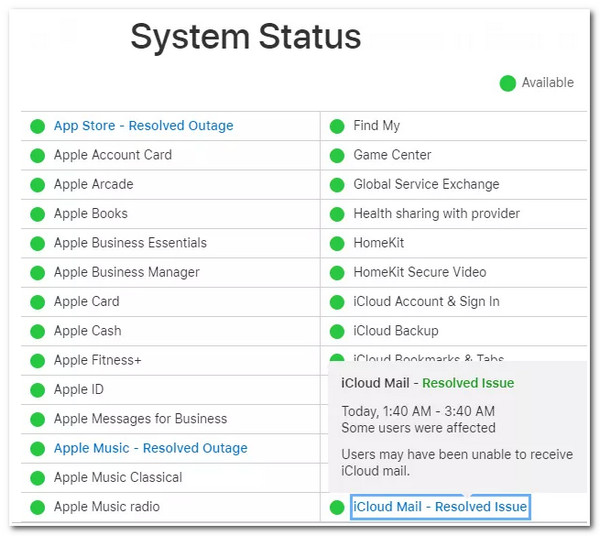
In case your network or internet connection works perfectly fine, then the Update Apple ID Settings stuck issue might occur due to the unavailable server status of Apple. You can visit the Apple status page on your browser and check whether the App Store, Apple ID, iCloud Account & Sign In are down. If you see a yellow diamond icon right before the server’s name, it means there’s an issue with it. You need to wait until Apple fixes it.
4. Sign Out and In Apple ID
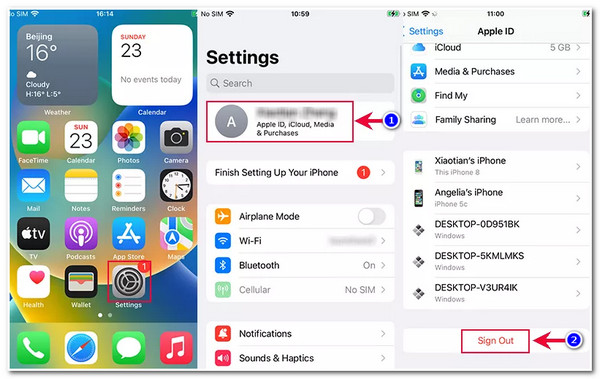
If these servers, App Store, Apple ID, iCloud Account & Sign In are currently working excellently, then another way you can get rid of the iOS update Apple ID Settings stuck issue is to sign out your Apple ID and sign in again. This method also possibly fixes the issue. Now, to do this, launch the "Settings" app on your iOS device, tap your "Apple ID" at the top, scroll down, and tap the "Sign out" button. Then, once you successfully sign out your Apple ID, sign in to it again.
5. Modify your iOS Device’s Apple ID Password
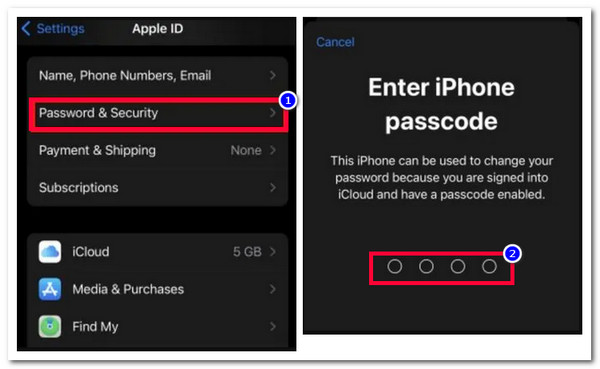
Another way you can stop the Update Apple ID Settings stuck issue from bothering you is by changing your Apple ID password. Changing your Apple ID password can stop the problematic update settings and force it to reinitiate the process again. Now, to change your Apple ID password, here are the steps you must follow:
Step 1Go to your iOS device’s "Settings" app, select your Apple ID, tap the "Password and Security" option, and tap the "Change Password" button. Then, fill in your "device passcode."
Step 2After that, enter the "new passcode" and tap the "Change" button. Then, choose between the "Sign out other devices" or "Don’t Sign out" options based on your preferences.
6. Update Your iOS Device to the Newest Version
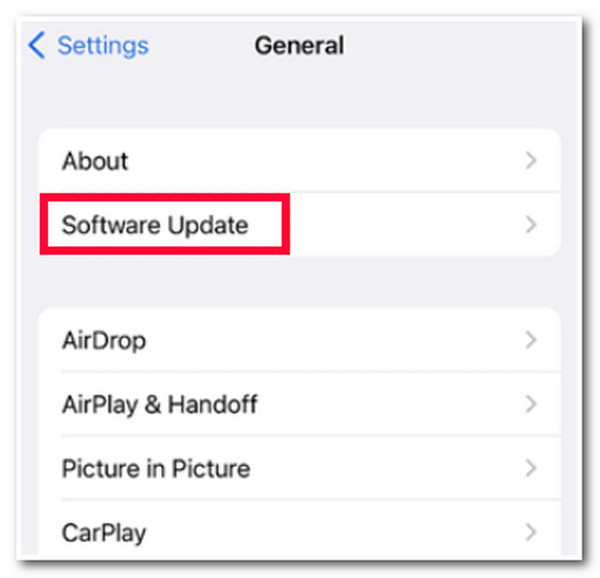
In case the iOS update Apple ID Settings stuck issue still bothers you, then this could be due to a system issue brought by an outdated version of your iOS device. Updating your device’s iOS version to the newest version will eradicate unknown glitches that made the issue bother you. To update your iOS device, you can head to your "Settings" app, select the "General" option, tap the "Software Update" button, and wait until the updating process is done.
Recommended Alternative Way to Backup Your iPhone/iPad Data without Apple ID
After performing the above fixes, you are probably able to free your iPhone/iPad from the Update Apple ID Settings stuck issue. Now, suppose you are hesitant to continue updating your Apple ID Settings and feel uncertain about executing the above fixes due to thinking that there could be a data loss. In that case, you can use the 4Easysoft iOS Data Backup and Restore tool to back up your iPhone/iPad data! This tool can back up 20+ file types, such as media files, contacts, notes, third-party apps’ data, etc., without Apple ID. Furthermore, this tool guarantees no data loss during the backup process! Use it to backup your data once updating Apple ID settings stuck.

Preview function that categorically displays all the data from your iPhone/iPad.
Able to retain all your data on your computer after the backup process.
Offer two backup modes, including the Standard and Encrypted Modes.
Support all iPhone and iPad models and versions, including iPhone 16.
100% Secure
100% Secure
FAQs about Update Apple ID Settings Stuck on iPhone 16
-
Will force restart delete data on iPhone/iPad?
No. Force restart will not delete any essential data on your iPhone/iPad. Force restart is recommended once your iPhone is unresponsive and suffers from an issue, just like the Update Apple ID Settings stuck issue.
-
Does Erase All Content and Settings fix the Update Apple ID Settings stuck issue?
Yes, it will fix the Update Apple ID Settings stuck issue. However, using this option takes a lot of time to finish, and it will erase all data. But you can use this post’s featured third-party tool to back up your data to a computer before erasing all content and settings on your device.
-
Is there a way I can turn off the Update Apple ID Settings notification?
Unfortunately, there’s no way you can turn off the Update Apple ID Settings notification. You must update your device’s Apple ID Settings, and once you have completed the process, it will vanish.
Conclusion
That’s it! Those are the 7 efficient ways to fix the Update Apple ID Settings stuck issue. Having these 7 ways, you can now free your iPhone/iPad from the problem brought by the issue. If you are looking for a way to back up your iPhone/iPad data before executing the above fixes to avoid data loss, you can use the 4Easysoft iOS Data Backup and Restore tool! This tool can quickly and efficiently backup all your iPhone/iPad data to your computer without needing Apple ID. Visit this tool’s official website to discover more!
100% Secure
100% Secure


