Chuyển và quản lý tất cả dữ liệu giữa các thiết bị iOS, thiết bị và máy tính cũng như iTunes và các thiết bị.
Cách chuyển ảnh từ iPhone sang iPhone/iPad mới nhanh chóng
AirDrop là công cụ tích hợp giúp bạn chuyển ảnh từ iPhone sang iPhone/iPad để di chuyển, chia sẻ hoặc sao lưu dữ liệu. Tuy nhiên, tốc độ khá chậm, đặc biệt là khi chuyển một loạt tệp. Sau đó, có 6 phương pháp hiệu quả để bạn chuyển ảnh từ iPhone sang iPhone hoặc iPad. Khi bạn có iPhone mới hoặc muốn chia sẻ một số bức ảnh thú vị với bạn bè, bạn có thể chọn cách tốt nhất cho mình.
Danh sách hướng dẫn
Phương pháp 1: Cách tốt nhất để chuyển ảnh giữa iPhone nhanh chóng Phương pháp 2: Sử dụng iCloud để chuyển ảnh iPhone qua 2 cách Phương pháp 3: Chuyển ảnh từ iPhone sang iPhone bằng iTunes Phương pháp 4: Trực tiếp AirDrop ảnh từ iPhone sang iPhone/iPad Phương pháp 5: Chuyển một vài bức ảnh giữa iPhone qua Email Phương pháp 6: Chuyển ảnh iPhone an toàn bằng cáp USBPhương pháp 1: Cách tốt nhất để chuyển ảnh giữa iPhone nhanh chóng
Nếu bạn có nhiều ảnh cần sao lưu hoặc chia sẻ với thiết bị iOS khác, 4Easysoft Chuyển iPhone sẽ giúp bạn chuyển ảnh nhanh chóng. Nó có thể quét và chuyển tất cả ảnh của bạn theo đợt, bao gồm cả tin nhắn hình ảnh hoặc ảnh đã tải xuống. Sau vài phút quét, bạn có thể xem trước và chọn ảnh mong muốn để chuyển giữa iPhone/iPad/Mac. Hơn nữa, kiểm tra thông tin về ảnh và xóa ảnh trùng lặp cũng khả dụng. Tìm hiểu công cụ mạnh mẽ này bên dưới:

Chuyển ảnh, tin nhắn, tài liệu và tất cả các tập tin giữa các thiết bị iOS.
Hỗ trợ chuyển hàng loạt và nhanh chóng mà không tốn thời gian chờ đợi.
Có thể xem trước ảnh để chỉ chọn những ảnh mong muốn chuyển.
Không lưu tệp của bạn để bảo vệ quyền riêng tư trong quá trình chuyển ảnh.
Bảo mật 100%
Bảo mật 100%
Bước 1Kết nối hai iPhone/iPad với máy tính của bạn qua cáp USB. Và 4Easysoft iPhone Transfer sẽ tự động phát hiện thông tin iOS của bạn.

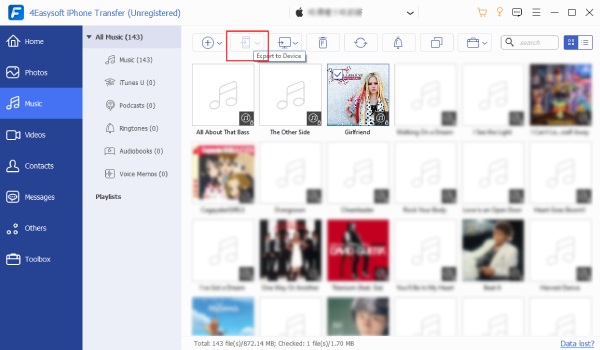
Bước 2Nhấp vào nút “Ảnh” để bắt đầu quét tất cả hình ảnh trên iPhone của bạn, chúng sẽ được phân loại để dễ dàng tìm kiếm. Chỉ cần xem trước chúng và chọn những hình ảnh mong muốn bằng cách đánh dấu.

Bước 3Sau khi chọn xong, bạn có thể nhấp vào nút “Xuất sang thiết bị” ở biểu ngữ trên cùng. Chọn đích mong muốn và đợi vài phút để chuyển ảnh từ iPhone sang iPhone/iPad.
Phương pháp 2: Sử dụng iCloud để chuyển ảnh iPhone qua 2 cách
iCloud là công cụ mặc định để tải lên và lưu trữ ảnh iPhone và tất cả dữ liệu của bạn trên đám mây. Bạn có thể dễ dàng đồng bộ hóa ảnh iPhone giữa các thiết bị không dây. Bạn chỉ cần đảm bảo hai iPhone sử dụng cùng một ID Apple và chúng được kết nối với cùng một Wi-Fi. Do đó, không thuận tiện để chuyển ảnh từ iPhone sang iPhone của bạn bè.
1. Bật iCloud Sync trong Cài đặt
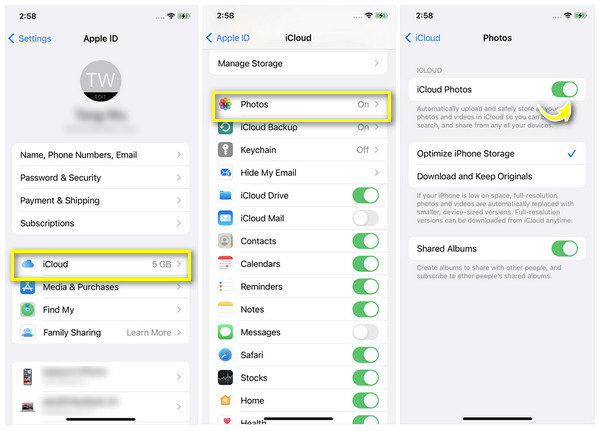
Bước 1Mở ứng dụng “Cài đặt” trên iPhone của bạn và chạm vào nút “iCloud”. Vuốt xuống để tìm cài đặt “Ảnh”.
Bước 2Bật sao lưu ảnh bằng nút “iCloud Photos”. Sau đó, bạn có thể chọn “Optimize iPhone Storage” hoặc “Download and Keep Originals” tùy theo nhu cầu của bạn.
2. Chuyển giữa iCloud Link
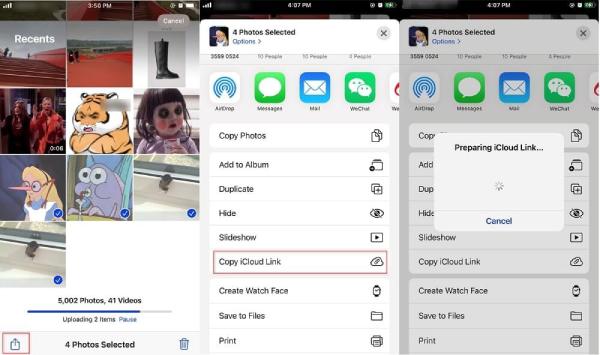
Bước 1Nếu iPhone của bạn được nâng cấp lên iOS 16, bạn có thể vào album iCloud và chọn ảnh mong muốn để chuyển.
Bước 2Nhấn nút “Chia sẻ” và nhấn nút “Sao chép liên kết iCloud” để tạo URL. Sau đó, bạn có thể dán liên kết đến bất kỳ ai bạn muốn chuyển ảnh đến.
Phương pháp 3: Chuyển ảnh từ iPhone sang iPhone bằng iTunes
Sử dụng iTunes trên Windows/Mac cũng là một cách dễ dàng để chuyển ảnh từ iPhone sang iPhone miễn phí. Điều duy nhất bạn cần lưu ý là iTunes sẽ xóa ảnh gốc khỏi thư viện iTunes sau khi chuyển. Thực hiện theo các bước dưới đây để biết thêm thông tin:
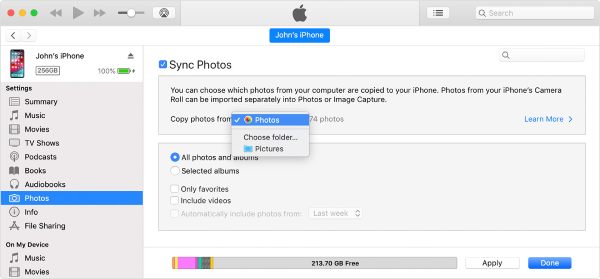
Bước 1Kết nối iPhone gốc của bạn với iTunes qua cáp USB trên Windows/Mac. Sau đó, ứng dụng “Ảnh” sẽ hiển thị trên PC. Chỉ cần nhấp vào hình ảnh bạn muốn chuyển, sau đó nhấp vào nút “Nhập”.
Bước 2Đổi sang iPhone/iPad khác và kết nối với iTunes. Bạn cần nhấp vào tab “Ảnh” và chọn thư mục mong muốn để đồng bộ hóa. Sau đó, nhấp vào nút “Áp dụng” để bắt đầu chuyển ảnh từ iPhone sang iPhone.
Phương pháp 4: Trực tiếp AirDrop ảnh từ iPhone sang iPhone/iPad
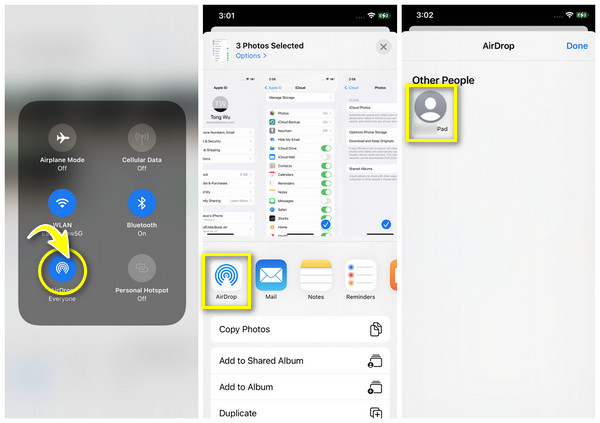
Như đã đề cập trước đó, AirDrop là cách mặc định để người dùng iPhone chuyển ảnh từ iPhone sang bất kỳ iPhone nào. Nó có thể giúp bạn chuyển mọi thứ, bao gồm danh bạ, tin nhắn, video, tài liệu, v.v. Nhưng bạn cần đảm bảo hai thiết bị iPhone đủ gần để phát hiện ra nhau. Nó khá tiện lợi để chuyển một vài bức ảnh giữa các iPhone.
Bước 1Trên cả hai thiết bị iOS, bạn nên vuốt xuống/lên để truy cập phần “Control Panel”. Nhấn và giữ nút “Bluetooth”, sau đó chạm vào nút “AirDrop”.
Bước 2Vào ứng dụng “Ảnh” và chọn tất cả ảnh bạn muốn chuyển. Sau đó, chạm vào nút “Chia sẻ” và chọn phương pháp “AirDrop”.
Bước 3iPhone của bạn sẽ phát hiện gần các thiết bị iOS. Chỉ cần chạm vào tài khoản mong muốn để nhận ảnh. Và chạm vào nút "Nhận" trên iPhone khác để chuyển ảnh giữa các iPhone.
Phương pháp 5: Chuyển một vài bức ảnh giữa iPhone qua Email
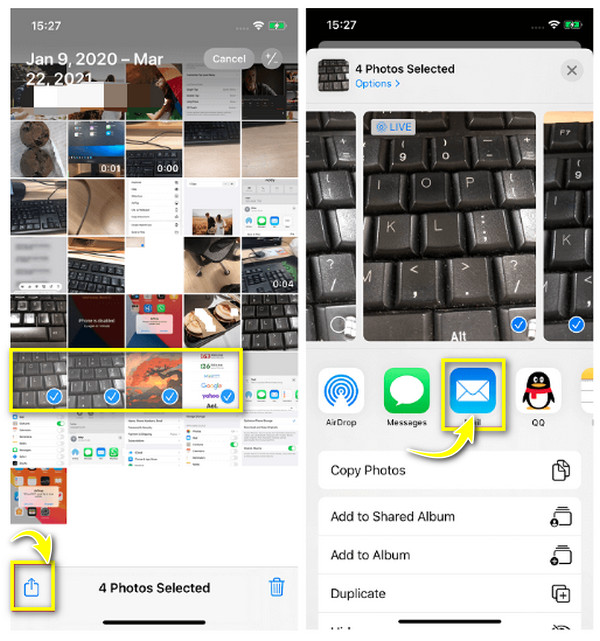
Giống như AirDrop, Email cũng là một cách khả thi nhưng chậm để bạn chuyển ảnh từ iPhone sang iPhone/iPad. Hơn nữa, nó có giới hạn kích thước trong vòng 25MB, chỉ có thể chuyển đổi một vài bức ảnh. Nếu bạn chỉ muốn chia sẻ 1 hoặc 2 bức ảnh cho người lạ, thì đó hẳn là một cách tốt để bảo vệ quyền riêng tư của bạn.
Bước 1Vào ứng dụng “Ảnh” trên iPhone và chọn hình ảnh mong muốn. Xin lưu ý không chọn quá nhiều. Sau đó, chạm vào nút “Chia sẻ” và chạm vào nút “Email”.
Bước 2Nhập địa chỉ email và thông tin cần thiết khác. Cuối cùng, chạm vào nút “Gửi” để chuyển ảnh từ iPhone của bạn sang bất kỳ iPhone/iPad nào. Chỉ cần vào ứng dụng thư để kiểm tra.
Phương pháp 6: Chuyển ảnh iPhone an toàn bằng cáp USB
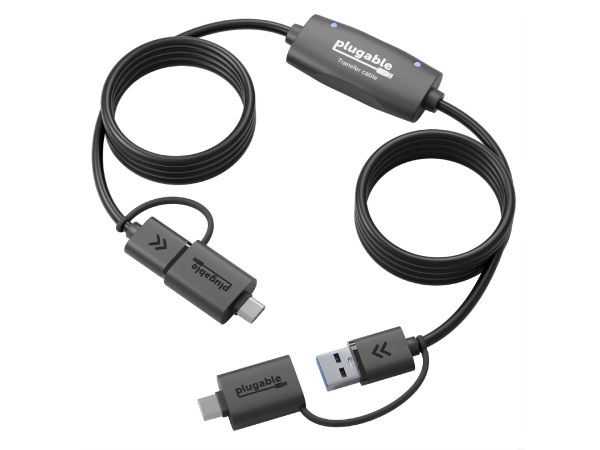
Nếu bạn lo lắng về việc rò rỉ bất kỳ thông tin riêng tư nào khi truyền dữ liệu qua Internet, tại sao không sử dụng cách đơn giản và truyền thống nhất? Không cần iTunes và máy tính, bạn có thể sử dụng cáp USB để chuyển ảnh từ iPhone sang iPhone/iPad, cách này cũng tốn ít thời gian hơn để chuyển ảnh hàng loạt.
Những gì bạn cần chuẩn bị là một cáp USB có hai kết nối USB-C. Chỉ cần kết nối thiết bị iOS mà bạn sử dụng để nhận ảnh trước, sau đó là một iPhone khác. Nhấn nút "Cho phép" trên iPhone để bật chức năng đọc dữ liệu. Sẽ có một "Cửa sổ nhập" bật lên và bạn có thể chọn ảnh mong muốn và nhấn nút "Nhập".
Phần kết luận
Bây giờ, bạn đã biết 6 cách dễ dàng và khả thi để chuyển ảnh từ iPhone sang iPhone/iPad. Bạn không cần phải lo lắng về quá trình chuyển đổi dài với AirDrop/Email, chỉ cần dựa vào 4Easysoft Chuyển iPhone. Nó sẽ giúp bạn di chuyển bất kỳ dữ liệu nào giữa các thiết bị iOS. Hơn nữa, bạn có thể xem trước ảnh trước khi chuyển, tiện lợi hơn các công cụ khác. Bất kể tài khoản Apple ID hay mối quan hệ giữa bạn và chủ sở hữu iPhone khác, hãy sử dụng nó để chuyển ảnh từ iPhone sang iPhone một cách an toàn và nhanh chóng.
Bảo mật 100%
Bảo mật 100%


