Quét hoàn toàn các thiết bị iOS của bạn và xóa tất cả các tệp rác trên iPhone, iPad và iPod.
Cách thêm tiện ích vào máy Mac và tùy chỉnh nó [Hướng dẫn năm 2024!]
Bạn có mong muốn luôn thấy danh sách việc cần làm của mình trong ứng dụng Notes trên màn hình máy tính Mac không? Việc thêm tiện ích sẽ giúp điều này trở nên khả thi! Câu hỏi bây giờ là: Làm thế nào để thêm tiện ích vào Mac? Cho dù bạn muốn xem các tác vụ hàng ngày của mình và quản lý chúng một cách nhanh chóng hay lướt qua các bản cập nhật thời tiết và nhiều hơn nữa, thì việc thêm tiện ích nằm ngay trong tầm tay bạn ngay bây giờ. Để đơn giản hơn, hãy đọc hướng dẫn này về cách thêm tiện ích vào máy tính để bàn Mac trong các hệ thống khác nhau. Hãy bắt đầu ngay!
Danh sách hướng dẫn
Cách thêm tiện ích vào màn hình Mac (MacOS được hỗ trợ) Làm thế nào bạn có thể tùy chỉnh các tiện ích của mình trên máy Mac Tăng tốc máy Mac của bạn khi các tiện ích làm chậm máyCách thêm tiện ích vào màn hình Mac (MacOS được hỗ trợ)
Trước hết, tất cả máy Mac có hỗ trợ thêm tiện ích trên màn hình không? Thật không may là không. Bắt đầu từ macOS Big Sur trở lên, bạn có thể nhận được hỗ trợ tiện ích ở Monterey, Ventura và Sonoma. Trong khi đó, đối với máy tính để bàn Mac cũ hơn, bạn phải sử dụng trợ giúp của bên thứ ba để thêm tiện ích.
Tiện ích hoạt động như thế nào? Tiện ích rất phổ biến vì cung cấp các chức năng và thông tin chi tiết nhanh chóng, như cập nhật theo thời gian thực, năng suất, xem ảnh, v.v. Vì vậy, bây giờ, nếu macOS của bạn hỗ trợ thêm tiện ích vào màn hình Mac, hãy xem các bước bên dưới để tìm hiểu cách thêm tiện ích vào máy Mac.
Làm thế nào để thêm tiện ích vào màn hình máy Mac?
• Trên màn hình máy tính Mac, nhấp chuột phải vào bất kỳ khoảng trống nào và chọn tùy chọn “Chỉnh sửa tiện ích” từ danh sách thả xuống.
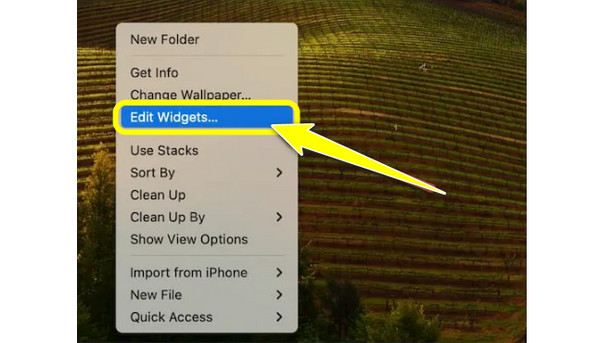
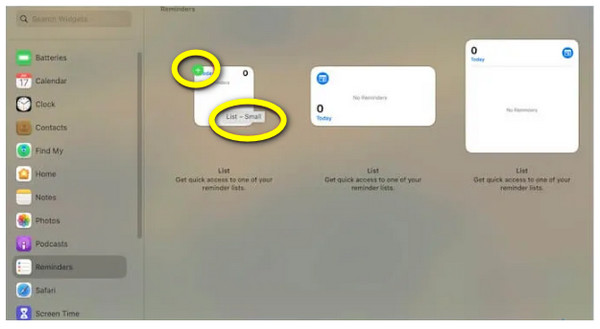
• Từ khung cửa sổ bên trái, hãy xác định mục bạn muốn sử dụng làm tiện ích, sau đó xác định kích thước bạn muốn cho mục đó, ví dụ: Nhỏ, Trung bình và Lớn, sau đó nhấp vào nút “Thêm” để xác nhận kích thước đã chọn.
Làm thế nào để thêm tiện ích vào Trung tâm thông báo của máy Mac?
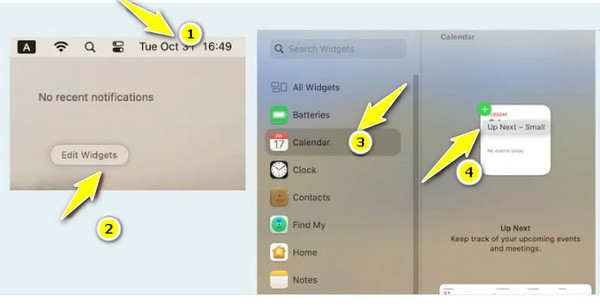
• Điều hướng đến góc xa bên phải của màn hình máy Mac, nơi dữ liệu và thời gian được đặt. Sau đó, nhấp vào nút “Chỉnh sửa tiện ích”.
• Tiếp theo, danh sách các tiện ích có sẵn sẽ được hiển thị trên màn hình; chọn một tiện ích, sau đó nhấp vào nút "Thêm" hoặc kéo để đưa vào Trung tâm thông báo. Sau đó, chọn kích thước có thể là Nhỏ, Trung bình hoặc Lớn cho tiện ích của bạn.
Làm thế nào để thêm tiện ích iPhone vào máy Mac?
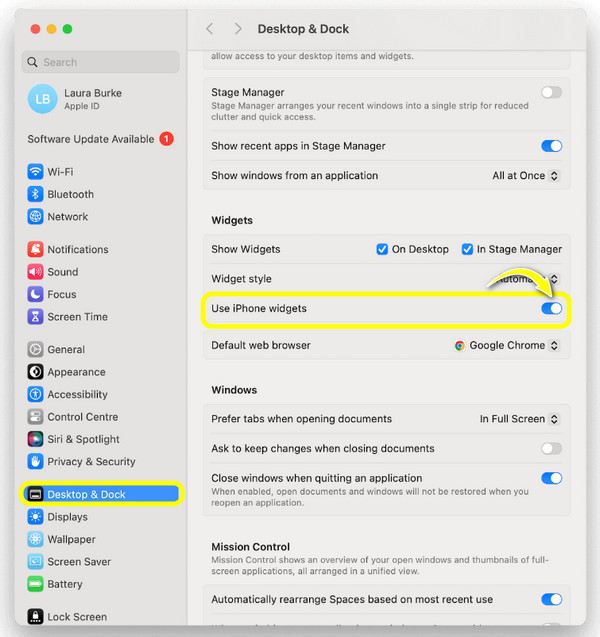
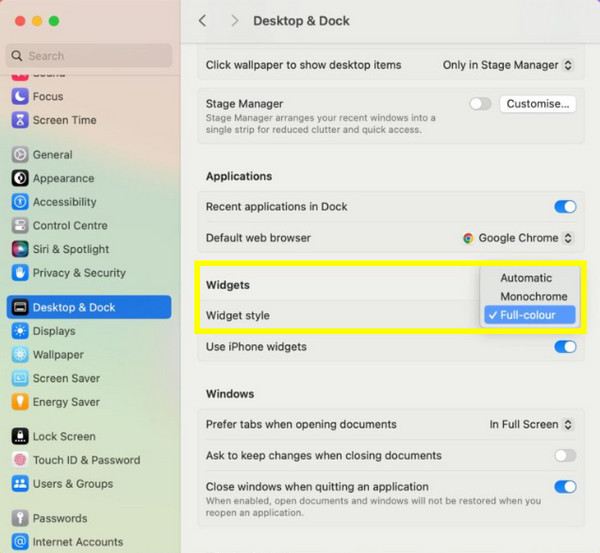
• Đối với mục này, bạn phải nhấp vào menu “Apple” để truy cập “System Settings”. Ở đây, hãy vào mục “Desktop & Dock”.
• Tìm tùy chọn “Sử dụng tiện ích iPhone” bằng cách cuộn xuống, sau đó đảm bảo chuyển nút của tùy chọn này sang “bật”. Bây giờ, bạn có thể truy cập tiện ích iPhone của mình trong thư viện tiện ích để thêm vào màn hình Mac hoặc Trung tâm thông báo.
Làm thế nào bạn có thể tùy chỉnh các tiện ích của mình trên máy Mac
Đó là cách đặt tiện ích trên máy tính Macbook và Mac! Sau khi bạn đã thêm tiện ích, việc tùy chỉnh hoặc chỉnh sửa chúng sẽ dễ dàng! Bạn chỉ có thể thực hiện bằng cách nhấp chuột phải vào tiện ích bạn muốn tùy chỉnh, chẳng hạn như tên, màu sắc, v.v. Nếu không, hãy sử dụng cùng quy trình như cách bạn đã thêm chúng để có thể chỉnh sửa cài đặt. Sau đây là cách thực hiện:
Làm thế nào để chỉnh sửa cài đặt tiện ích?
Bước 1Trên màn hình máy tính Mac, nhấp chuột phải vào bất kỳ vùng trống nào, sau đó chọn “Chỉnh sửa tiện ích” từ danh sách menu đã mở.
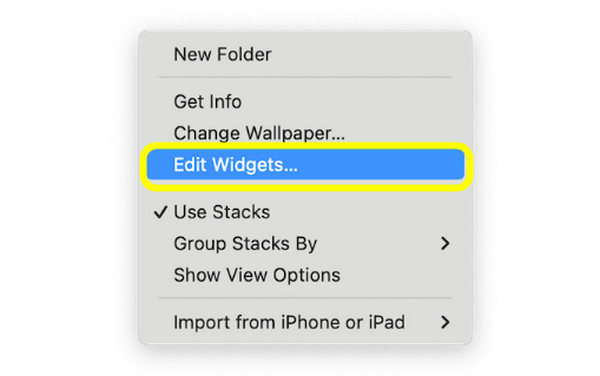
Bước 2Tìm những mục bạn muốn chỉnh sửa, sau đó kéo và đặt chúng vào vị trí bạn muốn trên màn hình nền. Ngoài ra, hãy xác định tùy chọn bố cục tiện ích mong muốn cho các ứng dụng cụ thể.
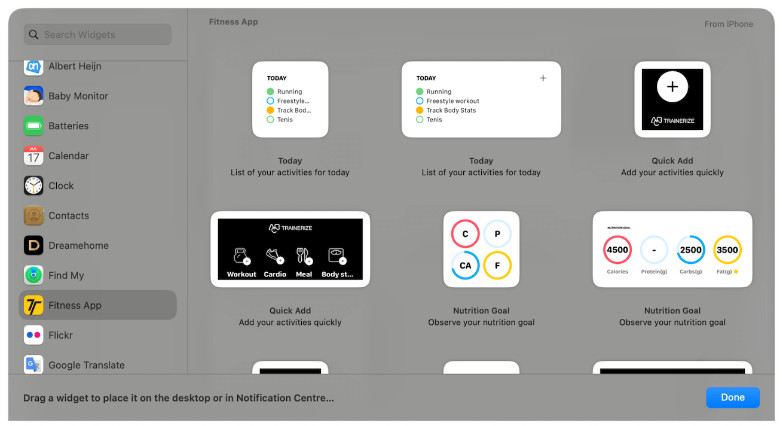
Bước 3Để xóa một số tiện ích, hãy nhấp vào nút “Xóa” (biểu tượng dấu trừ) ở góc trên bên trái của mỗi tiện ích.
Làm thế nào để chỉnh sửa tên, kích thước và màu sắc của Widget?
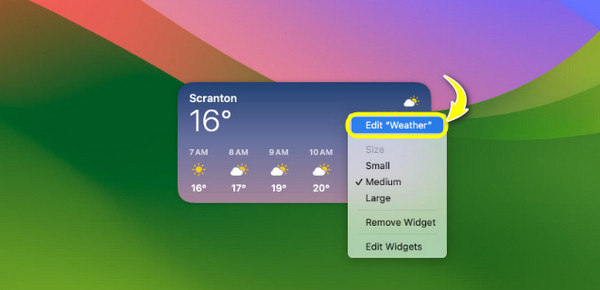
Bước 1Nhấp chuột phải hoặc “Control-nhấp” vào một tiện ích cụ thể, chẳng hạn như tiện ích thời tiết. Sau đó, để thay đổi một số thông tin về những gì tiện ích hiển thị trên màn hình, hãy nhấp vào “Chỉnh sửa [tên tiện ích]”. Tại đây, bạn có thể thay đổi thành phố đã thêm từ ô “Vị trí”, sau đó nhấp vào “Xong”.
Đối với kích thước tiện ích, hãy điều hướng đến các tùy chọn kích thước bên dưới, nơi bạn có thể thấy "Nhỏ", "Trung bình" và "Lớn". Chọn một tùy chọn để tăng hoặc giảm kích thước tiện ích đã thêm của bạn.
Bước 2Nếu bạn muốn luôn thấy các tiện ích có màu, hãy mở “System Settings”, sau đó điều hướng xuống phần “Desktop & Dock”. Cuộn xuống “Widget style” và chọn “Full-color” từ menu thả xuống.
Sử dụng 4Easysoft để tìm dữ liệu bị mất khi thêm tiện ích
Mặc dù việc thêm tiện ích rất thú vị và hiệu quả, nhưng bạn có thể không biết rằng nó có thể ảnh hưởng đến dữ liệu hiện có khác trên máy Mac của bạn. Một số có thể bị đặt nhầm chỗ hoặc tệ hơn là bị xóa. Vì vậy, đã đến lúc Phục hồi dữ liệu Mac 4Easysoft để sử dụng! Có chương trình này trên máy tính để bàn Mac của bạn, bất kể phiên bản hệ thống nào, bạn có thể khôi phục mọi loại dữ liệu, bao gồm ảnh, video, tài liệu, v.v. Giống như cách bạn học cách thêm tiện ích vào máy Mac nhanh như thế nào, phần mềm khôi phục này sẽ nhanh chóng quét tất cả các tệp đã mất và sau đó cung cấp cho bạn bản xem trước để kiểm tra xem đó có phải là dữ liệu đúng mà bạn muốn khôi phục hay không. Bất kể bạn có xóa nhầm dữ liệu của mình hay không khi thêm tiện ích vào máy Mac, chương trình này sẽ khôi phục chúng.

Có thể khôi phục mọi dữ liệu từ máy Mac và các thiết bị lưu trữ khác.
Phân loại dữ liệu bị mất thành hình ảnh, âm thanh, email, v.v.
Cung cấp hai chế độ phục hồi: quét nhanh hoặc tìm kiếm dữ liệu toàn diện.
Trước tiên, hãy xem trước dữ liệu đã chọn để quyết định có khôi phục dữ liệu đó hay không.
Bảo mật 100%
Bảo mật 100%
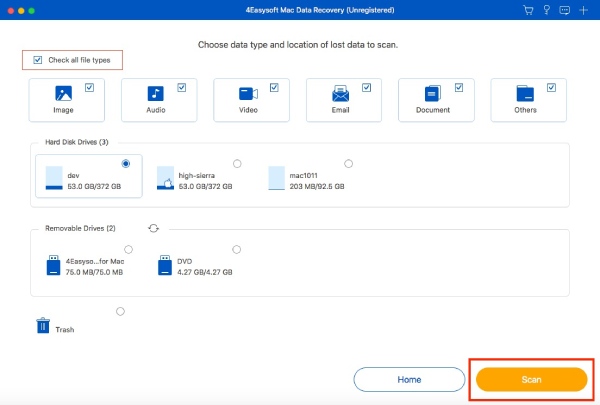
Bước 1Khi khởi chạy Phục hồi dữ liệu Mac, bắt đầu bằng nút “Start”. Bây giờ, hãy chọn tất cả các tệp bạn muốn khôi phục và ổ đĩa bạn muốn khôi phục. Nhấp vào nút “Scan” để tiếp tục.
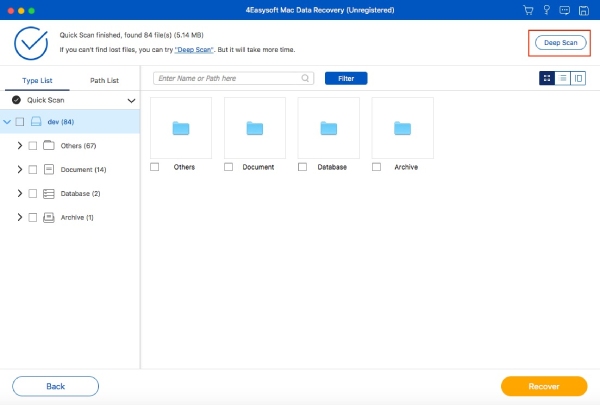
Bước 2Sau khi quét xong, bạn sẽ thấy tất cả các tệp bạn muốn khôi phục từ ổ đĩa bạn đã chọn. Nếu bạn muốn quét toàn diện vì không thấy các tệp mong muốn, hãy nhấp vào nút "Quét sâu" ở trên.
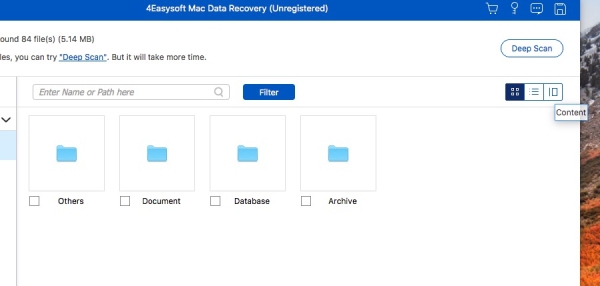
Bước 3Sau đó, tất cả các tệp được phân loại dựa trên loại tệp của chúng ở ngăn bên trái. Chọn một tệp và sau đó xem trước để kiểm tra xem đó có phải là dữ liệu bạn muốn khôi phục hay không. Nhấp vào nút "Khôi phục" để chỉ định đường dẫn và khôi phục thành công dữ liệu Mac của bạn.
Phần kết luận
Hôm nay bạn thấy hướng dẫn đầy đủ về cách thêm tiện ích vào máy Mac! Bạn có thể chỉnh sửa chúng ngay trong tầm tay mà không cần sự trợ giúp của bên thứ ba. Bây giờ bạn đã có chúng trên máy tính để bàn hoặc trung tâm thông báo, bạn có thể nhanh chóng tương tác với chúng. Tuy nhiên, vấn đề là một số dữ liệu hiện có có thể bị ảnh hưởng khi quản lý tiện ích của bạn. Trong tình huống này, không gì tốt hơn Phục hồi dữ liệu Mac 4Easysoft tool. Nó có tỷ lệ phục hồi cao, đảm bảo bạn có thể khôi phục toàn bộ dữ liệu đã mất trên máy Mac của mình một cách triệt để và nhanh chóng. Có trải nghiệm thú vị khi chỉnh sửa tiện ích của bạn mà không phải lo lắng về các tệp bị mất.
Bảo mật 100%
Bảo mật 100%


