Convert, edit, and compress videos/audios in 1000+ formats with high quality.
How to Fix Audio Delay Issue on VLC Media Player [Windows/Mac]
You might also encounter a time when you watch a video on VLC and suddenly notice that the video’s audio is delayed for about 2-5 seconds. This VLC audio delay issue may be caused by the original video or VLC itself. But despite that issue, VLC supports tweaking options to solve it. Fortunately, you landed on this page! Here, this article collected VLC troubleshooting methods and featured the ultimate way to eliminate this VLC audio delay issue permanently.
Guide List
Part 1: How to Fix VLC Audio Delay Issues with VLC Media Player Part 2: The Ultimate Way to Solve VLC Audio Delay Issue Permanently Part 3: FAQs about How to Fix VLC Audio Delay IssuePart 1: How to Fix VLC Audio Delay Issues with VLC Media Player
There are many ways to overcome this VLC audio delay issue, and you can also solve it with the help of a VLC Media Player. This media player is infused with built-in features that enable you to fix audio delays that occur whenever you do video playbacks on VLC. This post will cover three methods to solve it using VLC and show you simple steps to execute them.
1. Solve Audio Delay VLC Issue through Shortcut Keys - First on our list of methods to solve the audio delay issue by executing various keys on your keyboard. However, this method will not permanently eliminate the issue and will only remove the problem on your current playback on VLC. Additionally, it will require a lot of patience since you badly need to press the shortcut keys on your keyboard with perfect timing and pay attention to how long you will press them. To do this, here are the simple shortcut keys under Windows and Mac platforms.
To the users of Windows, here are the keys you need to press:
- If the audio starts before the video, press the K key on your keyboard. This will slow down your video’s audio.
- Otherwise, press J on your keyboard if the audio starts after the video. This will make the audio faster.
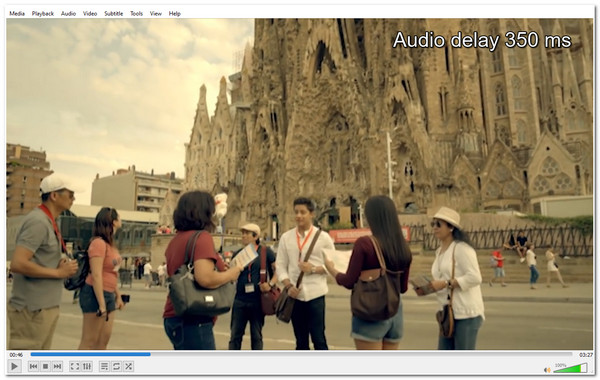
2. Eliminate the Audio Delay in VLC by setting up an Audio Track Synchronization - Another way of eliminating this audio delay issue is by manually setting up a delay value. Take note that this method will not fix the delay permanently. Instead, it will only fix the audio delay issue on the current video you are watching. You must go back to these settings and set it up again whenever you watch a video on VLC. In short, it doesn’t save the value you’ve already set. Here are the basic steps you need to follow to execute this method:
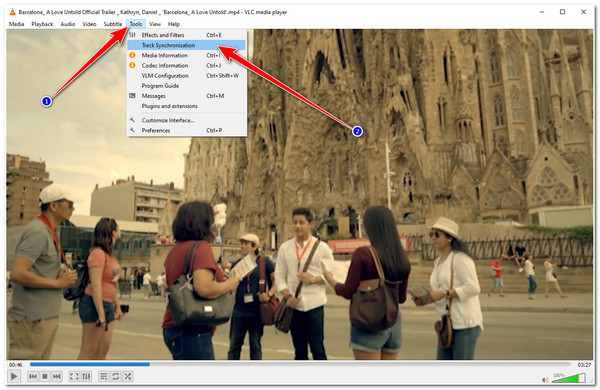
Step 1Launch the VLC on your computer. After that, select the Tools tab in the menu bar and click the Track Synchronization option.
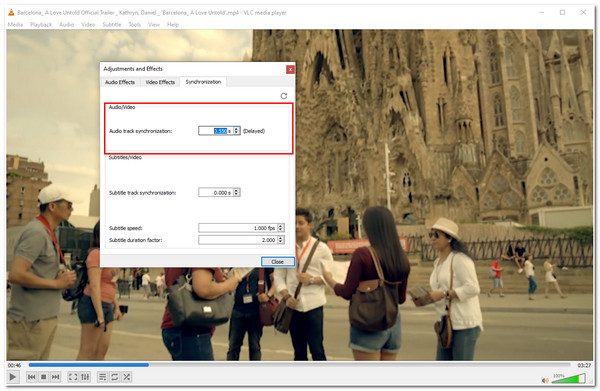
Step 2In the Adjustments and Effects window, enter a value under the Audio track synchronization. Once you set a positive value, the audio will run slower. While on the other hand, a negative value will make the audio faster.
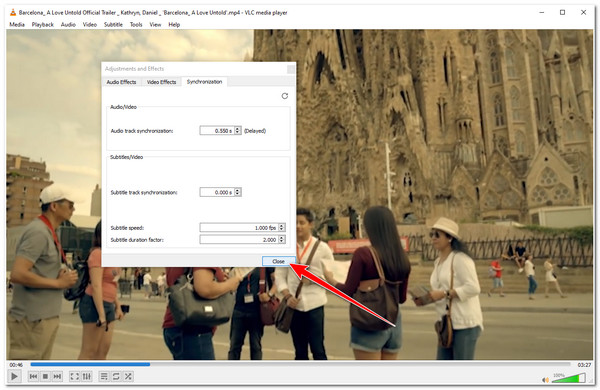
Step 3Once you are done and satisfied with the setup, tick the Close button.
3. Set up the Audio Desynchronization Compensation to Get Rid of VLC Audio Delay:
If you wish to permanently remove the audio delay issues without troubleshooting each video one by one, then you need to try this third method. Unlike the first two methods, this third method enables you to save your audio delay arrangements. Additionally, the arrangements you’ve made will automatically apply to other videos you will playback on VLC. Here are the simple steps you need to follow:
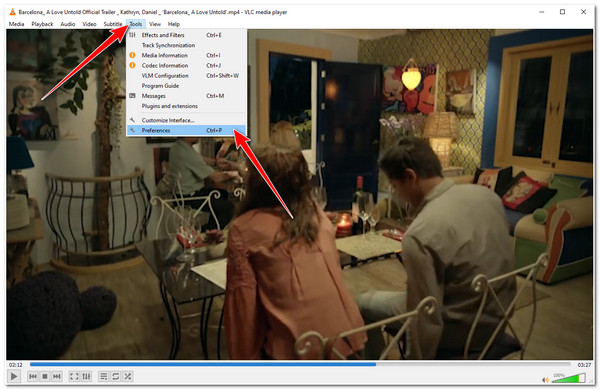
Step 1Open VLC Media Player on your computer, select the Tools tab, and click the Preferences option.
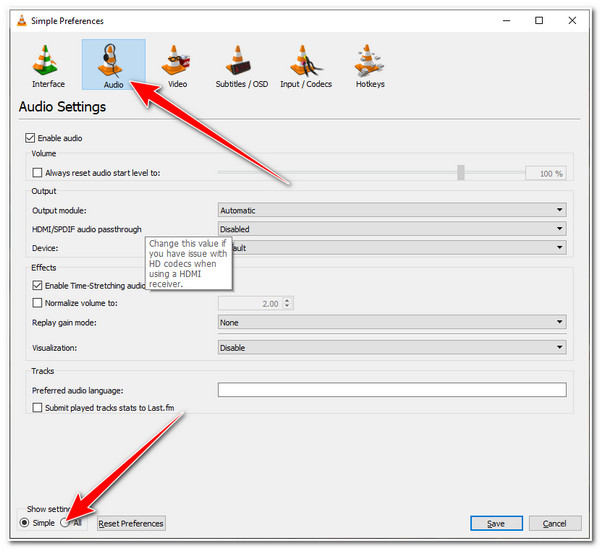
Step 2On the Advanced Preferences window, select the Audio tab and tick the All radio button in the bottom left corner of the VLC interface.
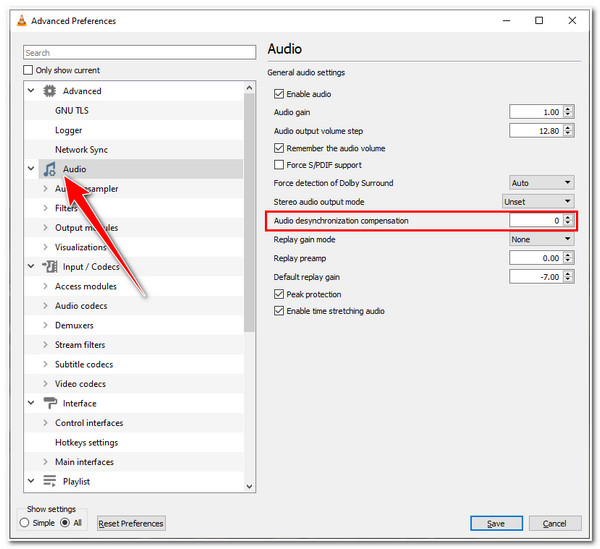
Step 3Then, select the Audio dropdown menu from the options and look for the Audio desynchronization compensation. Enter a value you wish to apply to your video’s audio on its input box. Set a positive value if the audio comes after the video. Otherwise, set a negative value if the audio plays ahead of the video. Once you are satisfied with your setups, tick the Save button.
Part 2: The Ultimate Way to Solve VLC Audio Delay Issue Permanently
After exploring the methods to solve audio delay in VLC Media Player, you might find it unpromising and hassle. If you wish to have delay-free audio that will not annoy you, make it happen through the 4Easysoft Total Video Converter. This tool comes with an audio editor which helps you sync delayed audio from a video file. Additionally, it is infused with a preview feature that lets you see and listen to the arrangements you’ve applied to your video’s audio. Moreover, it only takes the tool’s delay slider to permanently eliminate this VLC audio delay issue.

Composed of customizable audio settings where you can apply delay and volume arrangements.
Equipped with an audio sync feature on its toolbox, which comprises audio delay and output tweaking options.
Enable you to enhance your audio and video’s quality, resolution, and frame rate for a much better viewing experience.
Infused with AI Technology which is responsible for further enhancements of your video’s quality.
100% Secure
100% Secure
How to use 4Easysoft Total Video Converter to Solve VLC Audio Delay:
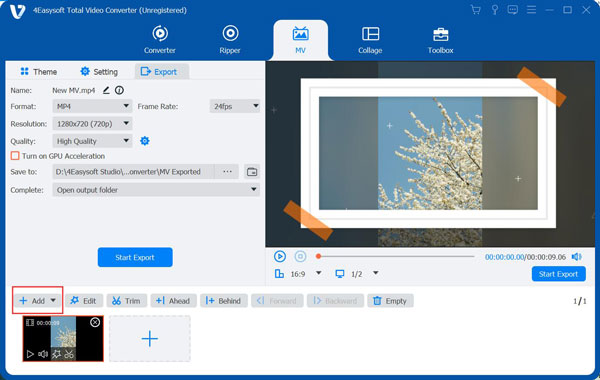
Step 1Download and install the 4Easysoft Total Video Converter on your Windows or Mac computer. After that, launch it and tick the MV tab. Click the Add button to import your video with an audio delay issue.
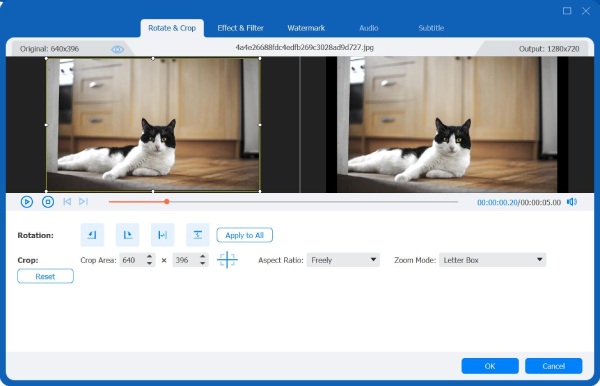
Step 2Next, tick the Edit button with the Starwand icon and access the Audio tab. You can undergo some audio delay arrangements in this section by using the tool’s built-in delay slider. You can also directly enter the delay value at the slider’s end. If you also wish to change your video’s volume, you just need to move the slider. Once you are satisfied with your setups, click the OK button. In this way, you will solve the VLC audio delay issue from the original video.
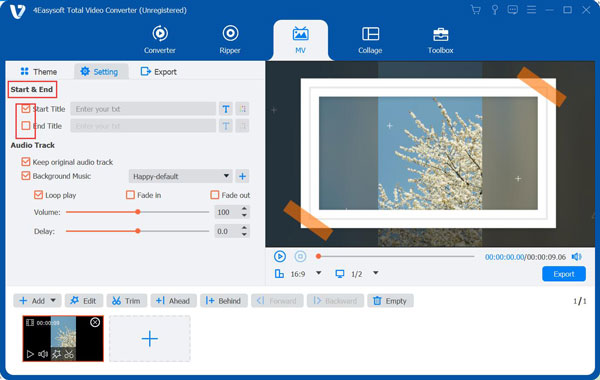
Step 3If you also wish to make further adjustments and editings, click the Setting tab and add your preferred Start and End titles. The tool’s audio delay adjustment feature was also provided under this tab.
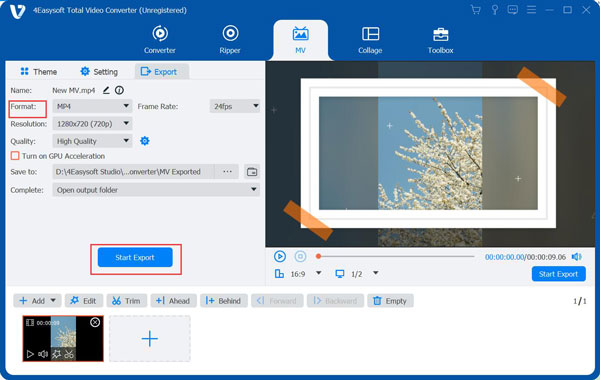
Step 4Lastly, select the Export tab to enhance your video’s Resolution, Quality, and Frame Rate. You can also export your video into another format, tick the Format dropdown menu option, and choose your preferred output format from the list. After those setups, click the Start Export button to save your file.
Part 3: FAQs about How to Fix VLC Audio Delay Issue
-
1. How do I fix the VLC audio delay in Mac?
If you encounter this issue on your VLC Media Player on Mac, you can use shortcut keys on your keyboard. To slow down the speed of the audio, press the G button. Otherwise, press the F key to increase the audio speed if it is played after the video.
-
2. What will happen if I keep pressing the K key for a long time in VLC?
It will continually increase the milliseconds of your video’s audio. This will slows down the speed of your audio.
-
3. How to fix Audio Delay in VLC using Android?
To fix it, open a video file in VLC on your android device and tap the screen to show the on-screen control. Then, tap the second button on your screen and select Audio delay from the option. Tap the Plus or Minus sign to apply the audio arrangements of your video.
Conclusion
In this article, you have explored the 4 ways to bring your videos back in sync when playing them on VLC. They are effective ways to free yourself from getting annoyed by unsync video and audio and have a much better watching experience. If VLC troubleshooting methods don’t work, we recommend the 4Easysoft Total Video Converter tool. This tool will permanently solve your VLC audio delay issue and enhance quality. So if you need to have the best movie or video-watching experience, install this tool and use its stunning features to redefine your homemade movies and videos!
100% Secure
100% Secure


