Recover all data from your iOS devices, iTunes and iCloud backup.
How to Backup iPhone Photos and Never Lose Them Again
In the Photos app, there are a lot of treasure troves of memories that capture the moments of your life. What happens if your iPhone is lost or damaged? Those countless photos could be gone forever! So, it is necessary to back up your iPhone photos beforehand. Hence, this guide will give you not one but three methods to secure your images, from iCloud to other options. Dive in and follow these iPhone backup photo methods!
Guide List
How to Backup All Your iPhone Photos Quickly s Detailed Steps to Backup iPhone Photos to iCloud Backup Photos from iPhone to PC with Windows PhotosHow to Backup All Your iPhone Photos Quickly
Whether you want to upgrade your device, prepare for a system reset, or simply want an extra layer of protection, 4Easysoft iOS Backup and Restore is your comprehensive solution! It is a dedicated software application for Windows and Mac that simplifies the process of backing up and restoring data from your iPhone to your computer. It offers robust features to make sure your essential iPhone data, not just photos but also messages, contacts, notes, videos, and more are securely backed up. Unlike some other methods, when you backup iPhone photos using the program, all your existing data remains intact, keeping down the risk of data loss and guaranteeing everyone a reliable way to secure your information. Regardless of your technical level, this software makes the backup iPhone to PC computer process accessible to everyone.

Let you choose and preview specific types of data or particular items for backup.
Widely compatible with various iOS devices and versions, ensuring broad support.
Make sure your existing iPhone data remains untouchable during the backup process.
Have tools for organizing and managing your backup files effectively.
100% Secure
100% Secure
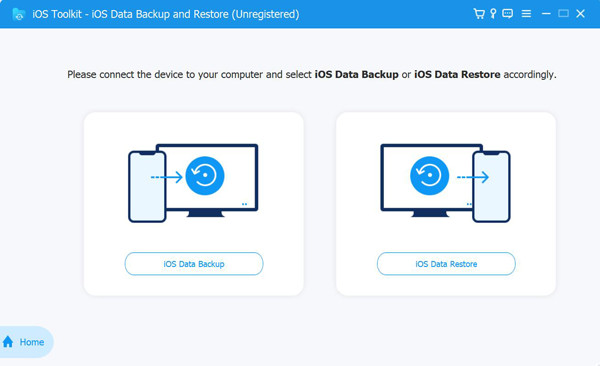
Step 1On your desktop screen, run the 4Easysoft iPhone Data Recovery program. From the home screen, select the "iOS Data Backup" button. Don’t let it slip into your mind to acquire a USB cable and link your iPhone to the computer.
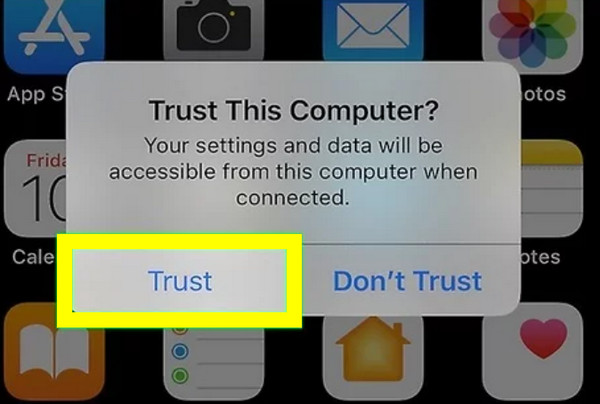
If prompted on your iPhone screen, please ensure to tap on the “Trust” button to let your computer access the Photos app.
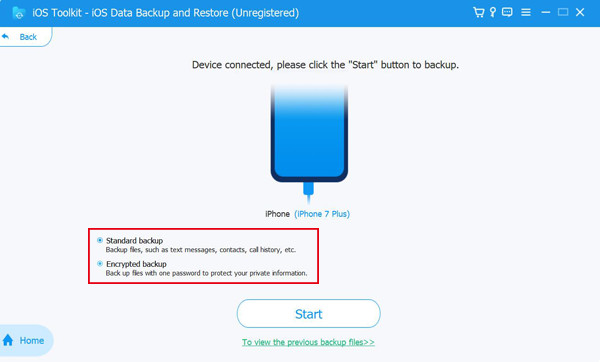
Step 2Inside this page, select between Standard backup and Encrypted backup. Suppose you have some information protected by a password; go for the "Encrypted backup" radio button. Proceed by clicking the “Start” button.
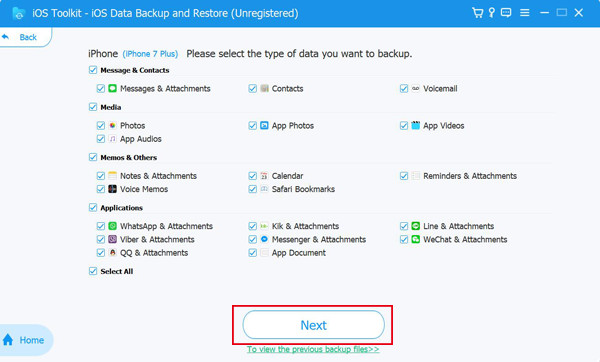
Step 3Next, your screen will present all the data types, like Media, Messages & Contacts, Memos, and more. Under "Media", put a checkmark on the "Photos" box, then click the "Next" button to begin the transferring process.
Detailed Steps to Backup iPhone Photos to iCloud
Backing up your Photos through iCloud is a convenient solution that guarantees your memories are securely stored and quickly within reach across all your Apple devices. As you know, iCloud is Apple’s cloud storage that smoothly integrates with your iPhone, iPad, and Mac, keeping your photos safe and synchronized as long as you log in with your Apple ID. This may be the easiest way to backup photos from an iPhone.
With the iCloud backup iPhone photos solution, you can enjoy peace knowing that your memories are safely stored and available whenever you need them. Here’s how to do it:
Step 1Check iCloud Storage. On your iPhone, turn over to the "Settings" app, tap your name at the top, and then head to the "iCloud" section to see how much storage is available.
Step 2Activate iCloud Photos. Begin by enabling iCloud Photos in Settings. After tapping your name at the top, go to iCloud, select "Photos," and make sure to toggle the switch "ON."
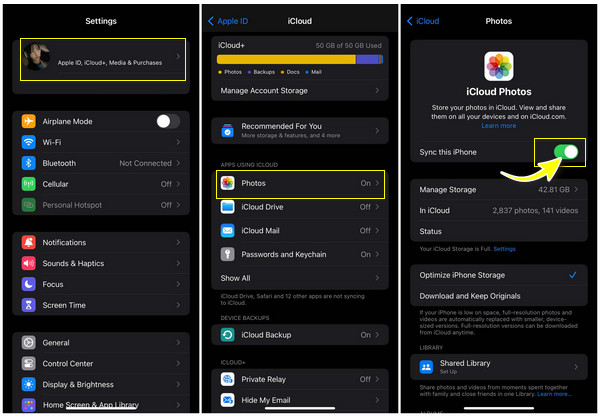
Step 3Optimize Your Storage. To save space while keeping your picture in iCloud, open the Settings app again, tap on your name, and select "iCloud". Inside the Photos section, choose “Optimize iPhone Storage” to keep only smaller, space-saving versions of your photos.
Step 4Backup iPhone Photos. Now, visit iCloud.com on your computer or any other device, then log in with your Apple ID. Go to "Photos" to see all your uploaded photos; you should see the same images on your iPhone’s Photos app.

Step 5Check Your Backup Regularly. On the "iCloud" section inside the "Settings" app, it’s nice if you periodically check that your photos are still being backed up on iCloud. There, you’ll see if the iCloud Photos is syncing properly.
Backup Photos from iPhone to PC with Windows Photos
Besides the convenient iCloud, you also have the Windows Photos app here. It is a built-in application that provides a friendly interface for organizing and managing your photos. Regardless of your reason for backing up, the Windows Photos app is among the methods that make the process straightforward and efficient. Instead of accessing your iPhone photos across all your Apple devices, in this way of the Windows Photos app, you can quickly back up your iPhone to a PC.
To transfer iPhone photos to a PC, check out the step-by-step guide below for the Windows Photos app:
Step 1Link Your iPhone to Computer. Get a workable USB cable to connect your iPhone to the Windows PC; depending on the model, you can use either a Lightning-to-USB cable or a USB-C-to-Lightning cable.

Step 2Open Your iOS Device. Unlock your iPhone, and if prompted, tap the "Trust" button to let your PC access your iPhone’s photos.
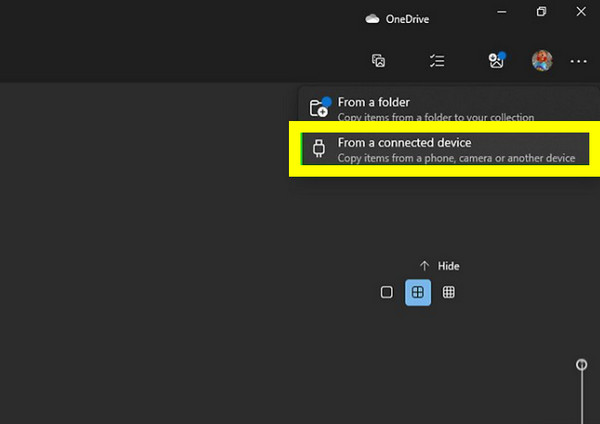
Step 3Backup iPhone Photos. Bring out the Photos app on your PC, click the "Import" button, and opt for "From a USB device" or alike option from the pulldown menu. It will then start searching for photos on your iPhone.
Step 4Select Photos to Backup. Once all photos are displayed, you can select individual items or click the "Select All" or any similar option to import everything. You can also click the "Delete items from my device after import" to free up space on your iDevice.

Step 5Choose Destination, then Import. Specify the location on your PC where the imported iPhone photos will be saved. Later, click the "Import" button to begin the transfer. The process depends on the number of images you have.
Conclusion
Safeguarding your iPhone photos is crucial to preserving your cherished memories and ensuring they are not gone forever due to unexpected events. From Apple’s cloud storage service, iCloud, to the Windows Photos app, you can now back up iPhone photos with convenience and security. However, for a comprehensive and reliable solution that has flexibility and ease of use, use the 4Easysoft iOS Data Backup & Restore. With this powerful software, you can transfer iPhone photos, messages, notes, and more to a PC for backup and easy recovery. It is beyond question the excellent choice for anyone looking to secure their memories with confidence.
100% Secure
100% Secure


