Record video, audio, gameplay, and webcam to record precious moments easily.
How to Screen Record on Dell Laptop? Steps on Windows 11/10
Screen recording has become necessary for creating tutorials, gameplay, and important meetings. How do you accomplish this if you own a Dell laptop? Thankfully, there are many easy ways how to screen record on Dell without breaking the bank. In today’s post, you’ll explore six different tools to learn how to screen record on Dell laptop, ensuring you choose the best option for your needs. Dive in now and get started recording your Dell screen with ease!
Guide List
4Easysoft Screen Recorder - High-Quality with Audio/Webcam Support Bandicam - Lightweight Tool with Customizable Settings OBS Studio - Open-source with Advanced Recording and Streaming VLC Media Player - Versatile Player that Captures Screen Game Bar - Built-in Tool for Gaming Video Capture Loom Screen Recorder - Extension Recorder with Instant Sharing4Easysoft Screen Recorder - High-Quality with Audio/Webcam Support
The first thing on this list is the 4Easysoft Screen Recorder—an excellent choice for creating high-quality recordings with both audio and webcam support. This software offers an intuitive main screen, making it effortless for both starters and professionals alike to capture everything on their screen. What’s more, 4Easysoft gives you the quality you want by letting you customize the settings like video resolution and frame rate. Whether you record your entire screen or customized area with a webcam and audio from the system and mic, it affects no quality during and after the session, even if you annotate in real time. Before moving on to another option, see the other best features of the program and learn how to screen record on Dell using it.

Record in HD with support for 1080p and 4K resolution.
Can capture your webcam and system audio and mic sound at once.
Provide real-time annotating and drawing tools during recording.
Save video in various file formats like MP4, MOV, AVI, MKV, and others.
100% Secure
100% Secure
Step 1Start the 4Easysoft Screen Recorder program on your Dell laptop to capture screen now. From the interface, choose the "Video Recorder" button to begin.

To select the recording area, choose either "Full" for the entire screen capture or "Custom" for customizing the area yourself. For those two, you can adjust the frame rate to change the position.
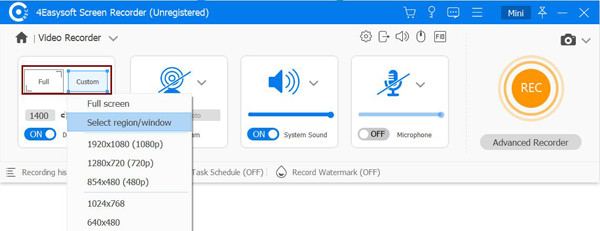
Step 2Depending on what you need, enable the "System Sound" switch button for capturing computer sounds; for voiceovers, please enable the "Microphone" button. Adjust their respective volumes via their sliders.

Step 3After setting everything up, click the "REC" button to start the screen recording on Dell; otherwise, use the "Ctrl + Alt + R" shortcut keys. Using the toolbox, annotate or draw during the recording; this won’t affect the quality.

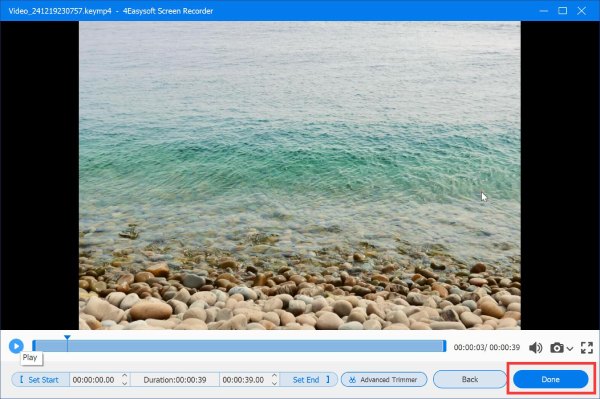
Step 4Later on, once finished, click the "Stop" button. In the preview window, watch and check if any trimmings need to be done. Once satisfied, end the process by clicking the "Save" button.
Bandicam - Lightweight Tool with Customizable Settings
Bandicam is another lightweight recording tool made perfectly for users looking for a simple yet robust solution to capture their on-screen activities. With its customizable settings, you can alter the recording area, frame rate, and compression to acquire the best quality. Thus, if you wish to record tutorials, games, or other content, use Bandicam now for high-quality recordings with minimal lag. Check out the below steps on how to screen record on Dell:
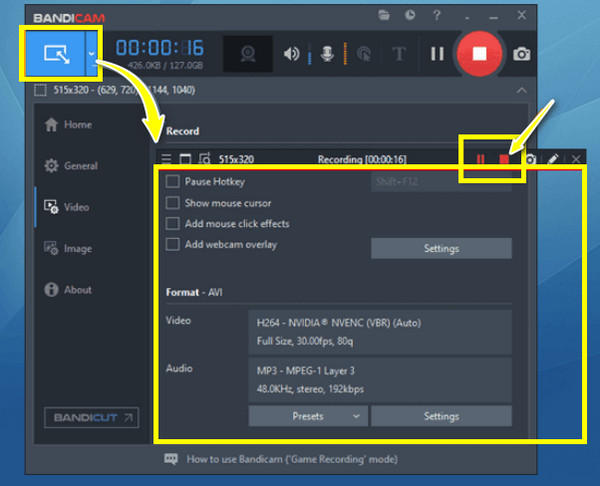
Step 1Upon starting Bandicam, select the "Rectangle on a screen" mode from the dropdown menu on the right side of the screen. Otherwise, you can choose other modes based on your requirements.
Step 2Before recording, you can check the video and audio settings and add a webcam overlay if you want. Once ready, click the "REC" button to screen record on Dell laptop.
OBS Studio - Open-source with Advanced Recording and Streaming
Moving forward, OBS Studio offers a more advanced method aside from learning how to screen record on Dell laptop with audio. This tool is a free, open-source software that is popular for its advanced recording and streaming capabilities. It is an excellent option for those who opt for complete control over their recordings, like adding layers such as text, images, and even live feeds. Furthermore, it supports streaming to well-known platforms like YouTube or Twitch. While it takes some time to learn, once mastered, you’ll get why it is a stand-out tool among professionals.
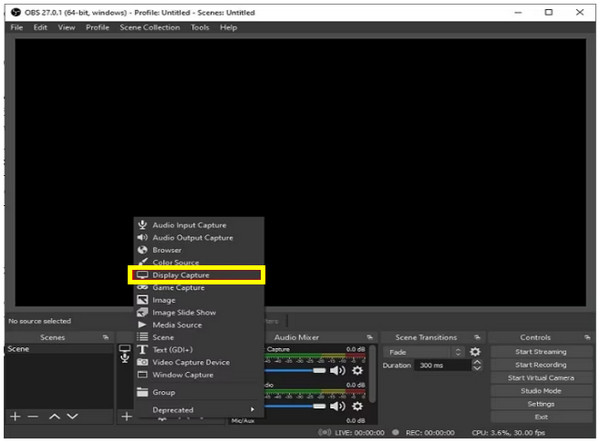
Step 1Inside OBS, click the "Add" button from "Scenes" to add a scene, then go to the "Add" button of "Sources" and choose "Display Capture" from the options. Add a title and click the "OK" button to proceed.
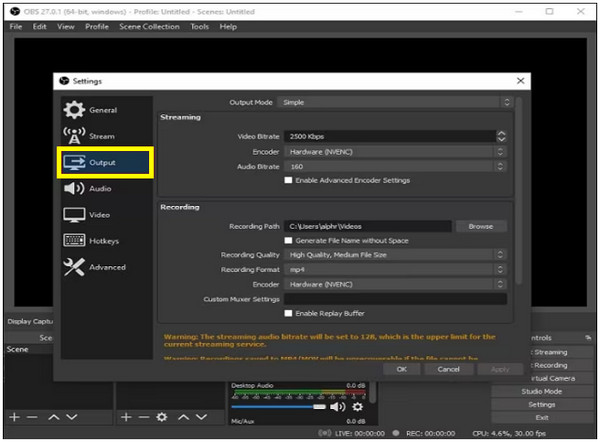
Step 2Next, head to the "Settings" button to change some "Output" settings like format, path, quality, and more. Once done, click the "Start Recording" button to capture screen on Dell.
VLC Media Player - Versatile Player that Captures Screen
If you want something more familiar to you, VLC Media Player is a famous media player that comes with the capability to record your screen, too. It is a great choice for a free, simple, but versatile tool for learning how to screen record on Dell laptop. Though it lacks some advanced features like webcam recording that is found in other recording software, VLC is perfect for basic desktop and audio recording tasks, so you may want to try it anyway.
Step 1Once the VLC is opened on your Dell laptop screen, head to the "Media" menu and go for "Convert/Save". Here, select the "Capture Device" tab, then click the "Capture mode" dropdown and select "Desktop".
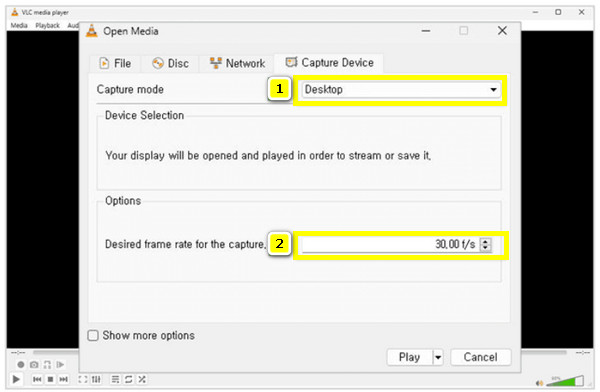
Step 2Next, go down to adjust the frame rate, click on the "Play" dropdown and choose "Convert/Save", which will take you to the "Output" window.
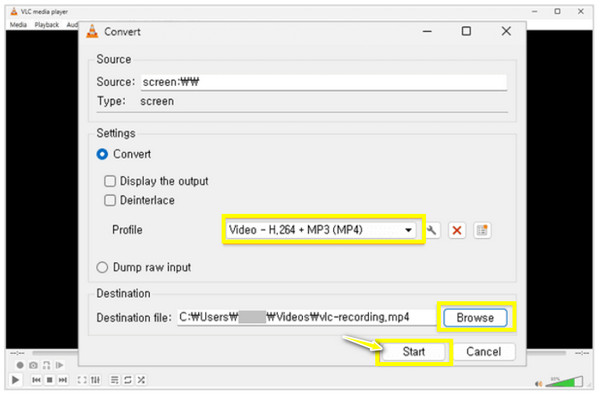
Here, you can select the desired format from the "Profile" field; you can also click the "Browse" button of "Destination" for your recording path.
Step 3Once everything is set, click the "Start" button to begin recording Dell video using VLC. When you’re finished, click the "Stop" button and locate the video in your chosen path.
Game Bar - Built-in Tool for Gaming Video Capture
If you want something more familiar to you, VLC Media Player is a famous media player that comes with the capability to record your screen, too. It is a great choice for a free, simple, but versatile tool for learning how to screen record on Dell laptop. Though it lacks some advanced features like webcam recording that is found in other recording software, VLC is perfect for basic desktop and audio recording tasks, so you may want to try it anyway.
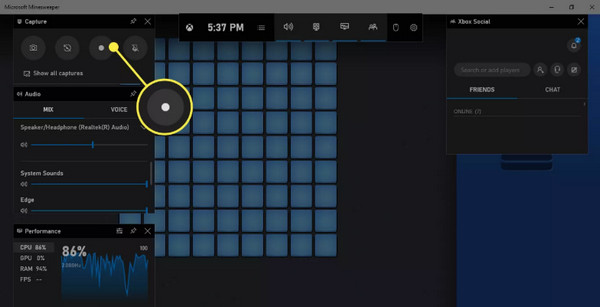
Step 1To launch the Game Bar on your Dell laptop, press the "Windows + G" keys. Then, ensure the Dell screen recording options are set correctly by going to "Settings" and "Capturing".
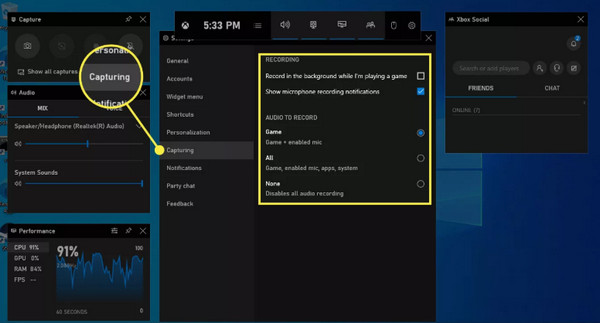
Step 2Following this, click the "Start" button or use the shortcuts "Windows + Alt + R" keys. During the session, you can mute or unmute your microphone. Later, click the "Stop" button to finish recording, then head to "Show All Capture" to view it.
Loom Screen Recorder - Extension Recorder with Instant Sharing
If you prefer an online tool, Loom Screen Recorder may be great for your taste! This recorder captures your screen and shares the recordings instantly. Aside from learning how to screen on Dell Chromebook and other models, you can upload your videos directly to the cloud and share them via link. Whether you want to record a short demo or a long presentation, Loom has the flexibility to get the job done quickly and efficiently.
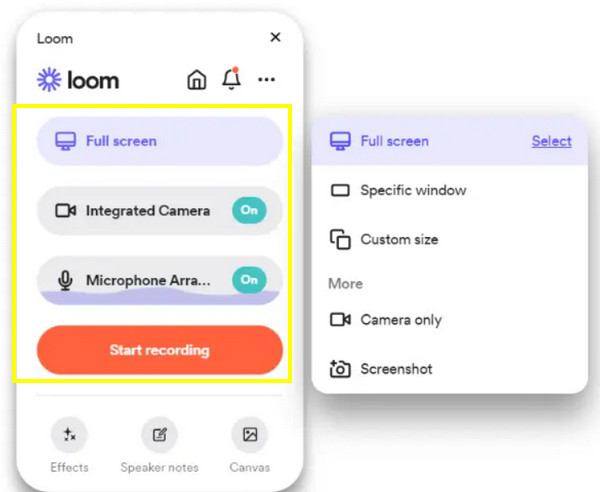
Step 1Go to "Chrome Web Store" and search for "Loom". Then, click "Add to Chrome". Now, sign into your Loom account to begin. Click the "Loom" button in the toolbar, and choose recording options.
Step 2Once you’ve selected your preferences, click the "Start Recording" button. You can pause, stop, draw, and annotate during recording. When you’re done, click the "Stop Recording" button.
Conclusion
There are many options for recording on your Dell laptop, right? From built-in tools like Game Bar to advanced options like OBS Studio, you can learn how to screen record on Dell, depending on your requirements. However, for a high-quality and friendly solution, 4Easysoft Screen Recorder is the best choice. It combines ease of use with robust features, making it perfect for both beginners and professionals. So, start recording with this program today and enhance your recording experience.
100% Secure
100% Secure


