Create DVD/Blu-ray disc/folder or ISO files from all video formats.
How to Burn a DVD on macOS Sequoia and Windows 7/8/10/11
Do you want to burn some homemade DVDs on Windows/Mac with songs and films you have recorded? Or do you want to burn an ISO image to a DVD for keeping it safer? Many people think burning a DVD is special for technicians. You can even do it at home! This article will give you some DVD burners and tutorials to burn a DVD on Windows 7/8/10/11 or macOS Sequoia.
Guide List
Part 1: The Ultimate Way to Burn DVDs on Windows 11 and Mac Ventura Part 2: How to Burn DVDs on Windows 7/8/10/11 Part 3: How to Burn DVDs on macOS Sequoia Part 4: FAQs about Burning DVDs on Windows and MacPart 1: The Ultimate Way to Burn DVDs on Windows 11 and Mac Ventura
4Easysoft DVD Creator is the ultimate DVD creator for Windows and macOS. It enables you to edit videos and audio files with multiple effects. Custom the DVD menus with the desired music, background, etc. Moreover, there are dozens of templates and editing toolkits to polish the videos for burning DVDs on Windows and Mac within clicks.
Support basic functions to create chapters by merging or splitting the videos.
Trim, crop, add music, add subtitles, and adjust video effects.
Choose the High option to keep the original resolution and quality.
Burn videos to DVD and DVD folder in different standards - NTSC or PAL.
100% Secure
100% Secure
And there are detailed how-to steps following to teach you to burn DVDs on Windows and Mac.
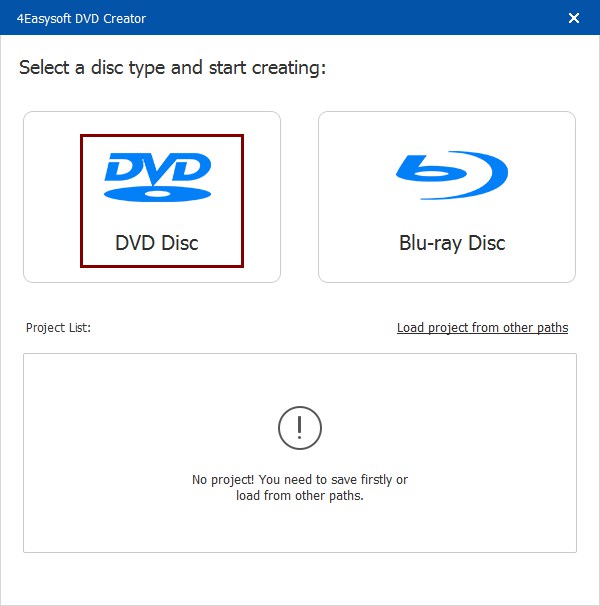
Step 1Firstly, you need to insert a blank DVD into your computer. After launching 4Easysoft DVD Creator, you can click the DVD Disc button on the main screen.
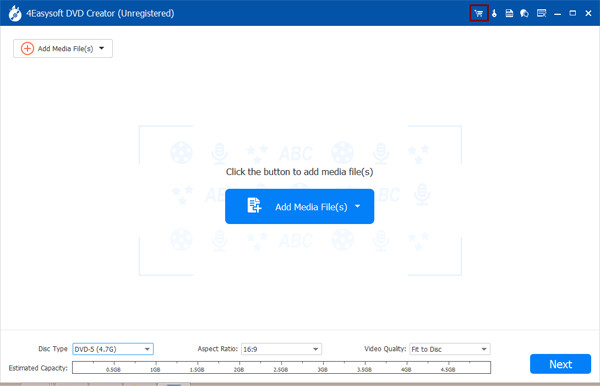
Step 2Click the Add Media Files button to import the desired files to this software. You can add several video files within 4.7 GB to create one D5 disc. Then click the Next button.
Step 3Creating a menu is necessary for the DVD to locate the desired videos quickly. There are many themed templates in software, and you can also create custom templates with the desired background and title. Moreover, you can also add background music and opening film as you like.
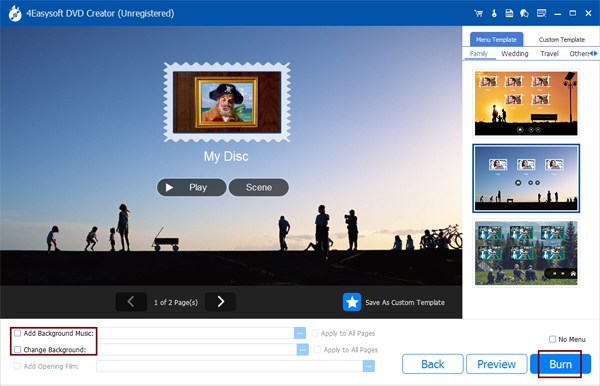
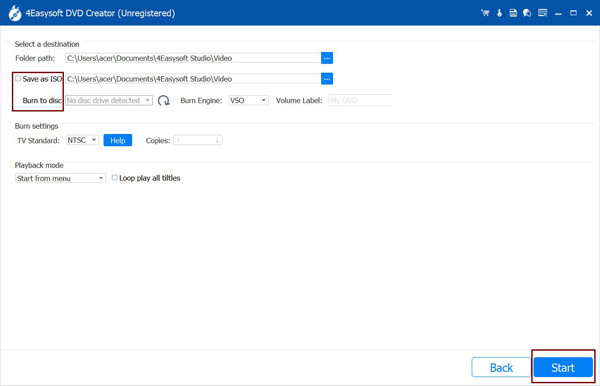
Step 4After the adjustments, click the Burn button to start changing the output settings. Here you can change the storage path, adjust the burning settings, and choose the playback mode. At last, click the Start button to create your DVD.
Part 2: How to Burn DVDs on Windows 7/8/10/11
1. Burn DVDs on both Windows 7/8/10/11 by Windows Media Player
If you don’t want to download third-party software, Windows users could use the built-in software Windows Media Player, you can burn three kinds of DVDs on Windows 7/8/10/11: audio CDs, data CDs, data DVDs, and even convert DVDs to other formats. And the steps are following.
Step 1Choose the drive you want to use that you have inserted into your computer.
Step 2In the Player Library, click the Burn button, and then you can select Audio CD or Data CD or DVD in the Burn options button.
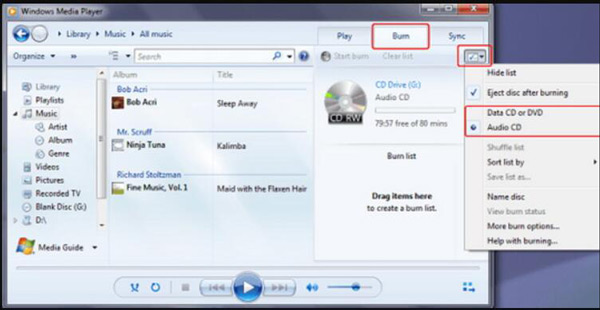
Step 3Search for the items in your Player Library that you want to burn to the disc, and then drag them to the list pane (on the right side of the Player Library) to create a burn list. When you're finished with the list, click the Start burn button. You should note that the video quality will be compressed
2. Burn DVDs on Windows 10 on CD-R
There is another way to burn DVDs on Windows 10, which is easier than using Windows Media Player. You can just use CD-R to treat DVDs like USB to import files. This way is a bit slow when writing, but it is just as effective and works in a pinch. Besides, you can use this way to burn ISO files, Blu-ray discs, and DVD. The steps to burn DVDs on windows 10 with CD-R are following.
Step 1Insert a blank DVD-R or CD-R disc into your optical drive. A burn disc window will appear on the screen. Give the disc a title, then click the Like a USB flash drive button. This option is the best choice since it will have better compatibility with older versions of Windows.
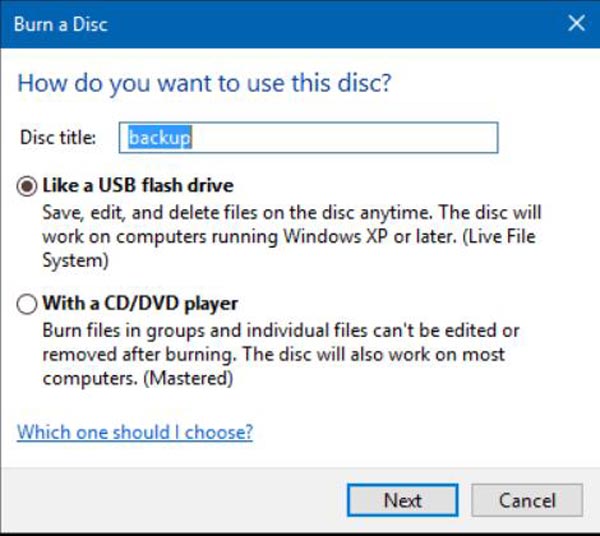
Step 2Click the Next button, then wait while the disc is prepared for use. Browse any files you would like to add to the disc, then click the Start button from the File Explorer button and open the drive containing your DVD-R or CD-R. Then drag and drop any files you want to write to the disc.
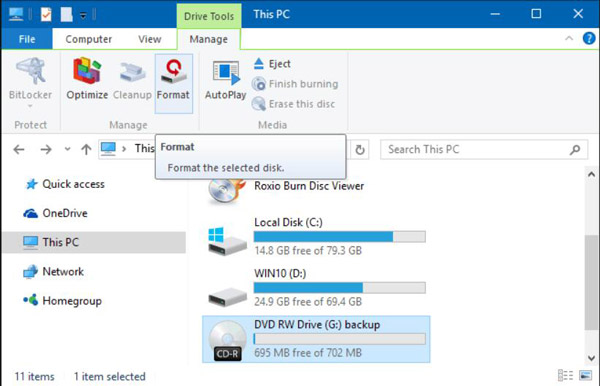
Step 3When complete, click the Manage button and then click the Eject button. Now you can manipulate and edit your files like you would on a standard USB thumb drive.
Part 3: How to Burn DVDs on macOS Sequoia
Mac users also could don’t need to download software to burn DVDs on Mac or extract DVD audio, but the disadvantage is that you can only deal with DVDs, burning ISO files and Blu-ray DVDs is also not supported by Mac, and the processing speed will be slower than using third-party software. Here are the steps to use Finder to burn DVDs on Mac,
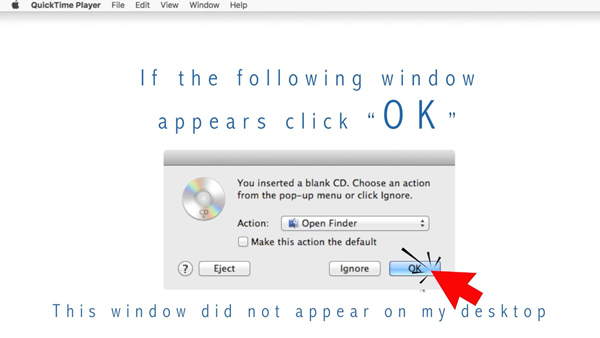
Step 1Insert a blank disc into your optical drive. If dialogue appears, click the Open Finder button. And click the Make this action the default button if you want to open the Finder every time you insert a blank disc.
Step 2When the disc appears on your desktop, double-click the disc to open its window, then drag the files and folders you want to burn to the DVD. And if you want to burn the same files to discs multiple times, use a burn folder.
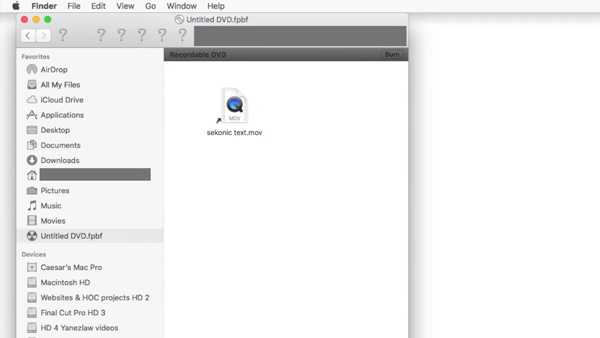
Step 3You should rename the files because when the disc is burned, the items on the disc have the same names and locations that they have in the disc window. After the disc is burned, you can’t change the items.
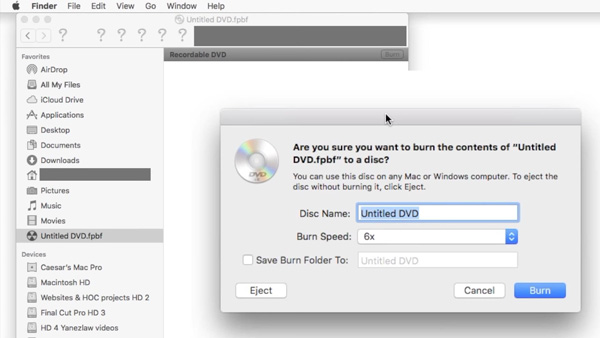
Step 4Then click the Burn button from Choose File to follow the instructions to complete burn DVDs on Mac.
Part 4: FAQs about Burning DVDs on Windows and Mac
-
How many times can a DVD be burned on Windows and Mac?
It is estimated that a DVD-RW or DVD+RW disc can be rewritten approximately 1000 times and a DVD-RAM 100,000 times. In addition, these formats (under certain circumstances) employ defect management schemes to actively verify data and skip over or relocate problems to a spare area of the disc.
-
Can you add more files to a burned DVD on Windows and Mac?
If the disc is not closed, additional files can be added. When you are ready, place the CD-R into the optical drive, open the CD-R folder, add more files, and then select the Burn to disc option. In Windows 10, after adding files to the CD-R folder, they are burned to the disc automatically.
-
What are the best external DVD burners for Windows and Mac?
The latest laptops and MacBooks do not have internal DVD burners now. Here are the 4 frequently used external DVD burners for Windows and Mac, LG Electronics 8X USB 2.0, Roofull External CD DVD, LG Electronics 8X USB 2.0, and External CD/DVD Drive for Laptop, USB 3.0 Ultra.
Conclusion
There are 4 ways introduced to you to burn DVDs on Windows 7/10/11 and macOS Sequoia. And there are three default ways without third-party software. But those ways also have disadvantages, such as processing speed slow, unable to deal with ISO files and Blu-ray DVDs, and so on. 4Easysoft DVD Creator is the ultimate choice to burn DVDs and ISO images with fancy features. Go to download and use this program like ImgBurn to experience high-quality burning DVDs on Windows and Mac.
100% Secure
100% Secure


