Convert, edit, and compress videos/audios in 1000+ formats with high quality.
Export Vertical Video for Instagram with Premiere Pro
You may be facing a browser interface right now and searching for a guide on how to export vertical videos for Instagram Premiere Pro. If you want to upload a video edited from Premiere Pro on Instagram, you need to ensure that it is vertical, for the platform suggests this orientation for smartphone playback. Well, search no more, for you have already found a page that features a guide on how to export vertical videos for Instagram Premiere Pro! So, start diving below!
Guide List
Steps to Create and Export Video for Instagram in Premiere Powerful Alternative Way to Export Vertical Video for InstagramSteps to Create and Export Video for Instagram in Premiere
Before exploring this post’s comprehensive guide about how to export vertical videos for Instagram Premiere Pro, you must note a few things about what Instagram supports. If you want your videos to appear beautifully on Instagram, you must ensure they are in a vertical orientation, stored in MP4 or MOV format, have 1080 x 1920 resolution, and have a 9:16 aspect ratio. How do you create/how to export vertical videos for Instagram on Premiere Pro? Here are detailed steps you must follow:
Step 1If you are working from scratch, shoot an HD video in 1080p resolution and 1920 wide that you wish to use as content for your Instagram upload.
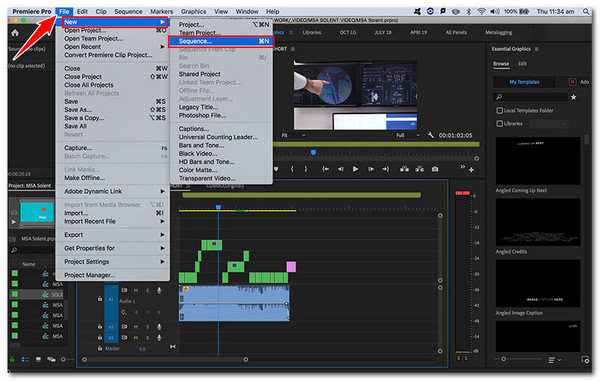
Step 2After shooting a video, transfer it to your computer, where Premiere Pro is installed. Next, click the “File” tab, select the “New” option, and click the “Sequences” button.
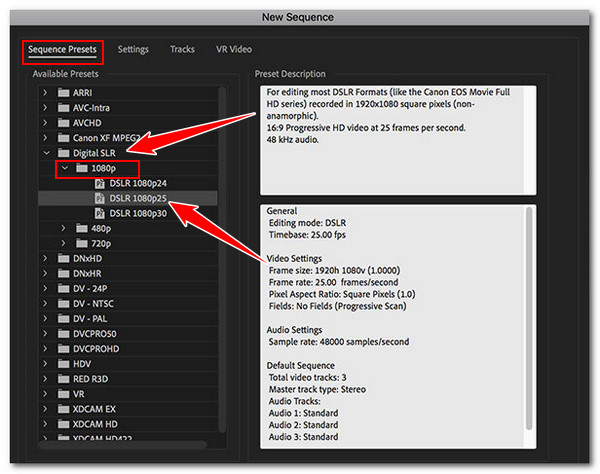
Step 3Then, select a preset under the “Sequence Presets”. Since you captured the video in 1080p, you can select “Digital SLR”, click “1080p”, choose “DSLR 1080p25”, and click OK”.
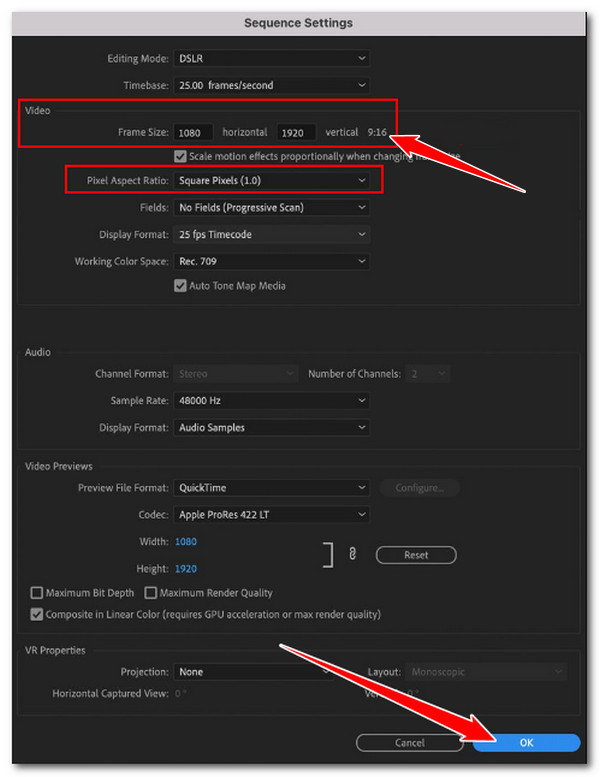
Step 4Next, head to the Project panel and right-click on the sequence you created earlier. Then, select “Sequence Settings” and alter the width and height to 1080 wide and 1920 height.
Note: Setting the Sequence Settings’ wide to 1080 and height to 1920 will automatically set the video’s orientation to vertical (9:16).
Step 5Select “Square Pixels (1.0)” under the Pixel Aspect Ratio and click “OK”. Then, create a new sequence and drag the main sequence (about the sequence created earlier) into it.
Step 6 Then, select the “Keep existing settings” option on the pop-up window. Afterward, go through your video and spot specific scenes where you think you should do editing.
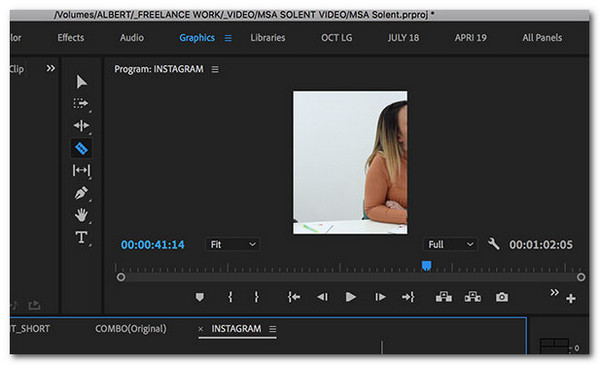
Step 7After that, you can head to the timeline and make edits. Once you are done, click the “File” tab, select the “Export” button, and click the “Media” button. Next, select “Format”.
Step 8Head to the “Preset” section, and pick “Match Source – High bitrate”. Then, put an output file name and destination. Lastly, click “Export”. And that’s it! That’s how you create and export videos optimized for the Instagram platform using Premiere Pro.
Powerful Alternative Way to Export Vertical Video for Instagram
That’s a detailed guide about how to export vertical videos for Instagram on Premiere Pro. Now, if you find things quite tricky to navigate just to export a video in a vertical orientation, consider using the powerful 4Easysoft Total Video Converter as an alternative. This beginner-friendly tool is infused with an MV maker feature that offers many options for redefining your video. This feature lets you change your video’s aspect ratio to 9:16, turning your video’s orientation to vertical. It also allows you to export your video in high quality, with 4K resolution and 60fps. Moreover, it lets you apply filters and effects to your video to bring Instagrammable vibes. Get to know more about this alternative to the guide on how to export vertical videos for Instagram on Premiere Pro.

Offer various beautiful themes that you can apply to your video to add animations.
Let you crop and trim your video to remove unwanted areas and scenes.
Enable you to add background audio with options to adjust the volume and add effects.
Allow you to apply start and end titles with text customization options.
100% Secure
100% Secure
Step 1 Install the 4Easysoft Total Video Converter on your computer. Then, run the tool, click the “MV” tab, and click “Add” to import the video you wish to export in a vertical orientation.
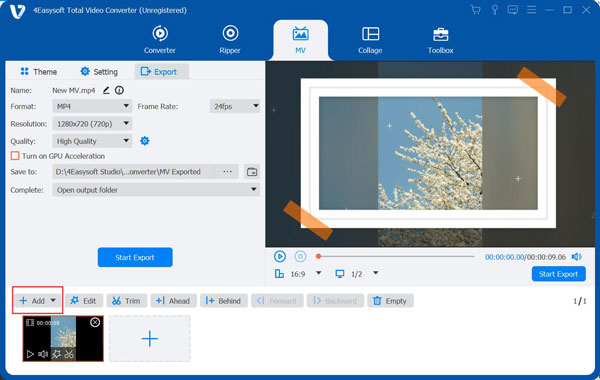
Step 2Next, click the “Edit” button and click the “Rotate & Crop” tab. Then, to make your video vertical, click “Aspect Ratio” and select the “9:16” option.
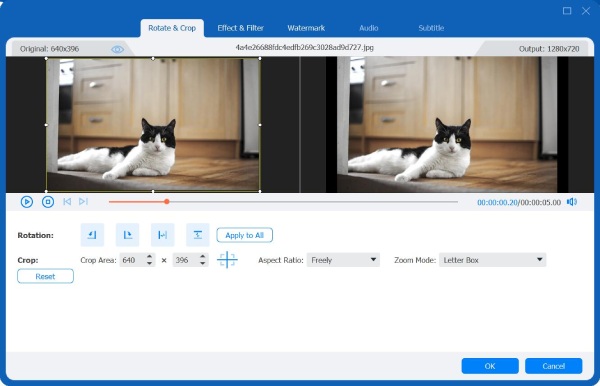
Step 3You can crop your video, apply filters, adjust the effects, and insert background audio and subtitles. These options offer various customization that you can use to change them. Once you are done, click the “OK” button.
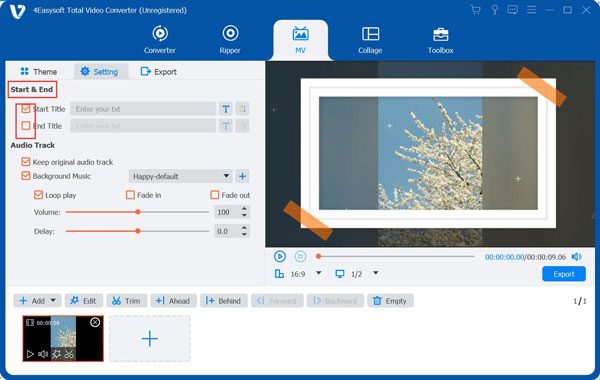
Step 4Then, click the “Theme” tab and select your preferred theme. Afterward, head to the “Settings” section; from there, you can add titles and background music. Then, click “Export”.
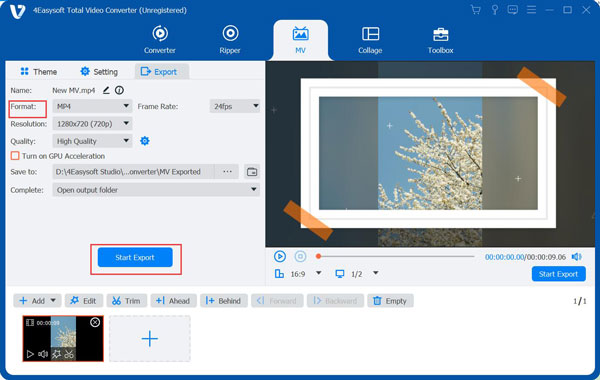
Step 5Select MP4/MOV if Instagram does not support your video’s format, set a resolution to HD, quality to high, etc., and click “Export”. And that’s it! That’s a simple guide that can be used as an alternative to the guide on how to export vertical videos for Instagram Premiere Pro.
Conclusion
That’s it! That’s the detailed guide on how to export vertical videos for Instagram Premiere Pro. With this guide, you can now quickly create content and export vertical videos optimized explicitly for the Instagram platform. If things are tricky and challenging to perform with Premiere Pro, you can use the powerful 4Easysoft Total Video Converter as an alternative. With this tool’s user-friendly interface and easy-to-use features related to vertical video exportation, you can quickly export your optimized vertical videos for Instagram. Try using this powerful tool now.
100% Secure
100% Secure


