Transfer and manage all data between iOS devices, device and computer, and iTunes and devices.
How to Transfer Voice Memos from iPhone 15/14 to Windows/Mac Computer
 Posted by Aira Lesly Escoto to iOS Transfer Jan 10, 2024
The Voice Memos app is essential on your iPhone since it provides a convenient way to record voice messages, including information or anything essential to say. And if you think it overeats your storage space, you want to learn how to transfer voice memos from iPhone to computer. This way, you can avoid losing essential messages by compiling them in one folder. The good news is that Apple provides the easiest ways to complete the action. Keep scrolling to see how to transfer voice memos from iPhone to computer.
Guide List
One Click to Transfer Batch of Voice Memos from iPhone to Computer How to Transfer Voice Memos from iPhone to PC/Mac via iTunes Steps to Transfer Voice Memos from iPhone to Computer with AirDrop How to Use Email to Transfer Voice Memos from iPhone to Computer FAQs about How to Transfer Voice Memos from iPhone to PC/MacOne Click to Transfer Batch of Voice Memos from iPhone to Computer
Are you searching for ways how to transfer voice memos from iPhone to computer with no sweat? You may think that getting your voice messages from iPhone in one click is impossible, but 4Easysoft iPhone Transfer made it possible. As mentioned, this tool is a one-click transfer of data supported on both Windows and Mac computer. Aside from the Voice Memos app, it supports various file kinds, including Messages, Notes, Videos, and other in-built and third-party apps. Moreover, you can preview and select the desired voice memos from iPhone to computer.
Batch transferring of voice memos and other iOS data from iPhone to computer.
Support ringtones creation; you can use your favorite music or other audio.
Capable of removing your transferred data in one click for more storage space.
A preview is given only to select the desired ones to be transferred.
100% Secure
100% Secure
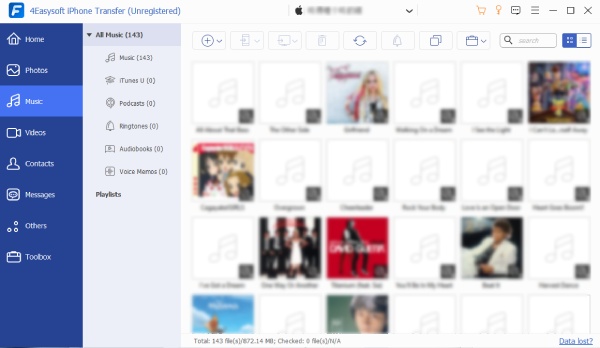
Step 1After launching the program, get a USB cable and link your iPhone to your computer. When it is detected, go to the "Music" button on the left menu. From there, all music, Voice memos, and other audio will be shown.
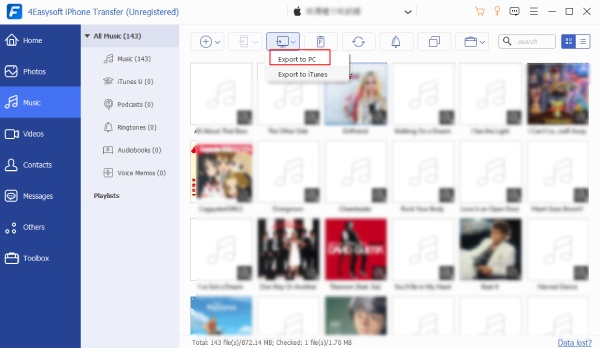
Step 2Navigate to the "Voice Memos" option under "All Music". Select your desired voice messages on the main screen. Lastly, click the "Export to PC" button above to select a folder to save the transferred voice memos on your computer.
How to Transfer Voice Memos from iPhone to PC/Mac via iTunes
As raised, Apple provides their users a convenient way to answer how to transfer voice memos from iPhone to computer through various ways, including iTunes. However, sometimes the iTunes match not working and transferring data.
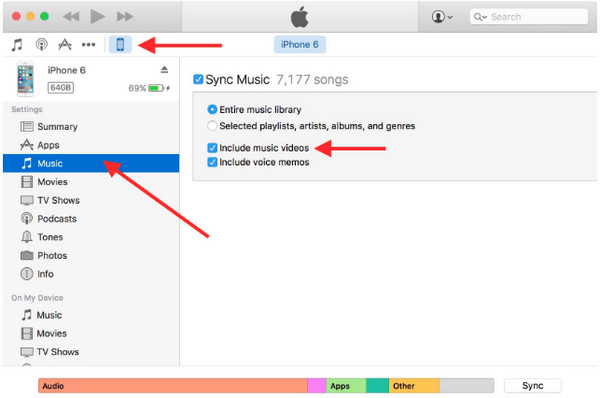
Step 1Utilize a USB cable to link your device to the iTunes computer. Run it, then click your "iPhone" button at the top corner.
Step 2Next, under "Settings", select the "Music" tab. Click the "Sync Music" checkbox and the "Include voice memos". Doing this will extract your voice messages and will be loaded to iTunes.
Step 3When you click the "Apply" button, iTunes will sync your iPhone and download your voice memos. That’s it! That’s how to transfer voice memos from iPhone to computer.
Steps to Transfer Voice Memos from iPhone to Computer with AirDrop
The following Apple official method is Airdrop. With it, you can wirelessly answer how to transfer voice memos from iPhone to computer. However, this only applies to iOS users, meaning you can’t use it for Windows and Android OS. If ready, here’s how:
Step 1First, ensure your devices are connected to "Wi-Fi" and "Bluetooth". On Mac, you can locate the "Airdrop" in the "Finder" window, then enable the "Everyone" option in the "Allow me to be discovered".

Step 2Return to your iPhone, then open the "Voice Memos" app. Go to "All Recording" and click "Edit". Tap your voice messages, then the "Share" button. Finally, tap the "Airdrop" button from there, then locate your Mac.
How to Use Email to Transfer Voice Memos from iPhone to Computer
Finally, you’re down to the last method, how to transfer a voice memo from iPhone to computer through Email. The process is almost the same as the Airdrop, so you can guarantee you can accomplish it quickly. Get ready for your Email application, then follow the given steps.
Step 1On your "Voice Memos" app, tap the ones you want to transfer, then tap the "Share" button. Select the "Email" app, then enter the account you want to share it with.
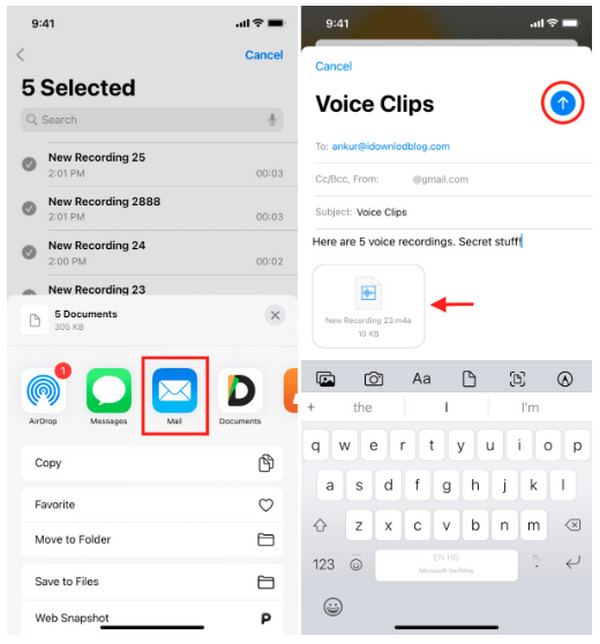
Step 2If there are many, you can save them in the "Files" app to put them in a single file. You can then transfer them all at once in your Email. Then open it on your computer to download. There you have it! You just answered how to transfer a voice memo from iPhone to computer.
FAQs about How to Transfer Voice Memos from iPhone to PC/Mac
-
Where to find transferred voice memos in iTunes?
On iTunes, there’s a specific section for Voice Memos. Once you’ve done transferring voice memos from iPhone to iTunes, click the Music icon, then choose Playlists at the top. From there, you will see all voice messages.
-
Where does the voice memos store on iPhone?
All voice memos will automatically store on iCloud alongside your other iOS data. This way, you can quickly transfer them onto your new iPhone if you enable the iCloud Backup option.
-
How to transfer large voice memos from iPhone to computer?
All the methods discussed in this post, including the official methods by Apple, can transfer large voice memos to a computer. The process might take long, but they are effective.
-
Can I utilize a USB cable to transfer voice memos directly to PC?
Yes, you can. Using the above methods in this post that uses a USB cable, such as iTunes, and with the assistance of the tool, you can quickly transfer voice memos.
-
Are voice memos automatically saved in iTunes backup?
If you only back it up on iTunes, all Voice Memos are backed up, but if you didn't enable it, they won’t automatically be saved. However, if you delete your voice memos and retake a backup on iTunes, the old backup you’ve done will be erased.
Conclusion
And that’s how easy it is! You now understand how to transfer voice memos from iPhone to computer. Exporting voice memos from your iPhone to your computer is more straightforward than you think. It requires you to use a USB cable and a Bluetooth function; after that, there is not much more required. For more security and protection of your other existing data, go to the 4Easysoft iPhone Transfer to transfer all essential data, including Voice Memos. Another great thing about the program is that it supports all versions and models of iOS devices. Free Download the program now!
100% Secure
100% Secure